
前言
本文具有强烈的个人感情色彩,如有观看不适,请尽快关闭. 本文仅作为个人学习记录使用,也欢迎在许可协议范围内转载或分享,请尊重版权并且保留原文链接,谢谢您的理解合作. 如果您觉得本站对您能有帮助,您可以使用RSS方式订阅本站,感谢支持!
笔记
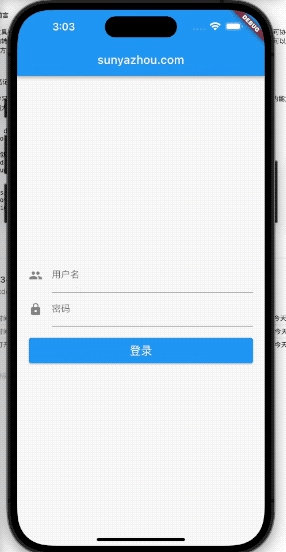
在学习flutter中处理用户名和密码输入的问题时,Flutter这边轻松搞定,学完后发现flutter内置的能力非常强大.下面是记录用户名密码输入的简单demo.
1
2
3
4
5
6
7
8
9
10
11
12
13
14
15
16
17
18
19
20
21
22
23
24
25
26
27
28
29
30
31
32
33
34
35
36
37
38
39
40
41
42
43
44
45
46
47
48
49
50
51
52
53
54
55
56
57
58
59
60
61
62
63
64
65
66
67
68
69
70
71
72
73
74
75
76
77
78
79
80
81
82
83
84
85
86
import 'package:flutter/material.dart';

///创建
void main () {
  runApp(MyApp());
}

class MyApp extends StatelessWidget  {
  @override
  Widget build(BuildContext context) {
    return MaterialApp(
      title: "hello flutter",
      home: Scaffold(
        appBar: AppBar(
          title: Text("sunyazhou.com"),
        ),
        body: ContentWidget(),
      ),
    );
  }
}

class LoginWidgetState extends State<LoginWidget> {
  String username = "";
  String password = "";
  GlobalKey<FormState> formGlobalKey = GlobalKey();
  @override
  Widget build(BuildContext context) {
    return Form(
        key: formGlobalKey,
        child: Column(
          mainAxisAlignment: MainAxisAlignment.center,
          children: [
            TextFormField(
              decoration: InputDecoration(
                  icon: Icon(Icons.people),
                  labelText: "用户名",

              ),
              onSaved: (value) {
                  print("执行了username的 onSaved:$value");
                  this.username = value!;
              },
              validator: (value) {
                if (value == null || value.length == 0) {
                  return "用户名不能为空!";
                }
                return null;
              },
            ),
            TextFormField(
              obscureText: true,
              decoration: InputDecoration(
                icon: Icon(Icons.lock),
                labelText: "密码",
              ),
              onSaved: (value) {
                print("执行了password的 onSaved:$value");
                this.password = value!;
              },
              validator: (value) {
                if (value == null || value.length == 0) {
                  return "密码不能为空!";
                }
                return null;
              },
            ),
            SizedBox(height: 20,),
            Container(
              width: double.infinity,
              height: 44,
              child: ElevatedButton(
                child: Text("登录", style: TextStyle(fontSize: 20, color: Colors.white),),
                onPressed: () {
                  print("注册按钮被点击");
                  formGlobalKey.currentState?.validate();
                  formGlobalKey.currentState?.save();
                  print("username:$username, password:$password");
                },
              ),
            ),
          ],
        ),
    );
  }
}
上面的代码不但具备输入框的功能,还具备输入框内的内容校验,当发生错误的时候 可以使用formGlobalKey拿到当前State调用validate()函数来触发输入框的校验方法.
1
formGlobalKey.currentState?.validate();
这步的操作原理大概是
- 声明GlobalKey
- 把声明的GlobalKey 的实例传入到
Form中 - 通过调用
formGlobalKey.currentState?.validate();函数来调用其表单内子控件的方法validator来校验 - 最后提交服务端登操作校验提交内容
总结
不得不说flutter还是有他的优势的,通过表单控件完成对children的方法注入.从而实现协议约束的形式, 代码简洁高效.
下面附上学习其他控件的记录
1
2
3
4
5
6
7
8
9
10
11
12
13
14
15
16
17
18
19
20
21
22
23
24
25
26
27
28
29
30
31
32
33
34
35
36
37
38
39
40
41
42
43
44
45
46
47
48
49
50
51
52
53
54
55
56
57
58
59
60
61
62
63
64
65
66
67
68
69
70
71
72
73
74
75
76
77
78
79
80
81
82
83
84
85
86
87
88
89
90
91
92
93
94
95
96
97
98
99
100
101
102
103
104
105
106
107
108
109
110
111
112
113
114
115
116
117
118
119
120
121
122
123
124
125
126
127
128
129
130
131
132
133
134
135
136
137
138
139
140
141
142
143
144
145
146
147
148
149
150
151
152
153
154
155
156
157
158
159
160
161
162
163
164
165
166
167
168
169
170
171
172
173
174
175
176
177
178
179
180
181
182
183

class ContentWidget extends StatelessWidget {
  @override
  Widget build(BuildContext context) {
    return Padding(
      padding: const EdgeInsets.all(20.0),
      child: LoginWidget(),
    );
  }
}

class LoginWidget extends StatefulWidget {
  @override
  State<StatefulWidget> createState() {
    return LoginWidgetState();
  }
}

class RegisterWidget extends StatefulWidget {
  @override
  State<StatefulWidget> createState() {
    return RegisterWidgetState();
  }
}

class RegisterWidgetState extends State <RegisterWidget> {
  final textEditingController = TextEditingController();

  @override
  void initState() {
    // TODO: implement initState
    textEditingController.text = "默认值";
    textEditingController.addListener(() {
        print("监听到值的变化: ${textEditingController.text}");
    });
  }
  @override
  Widget build(BuildContext context) {
    return Padding(
      padding: const EdgeInsets.all(20.0),
      child: Column(
        mainAxisAlignment: MainAxisAlignment.center,
        children: [
          TextField(
              decoration: InputDecoration(
                icon: Icon(Icons.people),
                labelText: "username",
                hintText: "请输入用户名",
                border: OutlineInputBorder(
                  borderSide: BorderSide(width: 1),
                ),
                // filled: true,
                // fillColor: Colors.purple,
              ),
            onChanged: (value) {
                print("当前值 $value");
            },
            onSubmitted: (value) {
                print("最后提交值:$value");
            },
            controller: textEditingController,
          ),
        ],
      ),
    );
  }
}

class RadiusImageDemo extends StatelessWidget {
  @override
  Widget build(BuildContext context) {
    return Center(
      child: ClipRRect(
        borderRadius: BorderRadius.circular(16),
        child: Image.network("https://www.sunyazhou.com/assets/images/avatar.jpg",
          width: 150,
          height: 150,
        ),
      ),
    );
  }
}

class CircleImageDemo extends StatelessWidget {
  @override
  Widget build(BuildContext context) {
    return ClipOval(
      child: Image.network("https://www.sunyazhou.com/assets/images/avatar.jpg",
        width: 150,
        height: 150,
      ),
    );
  }
}

class AssertImageDemo extends StatelessWidget
{
  @override
  Widget build(BuildContext context) {
    return Image.asset("assets/images/3.avif");
  }
}

class NetworkImageDemo extends StatelessWidget
{
  @override
  Widget build(BuildContext context) {
    return Center(
      child: Container(
        width: 300,
        height: 300,
        color: Colors.red,
        child: Image.network("https://www.sunyazhou.com/assets/images/20230312FlutterLifeCycle/flutter3.avif",
          // fit: BoxFit.cover,
          repeat: ImageRepeat.repeatY,
        ),

      ),
    );
  }
}

class ButtonDemo extends StatelessWidget
{
  @override
  Widget build(BuildContext context) {
    return Column(
      children: [
        ElevatedButton(
          child: Text("ElevatedButton"),
          onPressed: () => print("ElevatedButton click"),
        ),
        OutlinedButton(
          child: Text("OutlinedButton"),
          onPressed: () => print("OutlinedButton click"),
        ),
        FloatingActionButton(
          child: Text("FloatingActionButton"),
          onPressed: () => print("FloatingActionButton click"),
        ),

      ],
    );
  }
}

class TextRichDemo extends StatelessWidget
{
  @override
  Widget build(BuildContext context) {
    return Text.rich(
      TextSpan(
        children: [
          TextSpan(
              text: "sunyazhou.com", style: TextStyle(fontSize: 30, fontWeight: FontWeight.bold, color: Colors.red)
          ),
          TextSpan(
              text: "sunyazhou", style: TextStyle(fontSize: 18,color: Colors.blue)
          ),
          TextSpan(text: "\n本文具有强烈的个人感情色彩,如有观看不适,请尽快关闭. \n本文仅作为个人学习记录使用,也欢迎在许可协议范围内转载或使用,\n请尊重版权并且保留原文链接,谢谢您的理解合作. 如果您觉得本站对您能有帮助,您可以使用RSS方式订阅本站,这样您将能在第一时间获取本站信息.",style: TextStyle(fontSize: 20, color:  Colors.deepOrangeAccent)),

        ],
      ),
      textAlign: TextAlign.center,
    );
  }
}

class TextDemo extends StatelessWidget {
  @override
  Widget build(BuildContext context) {
    return Text("本文具有强烈的个人感情色彩,\n如有观看不适,请尽快关闭. \n本文仅作为个人学习记录使用,也欢迎在许可协议范围内转载或使用,"
      ,style: TextStyle(
        fontSize: 20,
        color: Colors.lightBlue,
      ),
      textAlign: TextAlign.center,
      // maxLines: 2,
      overflow: TextOverflow.ellipsis,
      // textScaleFactor: 2,
    );
  }
}