
前言
本文具有强烈的个人感情色彩,如有观看不适,请尽快关闭. 本文仅作为个人学习记录使用,也欢迎在许可协议范围内转载或分享,请尊重版权并且保留原文链接,谢谢您的理解合作. 如果您觉得本站对您能有帮助,您可以使用RSS方式订阅本站,感谢支持!
在我的技术认知里, Cocoapods已经成为每一位iOS开发者必备的技能之一,然后这么多年过去了,在我认为它已经过时了的时候居然还有人对这个东西玩的不透彻,今天我就把我这么多年使用的经验高阶部分全部都拿出来跟不熟悉这个工具的同行分享一下.
对于大多数软件开发团队来说,依赖管理工具必不可少,它能针对开源和私有依赖进行安装与管理,从而提升开发效率,降低维护成本。针对不同的语言与平台,其依赖管理工具也各有不同,例如npm管理Javascript、Gradle 、Maven 管理Jar 包、pip 管理 Python 包,Bundler、RubyGems等等。本文聚焦于 iOS 方面,对 CocoaPods 的使用和部分原理进行阐述。
简单易用的 CocoaPods
对于 iOSer 来说,CocoaPods 并不陌生,几乎所有的 iOS 工程都会有它的身影。CocoaPods 采用 Ruby 构建,它是 Swift 和 Objective-C Cocoa 项目的依赖管理工具。在 MacOS 上,推荐使用默认的 Ruby 进行安装 (以下操作均在 CocoaPods 1.10.1、Ruby 2.7.2 进行):
1
sudo gem install cocoapods
如果安装成功,便可以使用 pod 的相关命令了。针对一个简单的项目来说,只需三步便可引入其他的依赖:
- 1.创建 Podfile 文件( CocoaPods 提供了 pod init 命令创建)
- 2.对 Podfile 文件进行编写,添加依赖的库,版本等信息。
- 3.在命令行执行
pod install命令
顺利的话,这时在项目目录下会出现以下文件:
- .xcworkspace:CocoaPods 将项目分为了主工程与依赖工程(Pods)。与 .xcodeproj 相比 .xcworkspace 对于管理多个项目的能力更强,你也可以将复杂的大型应用转换为以 .xcworkspace 构建的多个兄弟项目,从而更轻松的维护和共享功能。
- Podfile.lock:记录并跟踪依赖库版本,将依赖库锁定于某个版本。
- Pods 文件夹:存放依赖库代码。
- Pods/Manifest.lock:每次 pod install 时创建的
Podfile.lock的副本,用于比较这两个文件。一般来说, Podfile.lock 会纳入版本控制管理,而 Pods 文件夹则不会纳入版本控制变更;这意味着 Podfile.lock 表示项目应该依赖的库版本信息,而 Manifest.lock 则代表本地 Pods 的依赖库版本信息。在 pod install 后会将脚本插入到 Build Phases,名为[CP] Check Pods Manifest.lock,从而保证开发者在运行 app 之前能够更新 Pods,以确保代码是最新的。
pod install vs. pod update
pod install:在每一次编辑 Podfile 以添加、更新或删除 pod 时使用。它会下载并安装新的 Pod,并将其版本信息写入 Podfile.lock 中。pod outdated:列出所有比 Podfile.lock 中当前记录的版本 newer 版本的 pod。pod update [PODNAME]:CocoaPods 会查找 newer 版本的 PODNAME,同时将 pod 更新到可能的最新版本(须符合 Podfile 限制)。若没有 PODNAME,则会将每一个 pod 更新到可能的最新版本。
一般来说,每次编辑 Podfile 时使用 pod install,仅在需要更新某个 pod 版本(所有版本)时才使用 pod update。同时,需提交 Podfile.lock 文件而不是 Pods 文件夹来达到同步所有 pod 版本的目的。
newer 代表更加新的,若采用中文理解起来比较别扭。
Podfile 语法规范
Podfile 描述了一个或多个 Xcode 项目的 target 依赖关系,它是一种 DSL,了解它对我们使用好 CocoaPods 是一个必不可少的步骤。下面列出其相关的语法规范:
Root Options
install!:指定 CocoaPods 安装 Podfile 时使用的安装方法和选项。如:
1
2
3
install! 'cocoapods',
         :deterministic_uuids => false,
         :integrate_targets => false
:clean:根据 podspec 和项目支持平台的指定,清理所有不被 pod 使用的文件,默认为 true。:deduplicate_targets:是否对 pod target 进行重复数据删除,默认为 true。:deterministic_uuids:创建 pod project 是否产生确定性 UUID,默认为 true。:integrate_targets:是否继承到用户项目中,为 false 会将 Pod 下载并安装到到 project_path/Pods 目录下,默认为 true。:lock_pos_sources:是否锁定 pod 的源文件,当 Xcode 尝试修改时会提示解锁文件,默认为 true。:warn_for_multiple_pod_sources:当多个 source 包含同名同版本 pod 时是否发出警告,默认为 true。:warn_for_unused_master_specs_repo:如果没有明确指出 master specs repo 的 git 是否发出警告,默认为 true。:share_schemes_for_development_pods:是否为开发中的 pod 分享 schemes,默认为 false。:disable_input_output_paths:是否禁用 CocoaPods 脚本阶段的输入输出路径(Copy Frameworks 和 Copy Resources),默认为 false。:preserve_pod_file_structure:是否保留所有 pod 的文件结构,默认为 false。:generate_multiple_pod_projects:是否为每一个 pod target 生成 一个 project,生成与 Pods/Pods 文件夹中,默认为 false。:incremental_installation:仅对自上次安装的 target 与其关联的 project 的变更部分进行重新生成,默认为 false。:skip_pods_project_generation:是否跳过生成 Pods.xcodeproj 并仅进行依赖项解析与下载,默认为 false。ensure_bundler!:当 bundler 版本不匹配时发出警告。
1
ensure_bundler! '~> 2.0.0'
Dependencies
pod:指定项目的依赖项
- 依赖版本控制:
=、>、>=、<、<=为字面意思;~> 0.1.2表示0.1.2 <= currVersion < 0.2之间的符合要求的最新版本版本。 - Build configurations:默认依赖安装在所有的构建配置中,但也可仅在指定构建配置中启用。
- Modular Headers:用于将 pod 转换为 module 以支持模块,这时在 Swift 中可以不用借助
bridging-header桥接就可以直接导入,简化了 Swift 引用 Objective-C 的方式;也可以采用use_modular_headers!进行全局的变更。 - Source:指定具有依赖项的源,同时会忽略全局源。
- Subspecs:默认会安装所有的 subspecs,但可制定安装某些 subspecs。
- Test Specs:默认不会安装 test specs,但可选择性安装 test specs。
- Local path:将开发的 pod 与其客户端一起使用,可采用 path。
- 指定某个特殊或者更为先进的 pod 版本
1
2
3
4
5
6
7
8
9
10
11
12
13
14
15
16
17
18
19
20
21
# 依赖版本控制
pod 'Objection', '~> 0.9'
# Build configurations
pod 'PonyDebugger', :configurations => ['Debug', 'Beta']
# Modular Headers
pod 'SSZipArchive', :modular_headers => true
# Source
pod 'PonyDebugger', :source => 'https://github.com/CocoaPods/Specs.git'
# Subspecs
pod 'QueryKit', :subspecs => ['Attribute', 'QuerySet']
# Test Specs
pod 'AFNetworking', :testspecs => ['UnitTests', 'SomeOtherTests']
# Local path
pod 'AFNetworking', :path => '~/Documents/AFNetworking'
# 指定某个特殊或者更为先进的 Pod 版本
pod 'AFNetworking', :git => 'https://github.com/gowalla/AFNetworking.git', :branch => 'dev'
pod 'AFNetworking', :git => 'https://github.com/gowalla/AFNetworking.git', :tag => '0.7.0'
pod 'AFNetworking', :git => 'https://github.com/gowalla/AFNetworking.git', :commit => '082f8319af'
# 指定某个 podspec
pod 'JSONKit', :podspec => 'https://example.com/JSONKit.podspec'
inherit:设置当前 target 的继承模式。
:complete 继承父级 target 的所有行为,:none 不继承父级 target 的任何行为,:search_paths 仅继承父级的搜索路径。
1
2
3
4
5
target 'App' do
  target 'AppTests' do
    inherit! :search_paths
  end
end
target:与 Xcode 中的 target 相对应,block 中是 target 的依赖项。
默认情况下,target 包含在父级 target 定义的依赖项,也即 inherit! 为 :complete。关于 :complete和 :search_paths,:complete 会拷贝父级 target 的 pod 副本,而 :search_paths 则只进行 FRAMEWORK_SEARCH_PATHS 和 HEADER_SEARCH_PATHS 的相关拷贝,具体可通过比对 Pods/Target Support Files 的相关文件得以验证,一般在 UnitTests 中使用,以减少多余的 install_framework 过程。
1
2
3
4
5
6
7
8
9
10
11
12
13
14
15
target 'ShowsApp' do
  pod 'ShowsKit'
  # 拥有 ShowsKit 和 ShowTVAuth 的拷贝
  target 'ShowsTV' do
    pod 'ShowTVAuth'
  end
  # 拥有 Specta 和 Expecta 的拷贝
  # 并且能够通过 ShowsApp 进行访问 ShowsKit, 相当于 ShowsApp 是 ShowsTests 的宿主APP
  target 'ShowsTests' do
    inherit! :search_paths
    pod 'Specta'
    pod 'Expecta'
  end
end
abstract_target:定义 abstract_target,方便 target 进行依赖继承,在 CocoaPods 1.0 版本之前为 link_with。
1
2
3
4
5
abstract_target 'Networking' do
  pod 'AlamoFire'
  target 'Networking App 1'
  target 'Networking App 2'
end
abstract:表示当前 target 是抽象的,不会链接到 Xcode 的 target 中。
script_phase:添加脚本阶段
在执行完 pod install 之后 CocoaPods 会将脚本添加到对应的 target build phases。
1
2
3
4
5
6
7
8
9
10
11
target 'App' do
script_phase {
:name => 'scriptName' # 脚本名称,
        :script => 'echo "nihao"' # 脚本内容,
        :execution_position => :before_compile / :after_compile
        :shell_path => '/usr/bin/ruby' # 脚本路径
        :input_files => ['/input/filePath'], # 输入文件
        :output_files => ['/outpput/filePath'] # 输出文件
}
end
Target configuration
platform:指定其构建平台。
默认值为 iOS 4.3、OSX 10.6、tvOS 9.0 和 watchOS 2.0。CocoaPods 1.0 之前的版本为 xcodeproj
1
2
platform :ios, '4.0'
project:指定包含 target 的 Xcode project。这一般在 workspace 存在多个 xcode project 中使用:
1
2
3
4
5
# 在 FastGPS Project 中可以找到一个名为 MyGPSApp 的 target
target 'MyGPSApp' do
  project 'FastGPS'
  ...
end
inhibit_all_warnings!:禁止所有警告。如果针对单个 Pod,则可以采用:
1
2
pod 'SSZipArchive', :inhibit_warnings => true
pod 'SSZipArchive', :inhibit_warnings => true
user_modular_headers!:将所有 Pod 模块化。如果针对单个 Pod,则可以采用:
1
2
3
pod 'SSZipArchive', :modular_headers => true
pod 'SSZipArchive', :modular_headers => false
user_frameworks!:采用 framework 而不是 .a 文件的静态库。 可以通过 :linkage 指定使用静态库还是动态库:
1
use_frameworks!:linkage => :dynamic / :static
supports_swift_versions:指定 target definition 支持的 swift 版本要求
1
supports_swift_versions '>= 3.0', '< 4.0'
Workspace
workspace:指定包含所有项目的 Xcode workspace。
Sources
sources:Podfile 从指定的源列表中进行检索。sources 默认存储在 ~/.cocoapods/repos 中,是全局的而非按 target definition 存储。当有多个相同的 Pod 时,优先采用检索到的 Pod 的第一个源,因此当指定另一个来源时,则需显示指定 CocoaPods 的源。
1
2
source 'https://github.com/artsy/Specs.git'
source 'https://github.com/CocoaPods/Specs.git'
Hooks
plugin:指定在安装期间使用的插件。
1
2
plugin 'cocoapods-keys', :keyring => 'Eidolon'
plugin 'slather'
pre_install:在下载后和在安装 Pod 前进行更改。
1
2
3
pre_install do |installer|
  # Do something fancy!
end
pre_integrate:在 project 写入磁盘前进行更改。
1
2
3
pre_integrate do |installer|
  # perform some changes on dependencies
end
post_install:对生成 project 写入磁盘前进行最后的修改。
1
2
3
4
5
6
7
8
9
10
post_install do |installer|
    installer.generated_projects.each do |project|
        project.targets.each do |target|
            target.build_configurations.each do |config|
                config.build_settings['IPHONEOS_DEPLOYMENT_TARGET'] = '11.0'
            end
        end
    end
end
post_integrate:在 project 写入磁盘后进行最后更改。
1
2
3
post_integrate do |installer|
  # some change after project write to disk
end
podspec 语法规范
podspec = pod Specification,意为 pod 规范,它是一个 Ruby 文件。包含了 Pod 的库版本详细信息,例如应从何处获取源、使用哪些文件、要应用构建设置等信息;也可以看作该文件是整个仓库的索引文件,了解它对我们知道 Pod 库是如何组织、运作的提供了很大帮助。podspec 的 DSL 提供了极大的灵活性,文件可通过 pod spec create 创建。
Root
| 名称 | 用途 | 必需 |
|---|---|---|
name | pod 名称 | required |
version | pod 版本,遵循语义化版本控制 | required |
swift_version | 支持的 Swift 版本 | |
cocoapods_version | 支持的 CocoaPods 版本 | |
authors | pod 维护者的姓名和电子邮件,用“, ”进行分割 | required |
license | pod 的许可证 | required |
homepage | pod 主页的 URL | required |
source | 源地址,即源文件的存放地址,支持多种形式源 | required |
summary | pod 的简短描述 | required |
prepare_command | 下载 pod 后执行的 bash 脚本 | |
static_framework | 是否采用静态 framework 分发 | |
deprecated | 该库是否已被弃用 | |
deprecated_in_favor_of | 该库名称已被弃用,取而代之 |
1
2
3
4
5
6
7
8
9
10
11
12
13
14
15
16
17
18
19
20
21
Pod::Spec.new do |s|
  s.name             = 'CustomPod'
  s.version          = '0.1.0'
  s.summary          = 'A short description of CustomPod.'
  s.swift_versions   = ['3.0', '4.0', '4.2']
  s.cocoapods_version  =  '>= 0.36'
  s.author           = { 'nihao' => 'XXXX@qq.com' }
  s.license          = { :type => 'MIT', :file => 'LICENSE' }
  s.homepage         = 'https://github.com/XXX/CustomPod'
# Supported Key
# :git=> :tag, :branch, :commit,:submodules
# :svn=> :folder, :tag,:revision
# :hg=>:revision
# :http=> :flatten, :type, :sha256, :sha1,:headers
  s.source           = { :git => 'https://github.com/XX/CustomPod.git', :tag => s.version.to_s }
  s.prepare_command  =  'ruby build_files.rb'
  s.static_framework = true
  s.deprecated       = true
  s.deprecated_in_favor_of  =  'NewMoreAwesomePod'
end
Platform
platform:pod 支持的平台,留空意味着 pod 支持所有平台。当支持多平台时应该用 deployment_target 代替。
1
spec.platform = :osx, '10.8'
deployment_target:允许指定支持此 pod 的多个平台,为每个平台指定不同的部署目标。
1
2
spec.ios.deployment_target = '6.0'
spec.osx.deployment_target = '10.8'
Build settings
dependency:基于其他 pods 或子规范的依赖
1
spec.dependency 'AFNetworking', '~> 1.0', :configurations => ['Debug']
info_plist:加入到生成的 Info.plist 的键值对,会对 CocoaPods 生成的默认值进行覆盖。仅对使用 framework 的框架有影响,对静态库无效。对于应用规范,这些值将合并到应用程序主机的 Info.plist;对于测试规范,这些值将合并到测试包的 Info.plist。
1
2
3
4
spec.info_plist = {
  'CFBundleIdentifier' => 'com.myorg.MyLib',
  'MY_VAR' => 'SOME_VALUE'
}
requires_arc:允许指定哪些 source_files 采用 ARC,不使用 ARC 的文件将具有 -fno-objc-arc 编译器标志
1
2
3
spec.requires_arc = false
spec.requires_arc = 'Classes/Arc'
spec.requires_arc = ['Classes/*ARC.m', 'Classes/ARC.mm']
frameworks:使用者 target 需要链接的系统框架列表
1
2
spec.ios.framework = 'CFNetwork'
spec.frameworks = 'QuartzCore', 'CoreData'
weak_frameworks:使用者 target 需要弱链接的框架列表
1
2
spec.weak_framework = 'Twitter'
spec.weak_frameworks = 'Twitter', 'SafariServices'
libraries:使用者 target 需要链接的系统库列表
1
2
spec.ios.library = 'xml2'
spec.libraries = 'xml2', 'z'
compiler_flags:应传递给编译器的 flags
1
2
spec.compiler_flags = '-DOS_OBJECT_USE_OBJC=0', '-Wno-format'
pod_target_xcconfig:将指定 flag 添加到最终 pod 的 xcconfig 文件
1
spec.pod_target_xcconfig = { 'OTHER_LDFLAGS' => '-lObjC' }
user_target_xcconfig:🙅 将指定 flag 添加到最终聚合的 target 的 xcconfig,不推荐使用此属性,因为会污染用户的构建设置,可能会导致冲突。
1
spec.user_target_xcconfig = { 'MY_SUBSPEC' => 'YES' }
prefix_header_contents:🙅 在 Pod 中注入的预编译内容,不推荐使用此属性,因为其会污染用户或者其他库的预编译头。
1
spec.prefix_header_contents = '#import <UIKit/UIKit.h>', '#import <Foundation/Foundation.h>'
prefix_header_file:预编译头文件,false 表示不生成默认的 CocoaPods 的与编译头文件。🙅 不推荐使用路径形式,因为其会污染用户或者其他库的预编译头。
1
2
spec.prefix_header_file = 'iphone/include/prefix.pch'
spec.prefix_header_file = false
module_name:生成的 framrwork / clang module 使用的名称,而非默认名称。
1
2
spec.module_name = 'Three20'
header_dir:存储头文件的目录,这样它们就不会被破坏。
1
spec.header_dir = 'Three20Core'
header_mappings_dir:用于保留头文件文件夹的目录。如未提供,头文件将被碾平。
1
spec.header_mappings_dir = 'src/include'
script_phases:该属性允许定义脚本在 pod 编译时执行,其作为 xcode build 命令的一部分执行,还可以利用编译期间所设置的环境变量。
1
2
3
4
spec.script_phases = [
    { :name => 'Hello World', :script => 'echo "Hello World"' },
    { :name => 'Hello Ruby World', :script => 'puts "Hello World"', :shell_path => '/usr/bin/ruby' },
  ]
File patterns
文件模式指定了库的所有文件管理方式,如源代码、头文件、framework、libaries、以及各种资源。其文件模式通配符形式可参考链接
source_files:指定源文件
1
spec.source_files = 'Classes/**/*.{h,m}', 'More_Classes/**/*.{h,m}'
public_header_files:指定公共头文件,这些头文件与源文件匹配,并生成文档向用户提供。如果未指定,则将 source_files 中的所有头文件都包含生成。
1
spec.public_header_files = 'Headers/Public/*.h'
project_header_files:指定项目头文件,与公共头文件相对应,以排除不应向用户项目公开且不应用于生成文档的标头,且不会出现在构建目录中。
1
2
spec.project_header_files = 'Headers/Project/*.h'
private_header_files:私有头文件,与公共头文件对应,以排除不应向用户项目公开且不应用于生成文档的标头,这些头文件会出现在产物中的 PrivateHeader 文件夹中。
1
spec.private_header_files = 'Headers/Private/*.h'
vendered_frameworks:pod 附加的 framework 路径
1
2
spec.ios.vendored_frameworks = 'Frameworks/MyFramework.framework'
spec.vendored_frameworks = 'MyFramework.framework', 'TheirFramework.xcframework'
vendered_libraries:pod 附加的 libraries 路径
1
2
spec.ios.vendored_library = 'Libraries/libProj4.a'
spec.vendored_libraries = 'libProj4.a', 'libJavaScriptCore.a'
on_demand_resources:根据 Introducing On demand Resources按需加载资源,不推荐与主工程共享标签,默认类别为 category => :download_on_demand
1
2
3
4
5
6
7
s.on_demand_resources = {
  'Tag1' => { :paths => ['file1.png', 'file2.png'], :category => :download_on_demand }
}
s.on_demand_resources = {
  'Tag1' => { :paths => ['file1.png', 'file2.png'], :category => :initial_install }
}
resources:为 pod 构建的 bundle 的名称和资源文件,其中 key 为 bundle 名称,值代表它们应用的文件模式。
1
2
3
4
spec.resource_bundles = {
'MapBox' => ['MapView/Map/Resources/*.png'],
    'MapBoxOtherResources' => ['MapView/Map/OtherResources/*.png']
}
exclude_files:排除的文件模式列表
1
2
spec.ios.exclude_files = 'Classes/osx'
spec.exclude_files = 'Classes/**/unused.{h,m}'
preserve_paths:下载后不应删除的文件。默认情况下,CocoaPods 会删除与其他文件模式不匹配的所有文件
1
2
spec.preserve_path = 'IMPORTANT.txt'
spec.preserve_paths = 'Frameworks/*.framework'
module_map:pod 继承为 framework 时使用的模块映射文件,默认为 true,CocoaPods 根据 公共头文件创建 module_map 文件。
1
2
spec.module_map = 'source/module.modulemap'
spec.module_map = false
Subspecs
subspec:子模块的规范;实行双重继承:specs 自动继承所有 subspec 作为依赖项(除非指定默认 spec);subspec 继承了父级的属性;
1
2
3
4
5
6
7
8
9
10
11
12
13
14
15
16
17
18
19
20
21
22
23
24
25
26
27
28
29
30
31
32
33
34
35
# 采用不同源文件的 Specs, CocoaPods 自动处理重复引用问题
subspec 'Twitter' do |sp|
  sp.source_files = 'Classes/Twitter'
end

subspec 'Pinboard' do |sp|
  sp.source_files = 'Classes/Pinboard'
end

# 引用其他子规范
s.subspec "Core" do |ss|
    ss.source_files  = "Sources/Moya/", "Sources/Moya/Plugins/"
    ss.dependency "Alamofire", "~> 5.0"
    ss.framework  = "Foundation"
  end
  s.subspec "ReactiveSwift" do |ss|
    ss.source_files = "Sources/ReactiveMoya/"
    ss.dependency "Moya/Core"
    ss.dependency "ReactiveSwift", "~> 6.0"
  end
  s.subspec "RxSwift" do |ss|
    ss.source_files = "Sources/RxMoya/"
    ss.dependency "Moya/Core"
    ss.dependency "RxSwift", "~> 5.0"
  end
end

# 嵌套子规范
Pod::Spec.new do |s|
  s.name = 'Root'
  s.subspec 'Level_1' do |sp|
    sp.subspec 'Level_2' do |ssp|
    end
  end
end
default_subspecs:默认子规范数组名称,不指定将全部子规范作为默认子规范,:none 表示不需要任何子规范。
1
2
3
spec.default_subspec = 'Core'
spec.default_subspecs = 'Core', 'UI'
spec.default_subspecs = :none
scheme:用以给指定 scheme configuration 添加拓展
1
2
spec.scheme = { :launch_arguments => ['Arg1'] }
spec.scheme = { :launch_arguments => ['Arg1', 'Arg2'], :environment_variables => { 'Key1' => 'Val1'} }
test_spec:测试规范,在 1.8 版本支持。可参考:CocoaPods 1.8 Beta
requires_app_host:是否需要宿主 APP 运行测试,仅适用于测试规范。
app_host_name:必要时作用于应用程序的应用程序规范名称
app_spec:宿主 APP 规范
1
2
3
4
5
6
7
8
9
10
11
12
13
14
15
16
17
18
Pod::Spec.new do |s|
  s.name         = 'CannonPodder'
  s.version      = '1.0.0'
  # ...rest of attributes here
  s.app_spec 'DemoApp' do |app_spec|
    app_spec.source_files = 'DemoApp/**/*.swift'
    # Dependency used only by this app spec.
    app_spec.dependency 'Alamofire'
  end
  s.test_spec 'Tests' do |test_spec|
    test_spec.requires_app_host = true
    # Use 'DemoApp' as the app host.
    test_spec.app_host_name = 'CannonPodder/DemoApp'
    # ...rest of attributes here
    # This is required since 'DemoApp' is specified as the app host.
    test_spec.dependency 'CannonPodder/DemoApp'
  end
end
Multi-Platform support
存储特定于某一个平台的值,分别为 ios、osx、macOS、tvos、watchos:
1
2
spec.resources = 'Resources/**/*.png'
spec.ios.resources = 'Resources_ios/**/*.png'
Pod 的开发流程
了解完 Podfile 和 podspec 的相关的规范之后,那么开发自己的 pod 应该是一件驾轻就熟的事。
Spec Repo
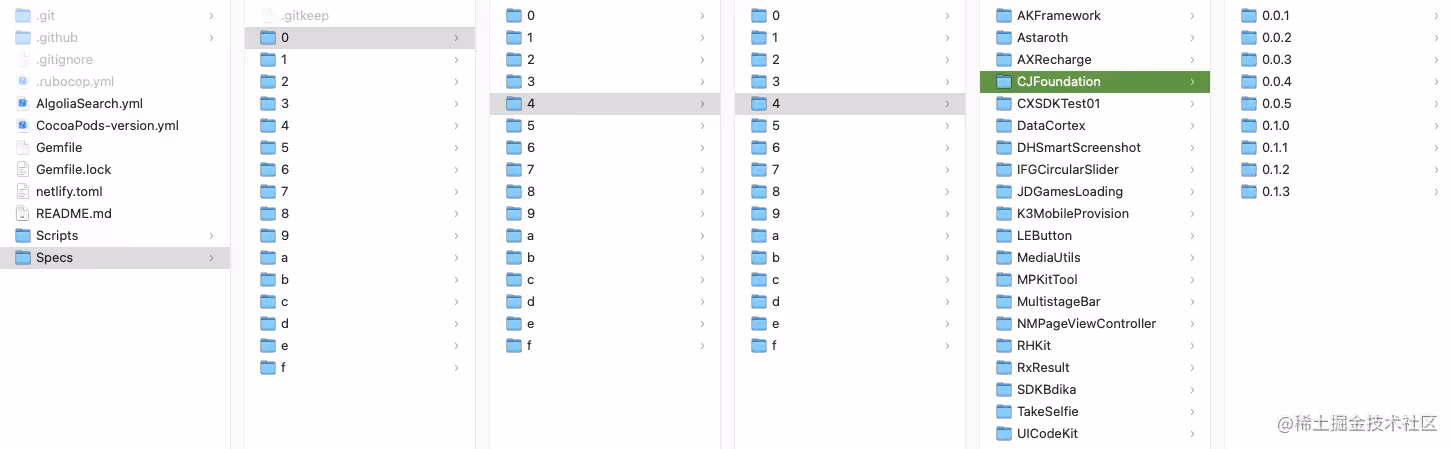
Spec Repo 是 podspec 的仓库,即是存储相关的 podspec 文件的地方。本地源存储于 ~/.cocoapods/repos中,它从 git 上拉取并完全保留目录结构。可以发现, Master Specs Repo 的现在目录结构有些特殊;以往版本的 Master Spec Repo 是完全在同一目录下的,但若大量文件在同一目录中会导致了 Github 下载慢 的问题。为解决这个问题,采用散列表形式处理。具体方式为对名称进行 MD5 计算得到散列值,取前三位作为目录前缀,以对文件分散化。初次之外,CocoaPods 后续还采用 CDN 以及 trunk 进一步加快下载速度,有兴趣可以参考 CocoaPods Source 管理机制。
如:md5("CJFoundation") => 044d913fdd5a52b303222c357521f744;CJFoundation 则在 /Specs/0/4/4 目录中
Create
只需利用 pod lib create [PodName] 命令便可以快速创建一个自己的 pod 。填写好使用平台、使用语言、是否包含 Demo、测试框架等信息,CocoaPods 会从默认的 Git 地址中拉取一份 pod 模版,同时也可以通过 --template-url=URL 指定模版地址。在执行完后,整个文件结构如下:
1
2
3
4
5
6
7
8
9
10
11
12
13
14
15
16
17
18
tree CustomPod -L 2
CustomPod
├── CustomPod
│   ├── Assets // 存放资源文件
│   └── Classes
│       └── RemoveMe.[swift/m] // 单一文件以确保最初编译工作
├── CustomPod.podspec // Pod 的 spec 文件, 是一个 Pod 依赖的索引以及规范信息
├── Example // 用作演示/测试的示例项目
│   ├── CustomPod
│   ├── CustomPod.xcodeproj
│   ├── CustomPod.xcworkspace
│   ├── Podfile
│   ├── Podfile.lock
│   ├── Pods
│   └── Tests
├── _Pods.xcodeproj -> Example/Pods/Pods.xcodeproj // 指向 Pods 项目的以获得 Carthage 支持
├── LICENSE // 许可证
└── README.md  // 自述文件
Development
将源文件和资源分别放入 Classes / Assets 文件夹中,或者按你喜欢的方式组织文件,并在 podspec 文件中编辑相应项。如果你有任何想使用的配置项,可参考前面的podsepc 语法规范 。 一般来说,开发 Pod 一般都是作为本地 Pod 被其他 Project 所依赖进行开发,无论是使用 example 文件夹的 project 或者其他的 Project。
pod 'Name', :path => '~/CustomPod/'
Testing
通过 pod lib lint 以验证 Pod 仓库的使用是否正常。
Release
前面提到过 podspec 可以看作是整个仓库的索引文件,有了这个文件也就能组织起一个 Pod。因此官方的源以及私有源都只需要 podspec 即可,而其他文件则应推送到 podspec 中 source 中指定仓库,这个仓库应该是你自创建的。 在准备发布推送源代码时,需要更新版本号以及在 git 上打上 tag,这是为了进行版本号匹配,因为默认情况下的 podspec 文件中:
1
s.source = { :git => 'https://github.com/XXX/CustomPod.git', :tag => s.version.to_s }
可能你的工作流操作如下:
1
2
3
4
5
6
7
8
$ cd ~/code/Pods/NAME
$ edit NAME.podspec
# set the new version to 0.0.1
# set the new tag to 0.0.1
$ pod lib lint
$ git add -A && git commit -m "Release 0.0.1."
$ git tag '0.0.1'
$ git push --tags
存有几种方式推送 podspec 文件:
- 1.推送到公共仓库,需要用到的 trunk 子命令,更多可以参考 Getting setup with Trunk:
1
2
3
4
5
6
# 通过电子邮箱进行注册
pod trunk register orta@cocoapods.org 'Orta Therox' --description='macbook air'
# 将指定podspec文件推送到公共仓库中
pod trunk push [NAME.podspec]
# 添加其他人作为协作者
pod trunk add-owner ARAnalytics kyle@cocoapods.org
- 2.推送到私有源,例如 Artsy/Specs,需要用到 repo 子命令,更多可以参考 Private Pods:
1
2
3
4
5
6
7
# 将私有源地址添加到本地
pod repo add REPO_NAME SOURCE_URL
# 检查私有源是否安装成功并准备就绪
cd ~/.cocoapods/repos/REPO_NAME
pod repo lint .
# 将Pod的podspec添加到指定REPO_NAME中
pod repo push REPO_NAME SPEC_NAME.podspec
- 3.不推送到任何源中,若能存在以 URL 方式检索到 podspec文件,则可用该 URL,一般采用仓库地址,例如:
1
pod 'AFNetworking', :git => 'https://github.com/XXX/CustomPod.git'
Semantic Versioning
语义化版本控制顾名思义是一种语义上的版本控制,它不要求强制遵循,只是希望开发者能够尽量遵守。如果库之间依赖关系过高,可能面临版本控制被锁死的风险(可能需要对每一个依赖库改版才能完成某次升级);如果库之间依赖关系过于松散,又将无法避免版本的混乱(可能库兼容性不再能支持以往版本),语义化版本控制正是作为这个问题的解决方案之一。无论在 CocoaPods 中,还是 Swift Packager Manager 上,官方都希望库开发者的的版本号能遵循这一原则:
例如,给定版本号 MAJOR.MINOR.PATCH:
- 1.
MAJOR:进行不兼容的 API 更改时进行修改 - 2.
MINOR:向后兼容的方式添加新功能时进行修改 - 3.
PATCH:进行向后兼容的错误修复时进行修改
先行版本号以及版本编译信息可以添加到 MAJOR.MINOR.PATCH 后面以作为延伸。
CocoaPods 原理浅析
CococaPods 核心组件
CocoaPods 被 Ruby 管理,其核心部分也被分为一个一个组件。下载源码,可以看到 Gemfile 文件如下,其依赖了若干个 gem,有意思的是 cp_gem 函数,通过 SKIP_UNRELEASED_VERSIONS 与 path来控制是否采用本地的 gem 路径,实现了 DEVELOPMENT 与 RELEASE 环境的切换。
1
2
3
4
5
6
7
8
9
10
11
12
13
14
15
16
17
18
19
20
21
22
23
24
25
26
27
28
29
30
31
32
33
SKIP_UNRELEASED_VERSIONS = false
# Declares a dependency to the git repo of CocoaPods gem. This declaration is
# compatible with the local git repos feature of Bundler.
def cp_gem(name, repo_name, branch = 'master', path: false)
  return gem name if SKIP_UNRELEASED_VERSIONS
  opts = if path
           { :path => "../#{repo_name}" }
         else
           url = "https://github.com/CocoaPods/#{repo_name}.git"
           { :git => url, :branch => branch }
         end
  gem name, opts
end

source 'https://rubygems.org'

gemspec

group :development do
  cp_gem 'claide',                'CLAide'
  cp_gem 'cocoapods-core',        'Core'
  cp_gem 'cocoapods-deintegrate', 'cocoapods-deintegrate'
  cp_gem 'cocoapods-downloader',  'cocoapods-downloader'
  cp_gem 'cocoapods-plugins',     'cocoapods-plugins'
  cp_gem 'cocoapods-search',      'cocoapods-search'
  cp_gem 'cocoapods-trunk',       'cocoapods-trunk'
  cp_gem 'cocoapods-try',         'cocoapods-try'
  cp_gem 'molinillo',             'Molinillo'
  cp_gem 'nanaimo',               'Nanaimo'
  cp_gem 'xcodeproj',             'Xcodeproj'
  gem 'cocoapods-dependencies', '~> 1.0.beta.1'
  ...
end
这些组件相对独立,被分成一个一个 Gem 包,在 Core Components 中,可以找到对这些组件的简要描述。同时也可以到 CocoaPods 的 Github 中去看详细文档。
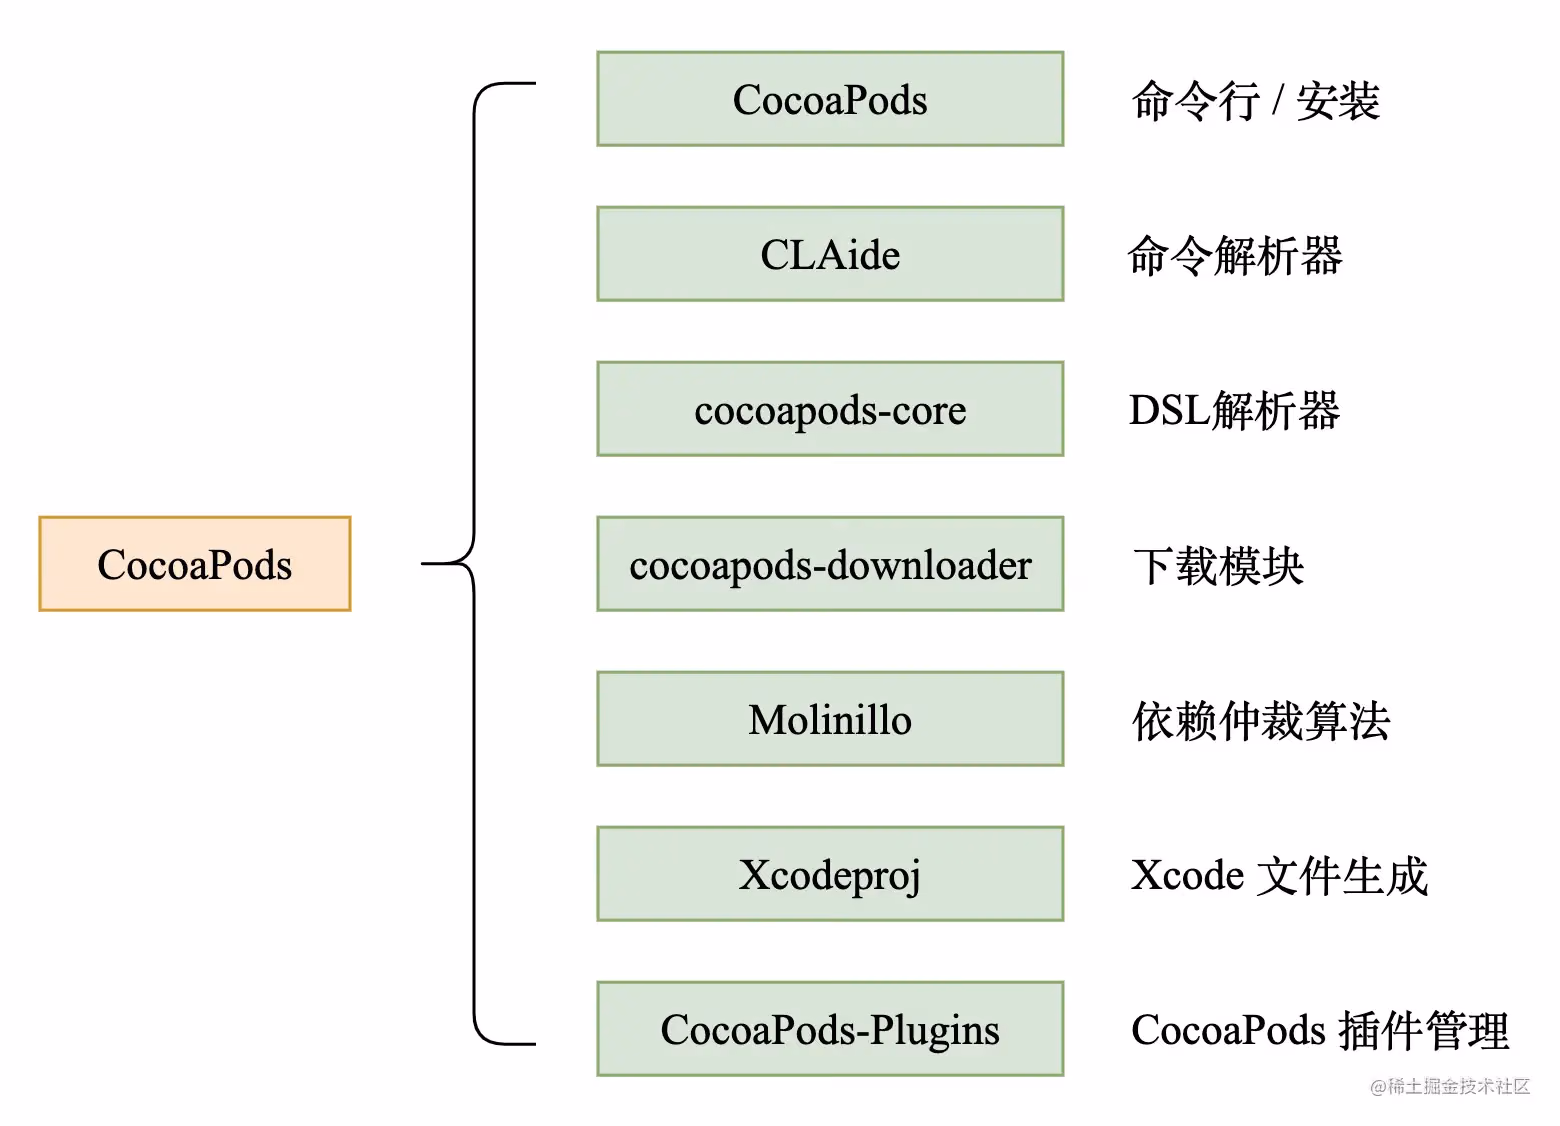
CocoaPods:命令行支持与安装程序,也会处理 CocoaPods 的所有用户交互。cocoapods-core:对模版文件的解析,如 Podfile、.podspec 等文件。CLAide:一个简单的命令解析器,它提供了一个快速创建功能齐全的命令行界面的 API。cocoapods-downloader:用于下载源码,为各种类型的源代码控制器(HTTP/SVN/Git/Mercurial) 提供下载器。它提供 tags、commites、revisions、branches 以及 zips 文件的下载与解压缩操作。Monlinillo:CocoaPods:对于依赖仲裁算法的封装,它是一个具有前项检察的回溯算法。不仅在 pods 中,Bundler 和 RubyGems 也是使用这一套仲裁算法。Xcodeproj:通过 Ruby 来对 Xcode projects 进行创建于修改。如:脚本管理、libraries 构建、Xcode workspece 和配置文件的管理。cocoapods-plugins:插件管理,其中有 pod plugins 命令帮助你获取的可用插件列表以及开发一个新插件等功能,具体可用 pod plugins –help 了解。
pod install 做了什么
执行 pod install --verbose,会显示 pod install 过程中的更多 debugging 信息。下文主要参考整体把握 CocoaPods 核心组件
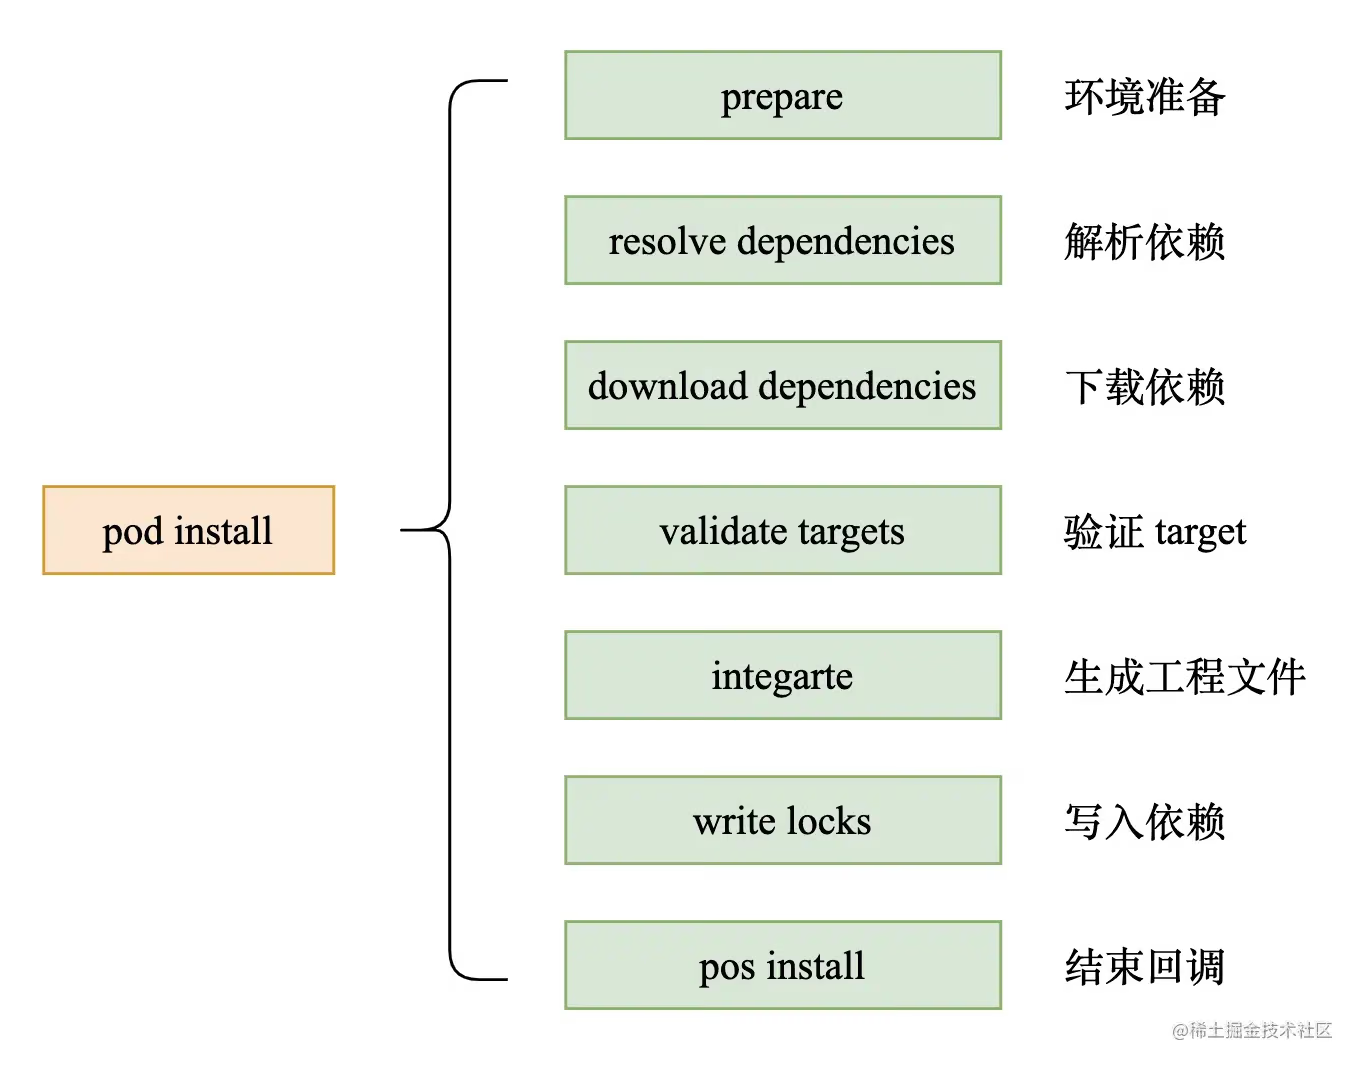
经过消息转发与 CLAide 命令解析,最终调用了 CocoaPods/lib/cocoapods/installer.rb 的 install! 函数,主要流程图如下:
1
2
3
4
5
6
7
8
9
10
11
12
13
14
15
def install!
prepare
resolve_dependencies
download_dependencies
validate_targets
clean_sandbox
if installation_options.skip_pods_project_generation?
show_skip_pods_project_generation_message
run_podfile_post_install_hooks
else
integrate
end
write_lockfiles
perform_post_install_actions
end
1. Install 环境准备(prepare)
1
2
3
4
5
6
7
8
9
10
11
12
13
14
15
16
17
18
def prepare
  # 如果检测出当前目录是 Pods,直接 raise 终止
  if Dir.pwd.start_with?(sandbox.root.to_path)
    message = 'Command should be run from a directory outside Pods directory.'
    message << "\n\n\tCurrent directory is #{UI.path(Pathname.pwd)}\n"
    raise Informative, message
  end
  UI.message 'Preparing' do
    # 如果 lock 文件的 CocoaPods 主版本和当前版本不同,将以新版本的配置对 xcodeproj 工程文件进行更新
    deintegrate_if_different_major_version
    # 对 sandbox(Pods) 目录建立子目录结构
    sandbox.prepare
    # 检测 PluginManager 是否有 pre-install 的 plugin
    ensure_plugins_are_installed!
    # 执行插件中 pre-install 的所有 hooks 方法
    run_plugins_pre_install_hooks
  end
end
在 prepare 阶段会完成 pod install 的环境准备,包括目录结构、版本一致性以及 pre_install 的 hook。
2. 解决依赖冲突(resolve dependencies)
1
2
3
4
5
6
7
8
9
10
11
12
13
14
15
16
17
18
19
20
21
22
23
def resolve_dependencies
    # 获取 Sources
    plugin_sources = run_source_provider_hooks
    # 创建一个 Analyzer
    analyzer = create_analyzer(plugin_sources)
    # 如果带有 repo_update 标记
    UI.section 'Updating local specs repositories' do
        # 执行 Analyzer 的更新 Repo 操作
        analyzer.update_repositories
    end if repo_update?
    UI.section 'Analyzing dependencies' do
        # 从 analyzer 取出最新的分析结果,@analysis_result,@aggregate_targets,@pod_targets
        analyze(analyzer)
        # 拼写错误降级识别,白名单过滤
        validate_build_configurations
    end
    # 如果 deployment? 为 true,会验证 podfile & lockfile 是否需要更新
    UI.section 'Verifying no changes' do
        verify_no_podfile_changes!
        verify_no_lockfile_changes!
    end if deployment?
    analyzer
end
通过 Podfile、Podfile.lock 以及 manifest.lock 等生成 Analyzer 对象,其内部会使用个 Molinillo 算法解析得到一张依赖关系表,进行一系列的分析与依赖冲突解决。
3. 下载依赖文件(download dependencies)
1
2
3
4
5
6
7
8
9
10
def download_dependencies
  UI.section 'Downloading dependencies' do
    # 构造 Pod Source Installer
    install_pod_sources
    # 执行 podfile 定义的 pre install 的 hooks
    run_podfile_pre_install_hooks
    # 根据配置清理 pod sources 信息,主要是清理无用 platform 相关内容
    clean_pod_sources
  end
end
经过前面分析与解决依赖冲突后,这是会进行依赖下载。会根据依赖信息是否被新添加或者修改等信息进行下载,同时下载后也会在本地留有一份缓存,其目录在 ~/Library/Caches/CocoaPods 。
4. 验证 targets(validate targets)
1
2
3
4
5
6
7
8
9
10
11
12
def validate_targets
    validator = Xcode::TargetValidator.new(aggregate_targets, pod_targets, installation_options)
    validator.validate!
end

def validate!
    verify_no_duplicate_framework_and_library_names
    verify_no_static_framework_transitive_dependencies
    verify_swift_pods_swift_version
    verify_swift_pods_have_module_dependencies
    verify_no_multiple_project_names if installation_options.generate_multiple_pod_projects?
end
verify_no_duplicate_framework_and_library_names:验证是否有重名的 framework / libraryverify_no_static_framework_transitive_dependencies:验证动态库是否有静态链接库依赖。个人认为,这个验证是不必要的,起码不必要 error。verify_swift_pods_swift_version:验证 Swift pod 的 Swift 版本配置且相互兼容verify_swift_pods_have_module_dependencies:验证 Swift pod 是否支持 moduleverify_no_multiple_project_names:验证没有重名的 project 名称
5. 生成工程(Integrate)
1
2
3
4
5
6
7
8
9
10
11
12
13
14
15
16
17
18
19
20
21
22
23
24
25
26
27
28
29
def integrate
    generate_pods_project
    if installation_options.integrate_targets?
        # 集成用户配置,读取依赖项,使用 xcconfig 来配置
        integrate_user_project
    else
        UI.section 'Skipping User Project Integration'
    end
end

def generate_pods_project
    # 创建 stage sanbox 用于保存安装前的沙盒状态,以支持增量编译的对比
    stage_sandbox(sandbox, pod_targets)
    # 检查是否支持增量编译,如果支持将返回 cache result
    cache_analysis_result = analyze_project_cache
    # 需要重新生成的 target
    pod_targets_to_generate = cache_analysis_result.pod_targets_to_generate
    # 需要重新生成的 aggregate target
    aggregate_targets_to_generate = cache_analysis_result.aggregate_targets_to_generate
    # 清理需要重新生成 target 的 header 和 pod folders
    clean_sandbox(pod_targets_to_generate)
    # 生成 Pod Project,组装 sandbox 中所有 Pod 的 path、build setting、源文件引用、静态库文件、资源文件等
    create_and_save_projects(pod_targets_to_generate, aggregate_targets_to_generate,
                                cache_analysis_result.build_configurations, cache_analysis_result.project_object_version)
    # SandboxDirCleaner 用于清理增量 pod 安装中的无用 headers、target support files 目录
    SandboxDirCleaner.new(sandbox, pod_targets, aggregate_targets).clean!
    # 更新安装后的 cache 结果到目录 `Pods/.project_cache` 下
    update_project_cache(cache_analysis_result, target_installation_results)
end
将之前版本仲裁的所有组件通过 project 文件的形式组织起来,并对 project 中做一些用户指定的配置。
6. 写入依赖(write lockfiles)
1
2
3
4
5
6
7
8
9
10
11
12
13
def write_lockfiles
  @lockfile = generate_lockfile
  UI.message "- Writing Lockfile in #{UI.path config.lockfile_path}" do
    # No need to invoke Sandbox#update_changed_file here since this logic already handles checking if the
    # contents of the file are the same.
    @lockfile.write_to_disk(config.lockfile_path)
  end
  UI.message "- Writing Manifest in #{UI.path sandbox.manifest_path}" do
    # No need to invoke Sandbox#update_changed_file here since this logic already handles checking if the
    # contents of the file are the same.
    @lockfile.write_to_disk(sandbox.manifest_path)
  end
end
将依赖更新写入 Podfile.lock 与 Manifest.lock
7. 结束回调(perform post install action)
1
2
3
4
5
6
7
8
9
10
11
12
def perform_post_install_actions
  # 调用 HooksManager 执行每个插件的 post_install 方法
  run_plugins_post_install_hooks
  # 打印过期 pod target 警告
  warn_for_deprecations
  # 如果 pod 配置了 script phases 脚本,会主动输出一条提示消息
  warn_for_installed_script_phases
  # 警告移除的 master specs repo 的 specs
  warn_for_removing_git_master_specs_repo
  # 输出结束信息 `Pod installation complete!`
  print_post_install_message
end
最后的收尾工作,进行 post install action 的 hook 执行以及一些 warning 打印。
CocoaPods + Plugins
早在 2013 年,CocoaPods 就添加了对插件的支持,以添加不符合依赖管理和生态系统增长为主要目标的功能。CocoaPods Plugins 可以:在 install 前后添加 hook、添加新命令到 pod、以及利用 Ruby 动态性做任何事。下面介绍一下常见的插件:
- cocoapods-binary:一个比较早期的二进制插件库,是诸多二进制方案的灵感来源
- cocoapods-repo-update:自动化 pod repo update
- cocoapods-integrate-flutter:将 flutter 与现有 iOS 应用程序集成
- cocoapods-uploader:上传文件/目录到远程仓库
许多插件可能许久未维护,读者使用需自行斟酌。
不太常见概念
CocoaPods 的配置内容几乎包含了 Xcode Build 的方方面面,因此存在许多不太常见的概念,在此做一个链接聚合以供参考。
Clang Module / module_map / umbrella header:Clang Module 是 Clang 16.0.0 中引入的概念,用以解决 #include / #import 头文件引入导致的相关问题;module_map 是用以描述 clang module 与 header 的关系;umbrella header 则是 module_map 中的语法规范,表示指定目录中的头文件都应包含在模块中。
- Modules
- Clang Module
- LLVM 中的 Module
- Hmap / Xcode Header / CocoaPods Headers
Header Map 是一组头文件信息映射表,用 .hmap 后缀表示,整体结构以 Key-Value 形式存储;Key为头文件名称、Value 为 头文件物理地址。
Xcode Phases - Header 在构建配置中分为 public、private 与 project ,用以与 target 关联;其中 public 、private 就复制到最终产物的 header 和 PrivateHeaders 中,而 project 头文件不对外使用,则不会放到最终产物。
- 一款可以让大型iOS工程编译速度提升50%的工具
- What are build phases?
- Xcconfig: 一种配置文件,用以对构建设置进行声明与管理,比如区分不同的开发环境等。
- On demand resource:WWDC 2015 引入的概念,对资源文件的按需加载。
总结
Cocoapods发展这么多年却依然服役于现有的iOS工程,足以说明其包管理的重要性,有很多SDK厂商用它做SDK制品工程的管理,有很多业务团队用它做工程组件化编译,凡此种种都足以说明这个工具是一个iOS开发者必备的专业工具,有很多细节希望大家认真挖掘.
参考列表:
Cocoapods.org官方网站
深入理解 CocoaPods
系统理解 iOS 库与框架 Cocoapods script phases CocoaPods Podfile 解析原理
Semantic Versioning 2.0.0
一款可以让大型iOS工程编译速度提升50%的工具
CocoaPods Source 管理机制
版本管理工具及 Ruby 工具链环境
整体把握 CocoaPods 核心组件
工程效率优化:CocoaPods优化
pod仓库的常用命令
如何在pod中的podspec使用XCAssets
Pod spec集成第三framework和.a工作记录