
Introduction
Recently I’ve been learning AV Foundation. I want to record what I’ve learned and also refer to some blog posts. The topic of this issue is AVAudioPlayer.
Audio Basics
The process of generating an audio file is to sample, quantize and encode sound information into a digital signal. The sounds that the human ear can hear range from a minimum frequency of 20Hz up to a maximum frequency of 20KHz, so the maximum bandwidth of an audio file format is 20KHz. According to the Nyquist theory, only when the sampling frequency is higher than twice the highest frequency of the sound signal can the sound represented by a digital signal be restored to the original sound, so the sampling rate of audio files is generally 40~50KHz, for example the most common CD-quality sampling rate is 44.1KHz. (That’s why people generally think CD quality is the best.) The process of sampling and quantizing sound is called Pulse Code Modulation, or PCM for short. PCM data is the most original audio data and is completely lossless, so although PCM data has excellent sound quality, its size is huge. To solve this problem, a series of audio formats were born one after another. These audio formats compress audio data using different methods, including lossless compression (ALAC, APE, FLAC) and lossy compression (MP3, AAC, OGG, WMA). Source: iOS Audio Playback (1): Overview by 码农人生
–
I think the way Cheng Yin handles audio is very clear He laid out a classic audio playback flow (using MP3 as an example)
- Read the MP3 file
- Parse information such as the sampling rate, bitrate and duration, and separate the audio frames in the MP3
- Decode the separated audio frames to obtain PCM data
- Apply audio effects to the PCM data (equalizer, reverb, etc., optional)
- Decode the PCM data into an audio signal
- Hand the audio signal to the hardware for playback
- Repeat steps 1-6 until playback completes
In the iOS system, Apple encapsulated the above process and provided interfaces at different levels 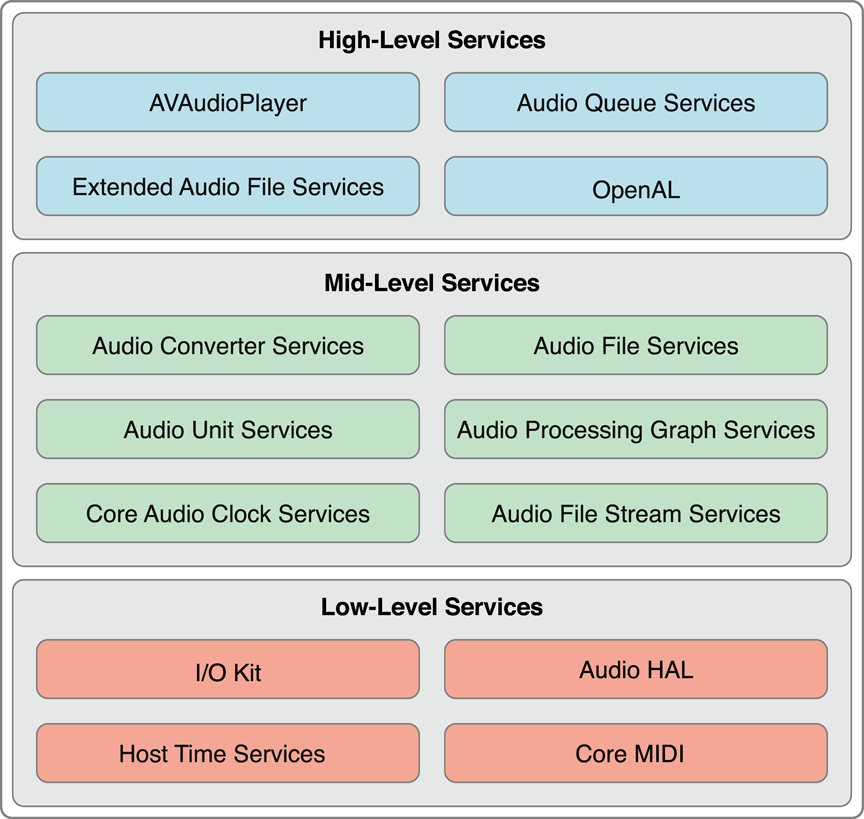
This is the interface hierarchy of CoreAudio
Below is a functional description of the mid- and high-level interfaces:
- Audio File Services: reads and writes audio data, which can complete step 2 of the playback flow;
- Audio File Stream Services: decodes audio, which can complete step 2 of the playback flow;
- Audio Converter services: converts audio data, which can complete step 3 of the playback flow;
- Audio Processing Graph Services: the audio effects module, which can complete step 4 of the playback flow;
- Audio Unit Services: plays audio data, which can complete steps 5 and 6 of the playback flow;
- Extended Audio File Services: a combination of Audio File Services and Audio
- Converter services;
- AVAudioPlayer/AVPlayer(AVFoundation): high-level interfaces that can complete the entire audio playback process (including local files and network streams, except step 4);
- Audio Queue Services: high-level interfaces that can record and play, which can complete steps 3, 5 and 6 of the playback flow;
- OpenAL: used for game audio playback, not discussed here
As you can see, Apple provides a very rich set of interfaces that can satisfy all kinds of requirements:
If you just want to implement audio playback without any other requirements, AVFoundation will satisfy you well. Its interfaces are simple to use and you don’t need to care about the details;
- If your app needs to stream audio and store it at the same time, then AudioFileStreamer plus AudioQueue can help you. You can first download the audio data to the local disk, then while downloading, read the local audio file using interfaces like NSFileHandler and hand it to AudioFileStreamer or AudioFile to parse and separate the audio frames. The separated audio frames can then be sent to AudioQueue for decoding and playback. If it’s a local file, you can simply read and parse the file directly. (Both of these are fairly straightforward approaches. This kind of requirement can also be implemented using AVFoundation plus a local server. AVAudioPlayer sends the request to the local server, the local server forwards it, obtains the data, stores it, and passes it on to AVAudioPlayer. Another trickier approach is to first download the audio into a file, and once a certain amount of data has been downloaded, give the file path to AVAudioPlayer for playback. Of course, this approach will have problems after seeking in the audio.)
- If you are developing a professional music player and need to apply audio effects (equalizer, reverb) to the audio, then in addition to reading and parsing data, you also need to use AudioConverter to convert the audio data into PCM data, and then use AudioUnit + AUGraph for audio effects processing and playback (but currently most apps with audio effects develop their own effects modules to process PCM data, because developing this part yourself gives stronger customization and extensibility. After PCM data is processed by the effects processor, it can be played using AudioUnit. Of course, AudioQueue also supports playing PCM data directly.). The diagram below describes the flow of audio playback using AudioFile + AudioConverter + AudioUnit
All of the above content is reproduced from 码农人生. I hope he doesn’t mind. If there are any problems, I’ll remove it immediately.
A brief introduction to AudioSession before using AVAudioPlayer
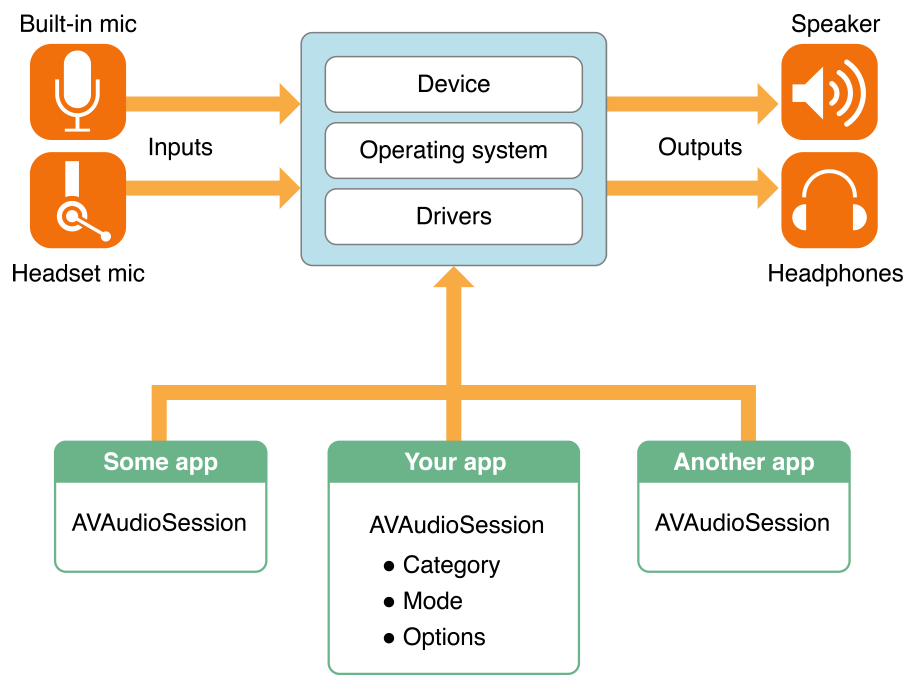
AVAudioSessionis responsible for managing the audio session. It is a singleton that acts as an intermediary between the application and the operating system. AudioSession reference
The main functions of AVAudioSession include the following:
- How the app uses audio services, such as playback or recording
- Controls and coordinates the app’s input/output devices (for example, microphone, headphones, phone speaker, Bluetooth connected external speakers, or AirPlay)
- Coordinates your app’s audio playback with the system and the behavior of other apps (for example, it needs to be interrupted when there’s a phone call, resumed when the call ends, and whether the song should also be muted when the mute button is pressed, etc.)
Note: AVAudioSession has been used since iOS 6. Before that it was called AudioSession.
How to use AVAudioPlayer
In my blog I try to use code rather than a thousand words Before using AVAudioPlayer, you need to import #import <AVFoundation/AVFoundation.h> in the AppDelegate
and start the audio session
1
2
3
4
5
6
7
8
9
10
11
12
13
14
15

- (BOOL)application:(UIApplication *)application didFinishLaunchingWithOptions:(NSDictionary *)launchOptions {

    AVAudioSession *session = [AVAudioSession sharedInstance];
    NSError *error;
    if (![session setCategory:AVAudioSessionCategoryPlayback error:&error]) {
        NSLog(@"Category Error: %@", [error localizedDescription]);
    }

    if (![session setActive:YES error:&error]) {
        NSLog(@"Activation Error: %@", [error localizedDescription]);
    }

    return YES;
}
AVAudioSession has been introduced above
Here let me talk about AVAudioSessionCategoryPlayback in [session setCategory:AVAudioSessionCategoryPlayback error:&error]
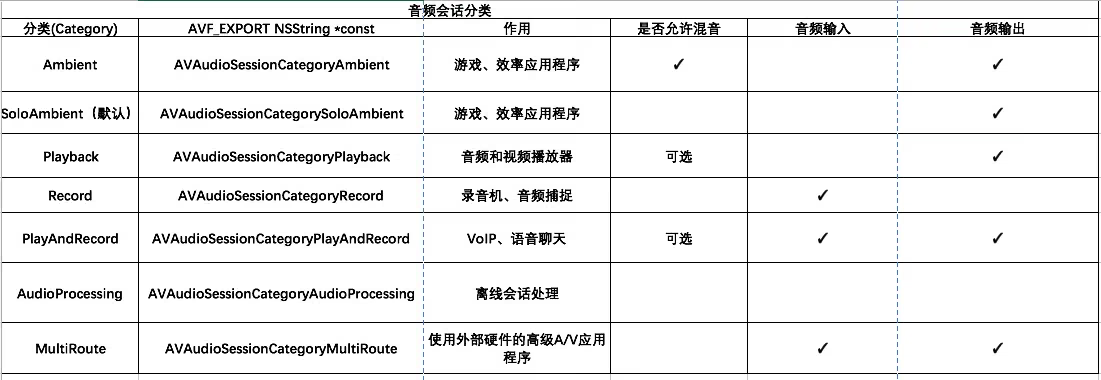
This is a list of the categories; you can take a look
Remember to enable background playback 
or modify it in the plist 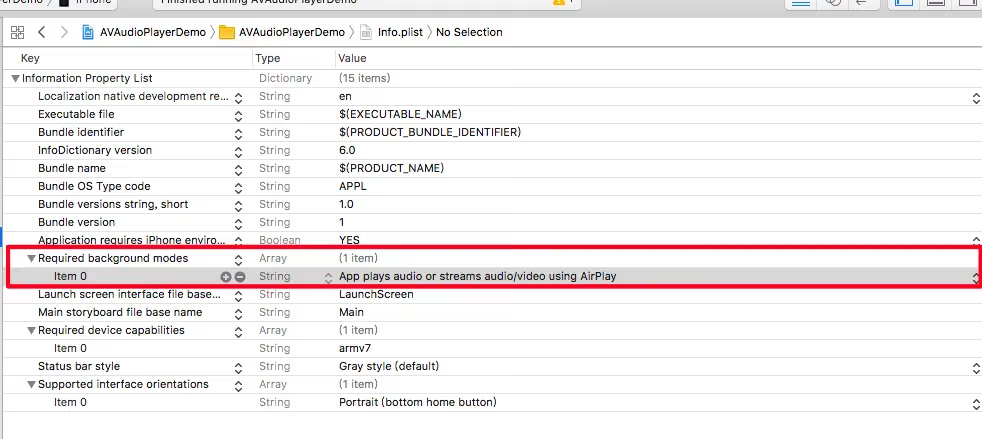
The code below creates the audio player
1
2
3
4
5
6
7
8
9
10
11
12
13
14
15
16
17
18
19
20
21
22
23
24
25
26
27
28

#import "ViewController.h"
#import <Masonry/Masonry.h>

#import "THControlKnob.h"
#import "THPlayButton.h"
#import <AVFoundation/AVFoundation.h>

@interface ViewController ()

// Three control faders
@property (weak, nonatomic) IBOutlet THOrangeControlKnob *panKnob;
@property (weak, nonatomic) IBOutlet THOrangeControlKnob *volumnKnob;
@property (weak, nonatomic) IBOutlet THGreenControlKnob *rateKnob;
@property (weak, nonatomic) IBOutlet THPlayButton *playButton;

// Music player
@property (nonatomic, strong) AVAudioPlayer *musicPlayer;
@property (nonatomic, getter = isPlaying) BOOL playing; //播放状态

// Unrelated code
@property (weak, nonatomic) IBOutlet UILabel *LeftRightRoundDec;
@property (weak, nonatomic) IBOutlet UILabel *voiceDec;
@property (weak, nonatomic) IBOutlet UILabel *rateDec;
@property (weak, nonatomic) IBOutlet UILabel *trackDescrption;

@end
Import the classes of several third-party controls for music playback
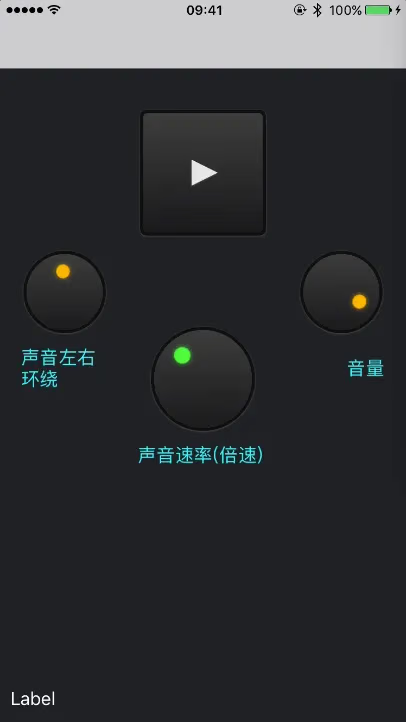
The three knobs above are from the imported open-source library
Next, create the player AVAudioPlayer
Creating it requires an NSURL representing the path of the file to be played. Here I simply dragged a song into the bundle from a demo
1
2
3
4
5
6
7
8
9
10
11
12
13
14
15
16
17
18
19
20
21
22
23
24
25

#pragma mark -
#pragma mark - Creating AVAudioPlayer and controlling playback state
/**
 Creates a music player

 @param fileName File name
 @param fileExtension File extension
 @return Player instance
 */
- (AVAudioPlayer *)createPlayForFile:(NSString *)fileName
                       withExtension:(NSString *)fileExtension{
    NSURL *url = [[NSBundle mainBundle] URLForResource:fileName withExtension:fileExtension];
    NSError *error = nil;
    AVAudioPlayer *audioPlayer = [[AVAudioPlayer alloc] initWithContentsOfURL:url error:&error];
    if (audioPlayer) {
        audioPlayer.numberOfLoops = -1; //-1无限循环
        audioPlayer.enableRate = YES; //启动倍速控制
        [audioPlayer prepareToPlay];
    } else {
        NSLog(@"Error creating player: %@",[error localizedDescription]);
    }
    return audioPlayer;
}
numberOfLoops = -1; means the song loops infinitely. Other constants represent the number of loops.
enableRate indicates whether speed control is enabled, such as 0.5x, 1.0x, or 2.0x. 1.0 means normal speed
Here let me talk about [audioPlayer prepareToPlay] Calling this function is to obtain the required audio hardware and preload the buffer of the Audio Queue. Of course, you can skip this method and call [audioPlayer play] directly, but calling the play method also implicitly activates it. Calling prepareToPlay is to reduce the latency between the preset loading when creating the player and hearing the sound output.
1
2
3
4
5
6
7
8
9
10
11
12
13
14
15
16
17
18
19
20
21
22
23

@implementation ViewController

- (instancetype)initWithNibName:(NSString *)nibNameOrNil bundle:(NSBundle *)nibBundleOrNil {
    self = [super initWithNibName:nibNameOrNil bundle:nibBundleOrNil];
    if (self) {
        if (self.musicPlayer == nil) {
            self.musicPlayer = [self createPlayForFile:@"384551_1438267683" withExtension:@"mp3"];
        }
        [self setupNotifications];
    }
    return self;
}

- (void)awakeFromNib{
    [super awakeFromNib];
    if (self.musicPlayer == nil) {
        self.musicPlayer = [self createPlayForFile:@"384551_1438267683" withExtension:@"mp3"];
    }
    [self setupNotifications];

}
Call the code that creates the player in
initWithNibNameorawakeFromNib
I’ll explain[self setupNotifications];later
First, let me add some common method wrappers, such as play, pause, stop
1
2
3
4
5
6
7
8
9
10
11
12
13
14
15
16
17
18
19
20
21
22
23
24
25
26
27
28
29
30

- (void)play {
    if (self.musicPlayer == nil) { return; }

    if (!self.playing) {
        NSTimeInterval delayTime = [self.musicPlayer deviceCurrentTime] + 0.01;
        [self.musicPlayer playAtTime:delayTime];
        self.playing = YES;
    }

    self.trackDescrption.text = [self.musicPlayer.url absoluteString];
    [self configNowPlayingInfoCenter]; //配置后台播放的页面信息
}
- (void)stop {
    if (self.musicPlayer == nil) { return; }
    if (self.playing) {
        [self.musicPlayer stop];
        self.musicPlayer.currentTime = 0.0f;
        self.playing = NO;
    }
}

- (void)pause {
    if (self.musicPlayer == nil) { return; }
    if (self.playing) {
        [self.musicPlayer pause];
        self.playing = NO;
    }
}
Here you can see [self.musicPlayer deviceCurrentTime] + 0.01 adds a 0.01 delay. This is so that when you build a player later, you might need to stitch clips forward or backward when pausing or switching songs; it’s also for using playAtTime to play music at a specified position for unexpected pauses or to restore the last playback configuration. Here you can see I wrote a
[self configNowPlayingInfoCenter]; to configure the page info for background playback This is mainly used to show the info on the lock screen when music is playing in the background. See the code below
1
2
3
4
5
6
7
8
9
10
11
12
13
14
15
16
17
18
19
20
21
22
23
24
25
26
27
28
29
30
// Sets the song info shown on the lock screen
-(void)configNowPlayingInfoCenter{
    if (NSClassFromString(@"MPNowPlayingInfoCenter")) {
        NSMutableDictionary *dict = [[NSMutableDictionary alloc] init];

        // Song title
        [dict setObject:@"歌曲名称" forKey:MPMediaItemPropertyTitle];

        // Artist
        [dict setObject:@"演唱者" forKey:MPMediaItemPropertyArtist];

        // Album name
        [dict setObject:@"专辑名" forKey:MPMediaItemPropertyAlbumTitle];

        // Album artwork
        UIImage *image = [UIImage imageNamed:@"sunyazhou"];
        MPMediaItemArtwork *artwork = [[MPMediaItemArtwork alloc] initWithImage:image];
        [dict setObject:artwork forKey:MPMediaItemPropertyArtwork];

        // Music duration
        [dict setObject:@20 forKey:MPMediaItemPropertyPlaybackDuration];

        // Current playback time, updated in the timer
       // [dict setObject:[NSNumber numberWithDouble:100.0] forKey:MPNowPlayingInfoPropertyElapsedPlaybackTime];

        // Set the music info shown on the lock screen
        [[MPNowPlayingInfoCenter defaultCenter] setNowPlayingInfo:dict];
    }
}
If you need to continuously refresh the playback progress bar on the lock screen in a timer, write the following code
1
2
3
4
5
6
7
8
9
10
// Timer updates progress
- (void)changeProgress:(NSTimer *)sender{
    if(self.player){
        // Current playback time
        NSMutableDictionary *dict = [NSMutableDictionary dictionaryWithDictionary:[[MPNowPlayingInfoCenter defaultCenter] nowPlayingInfo]];
        [dict setObject:[NSNumber numberWithDouble:self.player.currentTime] forKey:MPNowPlayingInfoPropertyElapsedPlaybackTime]; //音乐当前已经过时间
        [[MPNowPlayingInfoCenter defaultCenter] setNowPlayingInfo:dict];

    }
}
Reference iOS background running - background music playback
Below we’ll introduce
[self setupNotifications]; which registers observers to pause music playback when the audio is unexpectedly interrupted or the headphones are unplugged Here’s the implementation code:
1
2
3
4
5
6
7
8
9
10
11
12
13
14
15
16
17
18
19
/**
 Notification handling for playback
 */
- (void)setupNotifications {
    NSNotificationCenter *nsnc = [NSNotificationCenter defaultCenter];

    // Add notification for unexpected audio interruption
    [nsnc addObserver:self
             selector:@selector(handleInterruption:)
                 name:AVAudioSessionInterruptionNotification
               object:[AVAudioSession sharedInstance]];

    // Add route change notification
    [nsnc addObserver:self
             selector:@selector(hanldeRouteChange:)
                 name:AVAudioSessionRouteChangeNotification
               object:[AVAudioSession sharedInstance]];
}
Note: remember to add [[NSNotificationCenter defaultCenter] removeObserver:self] in dealloc
Scenarios where the audio is unexpectedly interrupted include receiving a phone call while listening to music, or holding down the Home button to use Siri
Below is the specific method implementation
1
2
3
4
5
6
7
8
9
10
11
12
13
14
15
16
17
18
19
20
21
22
23
24
25
26
27
28
29
30
31
32
33
34
/**
 Handles unexpected audio interruption

 @param notification Notification info
 */
- (void)handleInterruption:(NSNotification *)notification {
    NSDictionary *info = notification.userInfo;
    AVAudioSessionInterruptionType type = [info[AVAudioSessionInterruptionTypeKey] unsignedIntegerValue];
    if (type == AVAudioSessionInterruptionTypeBegan) {
        //Handle AVAudioSessionInterruptionTypeBegan
        [self pause];
    } else {
        //Handle AVAudioSessionInterruptionTypeEnded
        AVAudioSessionInterruptionOptions options = [info[AVAudioSessionInterruptionTypeKey] unsignedIntegerValue];
        NSError *error = nil;
        // Activate the audio session and allow external speakers
        [[AVAudioSession sharedInstance] setCategory:AVAudioSessionCategoryPlayback
                                         withOptions:AVAudioSessionCategoryOptionAllowBluetooth error:nil];
        [[AVAudioSession sharedInstance] setActive:YES withOptions:AVAudioSessionSetActiveOptionNotifyOthersOnDeactivation error:&error];
        if (options == AVAudioSessionInterruptionOptionShouldResume) {
            [self play];
        } else {
            [self play];
        }


        self.playButton.selected = YES;

        if (error) {
            NSLog(@"AVAudioSessionInterruptionOptionShouldResume失败:%@",[error localizedDescription]);
        }
    }
}
First, about handleInterruption: in unexpected interruption cases, such as when I hold down the Home button to use Siri,
I receive the unexpected interruption notification. When type == AVAudioSessionInterruptionTypeBegan, we stop or pause the music playback. When type != AVAudioSessionInterruptionTypeBegan, it must be AVAudioSessionInterruptionTypeEnded. At this point, notification.userInfo contains an AVAudioSessionInterruptionOptions value that indicates whether the audio session has been reactivated and whether playback can resume.
Note: I ran into a pitfall here Sometimes when the interruption happens, the audio session can become unresponsive. Later I found that in this case the session needs to be reactivated, as in the following code:
1
[[AVAudioSession sharedInstance] setActive:YES withOptions:AVAudioSessionSetActiveOptionNotifyOthersOnDeactivation error:&error];
Here AVAudioSessionSetActiveOptionNotifyOthersOnDeactivation is used to notify other apps that my session has been activated. Many player developers are not considerate; they never use this method, so every time others finish playing audio, they can’t receive the notification that audio can be played again. I suggest everyone be more cooperative and write good code.
Because my external Xiaomi Bluetooth speaker still didn’t work well, I finally added AVAudioSessionCategoryOptionAllowBluetooth as well
Activate the audio session and allow external speakers
1
2
[[AVAudioSession sharedInstance] setCategory:AVAudioSessionCategoryPlayback withOptions:AVAudioSessionCategoryOptionAllowBluetooth error:nil];
Then it worked
Next, let me talk about headphone plugging/unplugging or USB microphone disconnection. Apple has some definitions related to the Human Interface Guidelines (HIG), which suggest that when a hardware headphone is unplugged, you should pause the music, or when the microphone is disconnected, it should be muted. This is to keep the playback content from being heard by others. No matter what Apple’s rules are, we have to follow them, otherwise our app will be rejected.
1
2
3
4
5
6
7
8
9
10
11
12
13
14
15
16
- (void)hanldeRouteChange:(NSNotification *)notification {
    NSDictionary *info = notification.userInfo;
    AVAudioSessionRouteChangeReason reason = [info[AVAudioSessionRouteChangeReasonKey] unsignedIntegerValue];
    // The old device is unavailable
    if (reason == AVAudioSessionRouteChangeReasonOldDeviceUnavailable) {
        AVAudioSessionRouteDescription *previousRoute = info[AVAudioSessionRouteChangePreviousRouteKey];
        AVAudioSessionPortDescription *previousOutput = previousRoute.outputs[0];
        NSString *portType = previousOutput.portType;
        if ([portType isEqualToString:AVAudioSessionPortHeadphones]) {
            [self stop];
            self.playButton.selected = NO;
        }

    }

}
This requires using AVAudioSessionRouteChangeReasonKey to get the reason for the route change, AVAudioSessionRouteChangeReason. There are many reasons
1
2
3
4
5
6
7
8
9
10
11
12
typedef NS_ENUM(NSUInteger, AVAudioSessionRouteChangeReason)
{
	AVAudioSessionRouteChangeReasonUnknown = 0,
	AVAudioSessionRouteChangeReasonNewDeviceAvailable = 1,
	AVAudioSessionRouteChangeReasonOldDeviceUnavailable = 2,
	AVAudioSessionRouteChangeReasonCategoryChange = 3,
	AVAudioSessionRouteChangeReasonOverride = 4,
	AVAudioSessionRouteChangeReasonWakeFromSleep = 6,
	AVAudioSessionRouteChangeReasonNoSuitableRouteForCategory = 7,
	AVAudioSessionRouteChangeReasonRouteConfigurationChange NS_ENUM_AVAILABLE_IOS(7_0) = 8
} NS_AVAILABLE_IOS(6_0);
We need AVAudioSessionRouteChangeReasonOldDeviceUnavailable to determine whether the old device is unavailable Get the AVAudioSessionRouteDescription description info via AVAudioSessionRouteChangePreviousRouteKey
previousRoute then via
previousRoute.outputs[0] to get AVAudioSessionPortDescription
Get NSString *portType = previousOutput.portType
If [portType isEqualToString:AVAudioSessionPortHeadphones]
If it’s headphones AVAudioSessionPortHeadphones, then pause playback
That’s all the code logic for interruption and route changes
Below I’ll introduce something fun

The background info displayed earlier is exactly what’s shown in the image above, displayed on the lock screen
But you must be wondering how to implement receiving previous track, play/pause, next track taps on the lock screen
You need to write this in the AppDelegate
1
2
3
4
5
6
7
8
9
10
11
12
13
14
15
16
17
- (BOOL)application:(UIApplication *)application didFinishLaunchingWithOptions:(NSDictionary *)launchOptions {

    AVAudioSession *session = [AVAudioSession sharedInstance];
    NSError *error;
    if (![session setCategory:AVAudioSessionCategoryPlayback error:&error]) {
        NSLog(@"Category Error: %@", [error localizedDescription]);
    }

    if (![session setActive:YES error:&error]) {
        NSLog(@"Activation Error: %@", [error localizedDescription]);
    }

    [[UIApplication sharedApplication] beginReceivingRemoteControlEvents];
    [self becomeFirstResponder];
    return YES;
}
This line of code [[UIApplication sharedApplication] beginReceivingRemoteControlEvents];
as well as calling [self becomeFirstResponder]; to make the app the first responder. This is written so that the app responds more sensitively to audio playback, background switching, or interruptions.
1
2
3
- (BOOL)canBecomeFirstResponder {
    return YES;
}
Then write the following code to handle previous track, play/pause, next track taps on the lock screen
1
2
3
4
5
6
7
8
9
10
11
12
13
14
15
16
17
18
19
20
21
22
- (void)remoteControlReceivedWithEvent:(UIEvent *)event {
    if (event.type == UIEventTypeRemoteControl) {
        switch (event.subtype) {
            case UIEventSubtypeRemoteControlPlay:
                NSLog(@"暂停播放");
                break;
            case UIEventSubtypeRemoteControlPause:

                NSLog(@"继续播放");
                break;
            case UIEventSubtypeRemoteControlNextTrack:
                NSLog(@"下一曲");
                break;
            case UIEventSubtypeRemoteControlPreviousTrack:
                NSLog(@"上一曲");
                break;
            default:
                break;
        }
    }
}
I’ll leave the rest of the logic for you to fill in; I won’t cover it here.
Well, that’s all for AVAudioPlayer! If you have any questions, feel free to leave a comment; I can see them all and can also correct my mistakes. I’ll fix them promptly.
End
The final demo of the article