
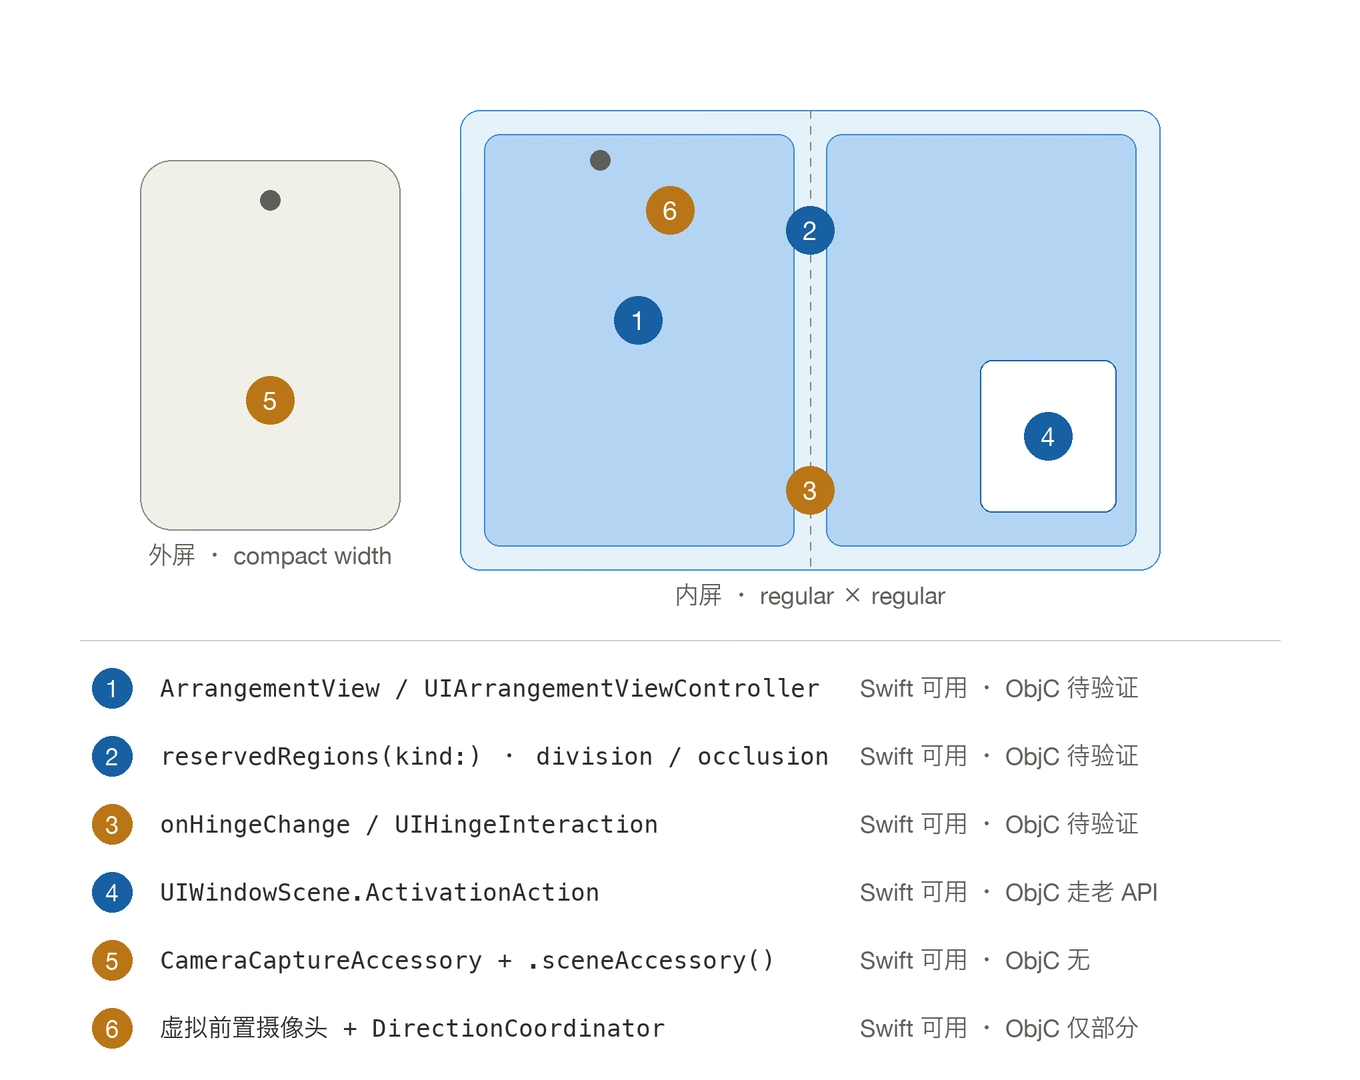
Items 1–6 are the six APIs covered below. Blue marks layout APIs; amber marks hardware APIs.
Preface
This post reflects strong personal opinions. If you feel uncomfortable while reading, please close it immediately. This article is for personal learning records only. You are welcome to repost or share it under the license terms — please respect the copyright and keep the original link. Thank you for your understanding and cooperation. If you find this site helpful, consider subscribing via RSS. Thanks for your support!
Before We Start: This Is Armchair Work
Three things up front, so nobody copies this and then yells at me:
- I don’t have the Xcode 27.1 beta, and there’s no iPhone Duo simulator (Device Hub) on my machine. Not one line of code below has been compiled.
- Every API name here comes from the six iPhone Duo Tech Talk videos Apple published on September 9, their captions, and write-ups of those videos — not from SDK headers.
- Therefore: the Swift signatures are reasonably trustworthy (the videos show real code). The Objective-C side is my reconstruction from UIKit / AVFoundation naming conventions, and the actual selectors should be confirmed against the shipped SDK. I flag every guess.
If you have the beta, run this against the simulator and tell me where I’m wrong. I’ll fix it.
What Actually Changed
One sentence: a screen that folds, a hinge you can read, two front cameras, and — for the first time on iOS — two windows of the same app.
The facts you have to deal with:
| Fact | Consequence |
|---|---|
| An outer and an inner display | Outer is compact width (like any iPhone); inner is regular × regular |
| A hinge in the middle | When partially folded, the inner display curves through the center and splits into several usable regions |
| Two front cameras | position == .front no longer means “pointing at you” |
| Multiple instances | The same app can run two windows at once — inner display only |
Three official hinge states: closed / partiallyOpen / fullyOpen. Add the book pose (half-folded, held up) and the tabletop pose (half-folded, lying flat) and the number of layouts you need to verify multiplies fast.
The Six New APIs at a Glance
| Capability | SwiftUI (Swift) | UIKit | Framework | Available in ObjC? |
|---|---|---|---|---|
| Fold-aware layout | ArrangementView | UIArrangementViewController | SwiftUI / UIKit | ⚠️ UIKit side only, unconfirmed |
| Reserved regions | GeometryProxy.reservedRegions(kind:) | UIView.reservedRegions(kind:) | SwiftUI / UIKit | ⚠️ UIKit side only, unconfirmed |
| Hinge state | onHingeChange | UIHingeInteraction | SwiftUI / UIKit | ⚠️ UIKit side only, unconfirmed |
| Multiple windows | UIWindowScene.ActivationAction | existing requestSceneSessionActivation | UIKit | ✅ via the existing API |
| Camera across displays | CameraCaptureAccessory + .sceneAccessory() | — | SwiftUI | ❌ Swift only |
| Virtual front camera | AVCaptureDeviceDiscoverySession | same name | AVFoundation | ✅ existing API |
| Camera direction | AVCaptureDeviceDirectionCoordinator | — | AVKit | ❌ Swift only (Swift concurrency) |
Notice the shape of that table: the five SwiftUI APIs simply do not exist in Objective-C. That isn’t Apple being hostile to ObjC — SwiftUI and Swift concurrency just don’t project into it. For a legacy codebase the barrier here isn’t the API, it’s the language.
On to the details. Every section is split into Swift and Objective-C.
1. Fold-Aware Layout: ArrangementView / UIArrangementViewController
What it is
Apple’s framing is precise: a layout container that sits between navigation containers and content containers, arranging exactly two views — primary and secondary — by a set of rules. The rule inputs are size classes, the view’s own aspect ratio, and any active division region.
Two styles:
.split— divides the space: horizontally when wider than tall, vertically when taller. Use it for main and detail, where neither side may be obscured..overlay— stacks them, moving side by side once the device folds. Use it for foreground over background, where partial obscuring is fine.
Which one? Apple gives a refreshingly direct answer: look at what you’d write today.
| You currently write | You want |
|---|---|
HStack / VStack | .split |
ZStack | .overlay |
| Main + detail (player + transcript) | .split |
| Foreground over background | .overlay |
Swift
1
2
3
4
5
6
7
8
NavigationStack {
    ArrangementView {
        PlayerView()
    } secondary: {
        UpNextView()
    }
    .arrangementViewStyle(.split)
}
Restricting the axis:
1
.arrangementViewStyle(.split.axes(.horizontal))
⚠️ A trap Apple calls out explicitly: when the arrangement can’t split along your chosen axis, it shows only a single view. That is not an error — one of your views silently disappears. Constraining the axis is therefore accepting “under some poses one page vanishes,” which is a product decision. Make it on purpose, not during review.
With overlay you can read where your view landed in the stack:
1
2
3
4
5
6
7
8
9
10
11
12
13
enum Minimization { case collapsed, expanded }

struct UpNextView: View {
    @Environment(\.overlayArrangementZIndex) private var zIndex: Int

    var body: some View {
        UpNextList(minimization: minimization)
    }

    var minimization: Minimization {
        zIndex > 0 ? .collapsed : .expanded
    }
}
Two explicit prohibitions (both surface as layout bugs, not compile errors):
- Arrangements provide no navigation — don’t nest a
NavigationSplitViewinside one. - Don’t put an
ArrangementViewinside aListorScrollView.
Objective-C
UIKit’s answer is UIArrangementViewController: attach two child view controllers and make it the root of a UINavigationController.
1
2
3
4
5
6
7
8
9
10
11
12
13
14
15
// ⚠️ Selector names are inferred — verify against the iOS 27.1 SDK headers
UIArrangementViewController *arrangementVC = [[UIArrangementViewController alloc] init];
UINavigationController *nav =
    [[UINavigationController alloc] initWithRootViewController:arrangementVC];

[arrangementVC setViewController:playerVC forArrangementRole:UIArrangementRolePrimary];
[arrangementVC setViewController:upNextVC forArrangementRole:UIArrangementRoleSecondary];

// Update the style (Swift's .split.axes(.horizontal))
[arrangementVC updateArrangement:UIArrangementStyleSplit];

// Read the overlay stacking position
UIArrangementState *state =
    [arrangementVC stateForArrangementRole:UIArrangementRoleSecondary];
model.minimization = (state.zIndex > 0) ? MinimizationCollapsed : MinimizationExpanded;
My read: UIArrangementViewController is probably ObjC-friendly (it’s a UIViewController subclass and the role parameter is likely an NS_ENUM), but Swift’s dot-chained static member syntax — .split.axes(.horizontal) — has no ObjC counterpart, so axis restriction either takes a different shape (an options struct) or doesn’t exist in ObjC at all. Check this against the SDK.
2. Reserved Regions: ReservedRegion / UIViewReservedRegion
What it is
A reserved region is an area claimed by hardware inside a larger usable area. It is not part of the safe area — it’s a separate concept. Two kinds:
- division region — the fold itself. Active only while partially folded; zero width when flat.
- occlusion region — obstructions like the under-display front camera. Active only while that camera is in use.
The outer camera is a permanent region, though the system accounts for it on its own when your controls live in the side strip.
The design concept alongside it is displacement: moving elements clear of these regions. The rules are consistent:
- Book pose → move toward the trailing side
- Tabletop pose → move down, with content meant for viewing at a distance going up
- Move related elements together, and not far
- Leave scrolling content alone — a feed passing under the fold is fine
- Sheets, alerts, menus and popovers are displaced by the system for free
Swift
1
2
3
4
5
6
GeometryReader { proxy in
    // The fold; .includeInactive reports it even when flat (zero width)
    let regions = proxy.reservedRegions(kind: .division, options: .includeInactive)
    let frames  = regions.map(\.frame)
    MyLayout(avoiding: frames)
}
1
2
3
4
5
6
// Occlusion regions (cameras)
GeometryReader { proxy in
    let regions = proxy.reservedRegions(kind: .occlusion)
    let frames  = regions.map(\.frame)
    MyLayout(avoiding: frames)
}
A neat use for includeInactive: when you want a stable, even column count in a grid. You get the region even on a flat screen, so the column decision stops reshuffling every time someone bends the device.
Objective-C
The SwiftUI GeometryProxy route doesn’t exist in ObjC. On the UIKit side it’s a method on UIView:
1
2
3
4
5
6
7
8
9
10
// ⚠️ Method name inferred from UIKit conventions — verify against the SDK
NSArray<UIViewReservedRegion *> *regions =
    [self.view reservedRegionsWithKind:UIViewReservedRegionKindDivision
                               options:UIViewReservedRegionOptionIncludeInactive];

NSMutableArray<NSValue *> *frames = [NSMutableArray array];
for (UIViewReservedRegion *region in regions) {
    [frames addObject:[NSValue valueWithCGRect:region.frame]];
}
[self layoutAvoiding:frames];
UIViewReservedRegion is the UIKit name Apple used in the video, and it returning objects with a frame is credible. Whether the selector is reservedRegionsWithKind: or reservedRegionsForKind: I genuinely can’t predict.
3. Hinge State: onHingeChange / UIHingeInteraction
What it is
Two things: a discrete status (closed / partiallyOpen / fullyOpen) and a continuous angle.
Apple is emphatic that this is for interactions and effects, not layout. Use arrangements and reserved regions for layout. If you find yourself computing frames from hinge.angle, you’re on the wrong API and you will fight the system.
The official example: a guitar app using the fold as a whammy bar.
Swift
1
2
3
4
5
6
7
8
9
10
11
12
13
14
15
16
struct InstrumentView: View {
    @State private var pitchBend: Double = 0

    var body: some View {
        GuitarView(pitchBend: pitchBend)
            .onHingeChange { _, context in
                // nil hinge == this device has no hinge. Always check.
                guard let hinge = context.hinge,
                      hinge.status == .partiallyOpen else {
                    pitchBend = 0
                    return
                }
                pitchBend = bend(for: hinge.angle)
            }
    }
}
That guard let hinge is not politeness, it’s mandatory. Your app runs on every other iPhone, where context.hinge is nil. Reset the effect in the else branch so the guitar doesn’t stay bent.
Objective-C
1
2
3
4
5
6
7
8
9
10
11
// ⚠️ Class name from the video; initializer/callback shape needs the SDK
UIHingeInteraction *hingeInteraction =
    [[UIHingeInteraction alloc] initWithChangeHandler:^(UIHingeContext *context) {
        UIHinge *hinge = context.hinge;      // nil on devices without a hinge
        if (hinge == nil || hinge.status != UIHingeStatusPartiallyOpen) {
            self.pitchBend = 0.0;
            return;
        }
        self.pitchBend = [self bendForAngle:hinge.angle];
    }];
[self.view addInteraction:hingeInteraction];
UIHingeInteraction follows the UIInteraction pattern (same family as UIPointerInteraction), so addInteraction: as the attachment point is a confident guess. What the initializer looks like, and whether the callback is a block or a delegate, needs the headers.
4. Multiple Windows: UIWindowSceneActivation
What it is
iPhone Duo is the first iPhone that can run multiple instances of your app’s UI. If you already support this on iPad, you get it here.
One hard limit: new windows can only be created on the inner display, never the outer one.
So handle the error path when requesting a scene. Apple’s answer is UIWindowScene.ActivationAction, which hides itself automatically when new windows aren’t available — you don’t hand-write “should this button show” logic.
Worth noting: the press called this “app cloning,” which it isn’t. This is the multi-window support iPadOS has had since 13 — two windows of one app, sharing one install, one account session and one set of local data. Not two independent containers.
Swift
The new SwiftUI action (name taken from Apple’s doc path UIKit/UIWindowScene/ActivationAction):
1
2
3
4
5
6
7
8
// ⚠️ Constructor unconfirmed
struct ContentView: View {
    var body: some View {
        UIWindowScene.ActivationAction("Open in New Window") {
            // Return the activity / configuration for the new scene
        }
    }
}
The safer route is the UIKit multi-window API that has existed for years — that one I’m confident about:
1
2
3
4
5
6
7
8
9
10
11
12
13
14
15
16
17
let activity = NSUserActivity(activityType: "com.example.openDocument")
activity.userInfo = ["documentID": document.id]

let options = UIWindowScene.ActivationRequestOptions()
options.requestingScene = view.window?.windowScene

UIApplication.shared.requestSceneSessionActivation(
    nil,
    userActivity: activity,
    options: options
) { error in
    // On the outer display, or when the limit is reached, you get an error here
    guard error == nil else {
        presentFallbackLayout()
        return
    }
}
Objective-C
The existing API works fine in ObjC, and it is the only part of this section that isn’t a gamble:
1
2
3
4
5
6
7
8
9
10
11
12
13
14
15
NSUserActivity *activity =
    [[NSUserActivity alloc] initWithActivityType:@"com.example.openDocument"];
activity.userInfo = @{ @"documentID": documentID };

UIWindowSceneActivationRequestOptions *options =
    [[UIWindowSceneActivationRequestOptions alloc] init];
options.requestingScene = self.view.window.windowScene;

[[UIApplication sharedApplication] requestSceneSessionActivation:nil
                                                    userActivity:activity
                                                         options:options
                                                    errorHandler:^(NSError *error) {
    // Windows can't open on the outer display — this fires
    [self presentFallbackLayout];
}];
As for the new UIWindowScene.ActivationAction: in Swift it’s a nested type, which in ObjC would normally surface as UIWindowSceneActivationAction, but it’s almost certainly a SwiftUI View — out of reach from ObjC. Use the code above.
5. Camera Across Displays: CameraCaptureAccessory
What it is
The main camera UI runs full screen on the inner display while the outer display shows a supplementary UI. The canonical uses: showing your subject their own framing, or a teleprompter.
Availability conditions are explicit:
- Your app is full screen on the inner display
- There’s an active camera session
- It’s registered on the camera view, and appears only while that view is visible
Availability is controlled dynamically by the system — enabled by default, revocable at any moment (close the device, for instance). Wire up onAvailabilityChange and disable your UI instead of letting users tap into nothing.
Swift
1
2
3
4
5
6
7
8
9
10
11
12
13
14
15
16
17
struct CameraRootView: View {
    @State private var model = TeleprompterModel()

    var body: some View {
        CameraView(model: model)
            .sceneAccessory {
                CameraCaptureAccessory(isEnabled: $model.isEnabled) {
                    TeleprompterView(model: model)
                }
                .onAvailabilityChange { model.isAvailable = $0 }
            }
            .toolbar {
                TeleprompterToggle(isEnabled: $model.isEnabled)
                    .disabled(!model.isAvailable)   // gray it out when unavailable
            }
    }
}
Objective-C
Nothing here. CameraCaptureAccessory and .sceneAccessory() are SwiftUI types; ObjC can’t even see the names.
A UIKit app that wants content on both displays falls back to the existing external-display approach (a second UIWindow on another UIWindowScene). Apple’s background doc for this is Presenting content on a connected display — but that’s external-display semantics, not camera-accessory semantics, and the system won’t manage availability for you.
6. The Virtual Front Camera and Direction Tracking
What it is
iPhone Duo has two front cameras, both square sensors with an ultrawide field of view:
- Outer ultrawide (on the outside of the device): up to 4K @ 120fps
- Inner ultrawide (revealed when you unfold; the first under-display camera on iPhone): up to 1080p @ 60fps
Discover the front camera the usual way and you get a Virtual Front Camera: a device that switches automatically between the two physical cameras as the phone opens and closes, always streaming from the most relevant one. You do nothing.
The trade-off: it exposes only what both cameras share — 1080p, 60fps, no depth. For 4K120 or depth, use builtInOuterUltraWideCamera / builtInInnerUltraWideCamera directly, and you own the switching.
Then the genuinely new problem: position == .front no longer means “facing you.” The two displays can face opposite directions — you’re reading the inner display while the stream comes from the outer front camera, which is pointing away. Close the device and that same camera swings around to face you.
The fix is AVKit’s AVCaptureDeviceDirectionCoordinator: bind it to a view and it reports which camera is forward-facing relative to that view. One coordinator per view — two displays means two coordinators.
Swift
Discovering the virtual front camera (existing AVFoundation API):
1
2
3
4
5
6
let discovery = AVCaptureDevice.DiscoverySession(
    deviceTypes: [.builtInWideAngleCamera, .builtInUltraWideCamera],
    mediaType: .video,
    position: .front
)
// On iPhone Duo this yields the Virtual Front Camera
The direction coordinator (this is Apple’s own code from the video, so it’s the most trustworthy snippet here):
1
2
3
4
5
6
7
8
9
10
11
directionCoordinator = AVCaptureDeviceDirectionCoordinator(
    view: view,
    deviceTypes: [
        .builtInOuterUltraWideCamera,
        .builtInInnerUltraWideCamera,
        .builtInDualWideCamera,
    ],
    changeHandler: { [weak self] map in
        self?.updateCameraSession(map)
    }
)
Two implementation notes Apple stresses:
- It hands you an
AVCaptureDeviceDescriptor, not anAVCaptureDevice— aSendablestand-in. The coordinator is tied to a view and therefore main-actor isolated, so don’t call AVFoundation from the handler. Pass the descriptor to your camera actor and build the device there. - Re-decide mirroring when direction changes — mirror the preview when a rear camera becomes the forward-facing one, for a natural selfie.
Three things for polishing the preview:
1
2
3
4
5
previewLayer.videoGravity = .resizeAspectFill          // fit vs. fill
device.dynamicAspectRatio                              // square sensor → pick a landscape ratio
AVCaptureDevice.RotationCoordinator                    // upright previews across display changes
// After adopting RotationCoordinator, switch this off for performance
photoOutput.isCameraSensorOrientationCompensationEnabled = false
Objective-C
Discovery is no problem — AVCaptureDeviceDiscoverySession is ancient and fully available:
1
2
3
4
5
6
7
NSArray<AVCaptureDeviceType> *types = @[AVCaptureDeviceTypeBuiltInWideAngleCamera,
                                        AVCaptureDeviceTypeBuiltInUltraWideCamera];
AVCaptureDeviceDiscoverySession *session =
    [AVCaptureDeviceDiscoverySession discoverySessionWithDeviceTypes:types
                                                           mediaType:AVMediaTypeVideo
                                                            position:AVCaptureDevicePositionFront];
// On iPhone Duo you get the Virtual Front Camera — automatic switching, zero work
AVCaptureDeviceDirectionCoordinator is almost certainly off-limits in ObjC. Not because of the name, but because of the design: main-actor isolation, a Sendable descriptor in the callback, and documentation that explicitly says not to touch AVFoundation from the handler. That’s a Swift-concurrency design with nowhere to land in ObjC.
Which means: an ObjC project either accepts the virtual front camera’s automatic switching (capped at 1080p60) or guesses direction by watching scene/display changes itself. Getting the full 4K120 plus accurate direction tracking means writing that piece in Swift. Of everything in this round, that’s the most concrete language barrier.
Swift vs. Objective-C: The Full Table
| Capability | Swift | Objective-C | Verdict |
|---|---|---|---|
| Fold-aware layout | ArrangementView / UIArrangementViewController | UIArrangementViewController | ⚠️ Probably available; axis restriction likely missing |
| Reserved regions | GeometryProxy.reservedRegions(kind:) | the UIView equivalent | ⚠️ Probably available; selector unconfirmed |
| Hinge angle | onHingeChange / UIHingeInteraction | UIHingeInteraction | ⚠️ Probably available; init shape unconfirmed |
| Multiple windows | UIWindowScene.ActivationAction + existing API | existing requestSceneSessionActivation | ✅ Fully available |
| Camera accessory | CameraCaptureAccessory | — | ❌ None |
| Virtual front camera | DiscoverySession | same name | ✅ Fully available |
| Direction tracking | AVCaptureDeviceDirectionCoordinator | — | ❌ None (Swift concurrency) |
In one line: the three UIKit APIs are worth betting on, the two SwiftUI ones aren’t there at all, the camera story is split, and the real gatekeeper is AVCaptureDeviceDirectionCoordinator.
The Migration List You Need Even If You Skip All Six
These new APIs aren’t the urgent part. This is — ordered by what breaks first:
- Scene lifecycle: without a
UISceneDelegate, an app built against the new SDK won’t even launch. Non-negotiable; it goes first. UIScreen.main: with two displays, which one is “main”? Treat it as deprecated — usetraitCollection.displayScale, or reach the screen throughwindow.windowScene.- Orientation checks → size class checks: the inner display ignores your supported interface orientations entirely. Every orientation-based layout branch is wrong.
- Safe areas are asymmetric: insets can differ on each side. Handle every edge independently — no
safeAreaInsets.left * 2. Re-test in Split View, where it gets narrow again. - Vertical bars: side toolbars and tab bars have fixed width and flexible height, so symbols work better than text — give every item both a title and an image and let the system choose. Overflow happens sooner; set
visibilityPriority. - Test at half width: every app participates in Split View, so your UI may get half a screen. This is where layout bugs live.
- Audit centered single-column layouts: on a display that wide, one centered column is usually waste. Consider two.
References
Apple’s six Tech Talks (the primary sources for this post):
- Prepare your app for iPhone Duo
- Raise the bar with iPhone Duo
- Strike a pose with adaptive layouts on iPhone Duo
- Leverage multiple displays and scenes on iPhone Duo
- Build a great camera experience for iPhone Duo
- Design for iPhone Duo
Secondary write-ups I cross-checked against:
- iPhone Duo’s New Code: Six APIs Developers Have Not Used Before — The Mac Observer
- iPhone Duo: First Developer Good-to-Knows — Swiftjective-C
- iPhone Duo — Developer Video Hub — written notes for all six videos
One last time: none of this code has been compiled. Once the Xcode 27.1 beta lands I’ll run every snippet in the simulator and come back and correct this post. Then we’ll see which guesses held up and which ones I made up.