Preface
This post reflects strong personal opinions. If you feel uncomfortable while reading, please close it immediately. This article is for personal learning records only. You are welcome to repost or share it under the license terms — please respect the copyright and keep the original link. Thank you for your understanding and cooperation. If you find this site helpful, consider subscribing via RSS. Thanks for your support!
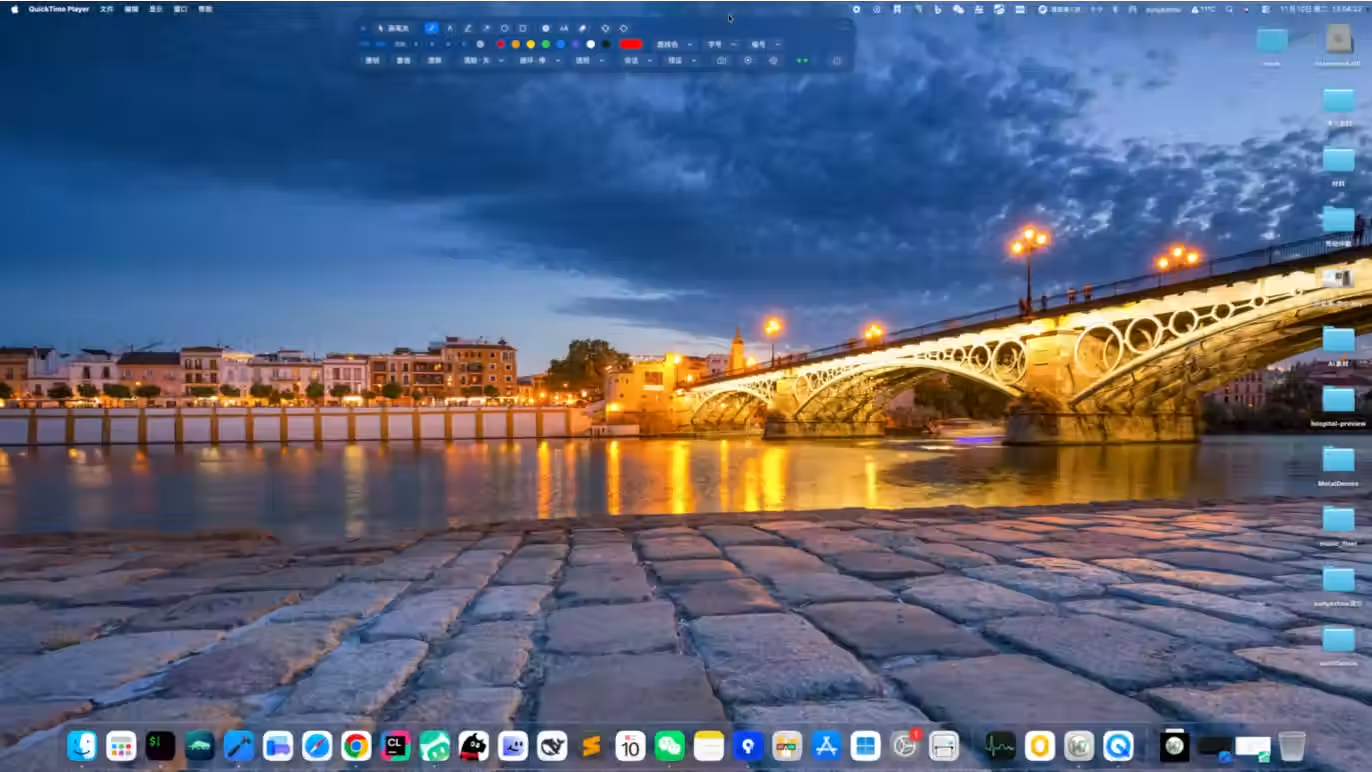
A while ago I built a floating toolbar for macOS: a borderless NSPanel sitting at the bottom of the screen with a row of drawing tools, draggable to wherever it feels comfortable. The first bug report from a real run was:
It is easy to drag it off the screen.
My first instinct was “just check on mouse-up and move it back”. But the actual experience is: it disappears during the drag. What the user sees is “I pushed it away and something dragged it half back”, which is worse than not supporting dragging at all.
What you actually want is to clamp the position on every frame, and to change how the translation is computed. The core is a single line:
1
min(max(value, lower), upper)
Below I walk through both macOS and iOS. There is no window to drag on iOS, but “keeping a subview inside its superview” is exactly the same problem — only the source of the bounds changes.
1. First, whose bounds are they?
Before clamping, answer one question: which rectangle is the allowed area? Each platform has its own answer.
| Platform | Common wrong choice | Correct choice |
|---|---|---|
| macOS | NSScreen.frame | NSScreen.visibleFrame |
| UIKit | UIScreen.main.bounds | superview.bounds (minus safeAreaInsets) |
| SwiftUI | a hard-coded size | container size + safe area |
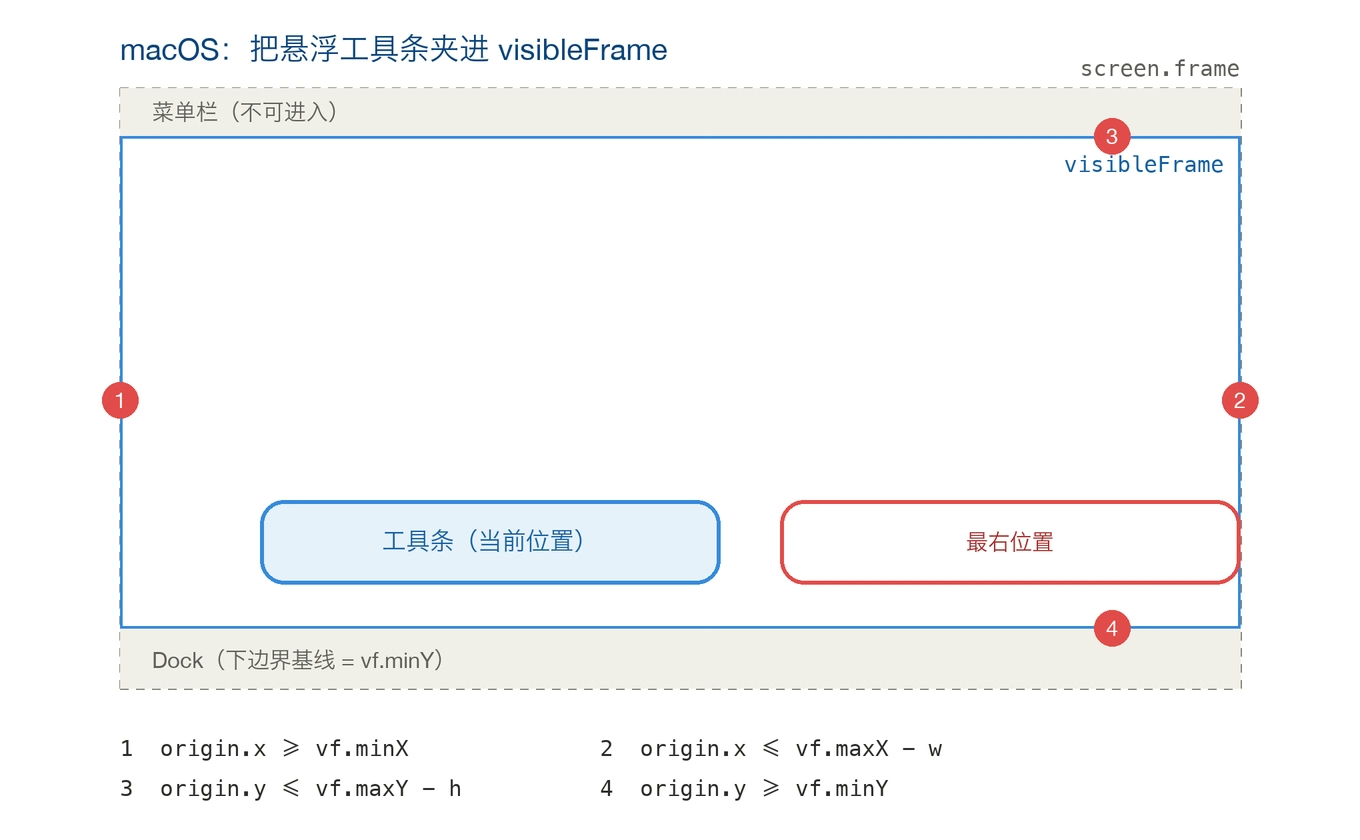
screen.frameis the whole physical display, including the menu bar and the Dock. Clamp against it and your window can slide under the Dock or get half covered by the menu bar.visibleFrameis the area the system considers usable: menu bar subtracted from the top, Dock from the bottom, side Dock from the sides. It is dynamic — move the Dock, switch displays, change resolution, and it follows. MeasuringNSStatusBar.thicknessyourself, or hard-coding 44pt, will be off by a few pixels on some display, guaranteed.- On iOS,
boundsis the space the superview gives you;safeAreaInsetsis what the system occupies (status bar, notch, home indicator). By default you should respect the safe area, unless you genuinely want to draw under the notch.
2. macOS: clamping an NSPanel every frame
2.1 Remember the moment the drag started
The translation must be computed against a fixed anchor: the mouse position and window origin at mouse-down.
1
2
3
4
5
6
7
8
9
10
11
12
13
14
15
16
17
/// Mouse position in screen coordinates + window origin, captured on mouse-down
private var dragStart: (mouse: NSPoint, origin: NSPoint)?

func dragToCurrentMouse() {
    guard let panel else { return }
    let now = NSEvent.mouseLocation

    guard let start = dragStart else {          // first callback only records the anchor
        dragStart = (now, panel.frame.origin)
        return
    }

    var origin = NSPoint(x: start.origin.x + (now.x - start.mouse.x),
                         y: start.origin.y + (now.y - start.mouse.y))
    origin = clamp(origin, size: panel.frame.size)   // clamp every frame, not on mouse-up
    panel.setFrameOrigin(origin)
}
2.2 The clamp itself
1
2
3
4
5
6
7
8
/// Clamp the window origin into the selected screen's visibleFrame
private func clamp(_ origin: NSPoint, size: NSSize) -> NSPoint {
    let vf = selectedScreen().visibleFrame          // on multi-display, the screen the panel is locked to
    let maxX = max(vf.minX, vf.maxX - size.width)
    let maxY = max(vf.minY, vf.maxY - size.height)
    return NSPoint(x: min(max(origin.x, vf.minX), maxX),
                   y: min(max(origin.y, vf.minY), maxY))
}
The four edges:
| Edge | Condition | Note |
|---|---|---|
| Left | origin.x >= vf.minX | the left side cannot cross the screen edge |
| Right | origin.x <= vf.maxX - w | subtract the width so the right side hugs the edge |
| Top | origin.y <= vf.maxY - h | the top cannot go under the menu bar |
| Bottom | origin.y >= vf.minY | vf.minY is the top of the Dock |
The max(vf.maxX - size.width, vf.minX) guard is not redundant: if the window is wider than the screen, vf.maxX - w is smaller than vf.minX, the interval inverts, and min(max()) flips between the two values. The extra max degenerates the interval to “stick to the left edge”, which at least does not jitter.
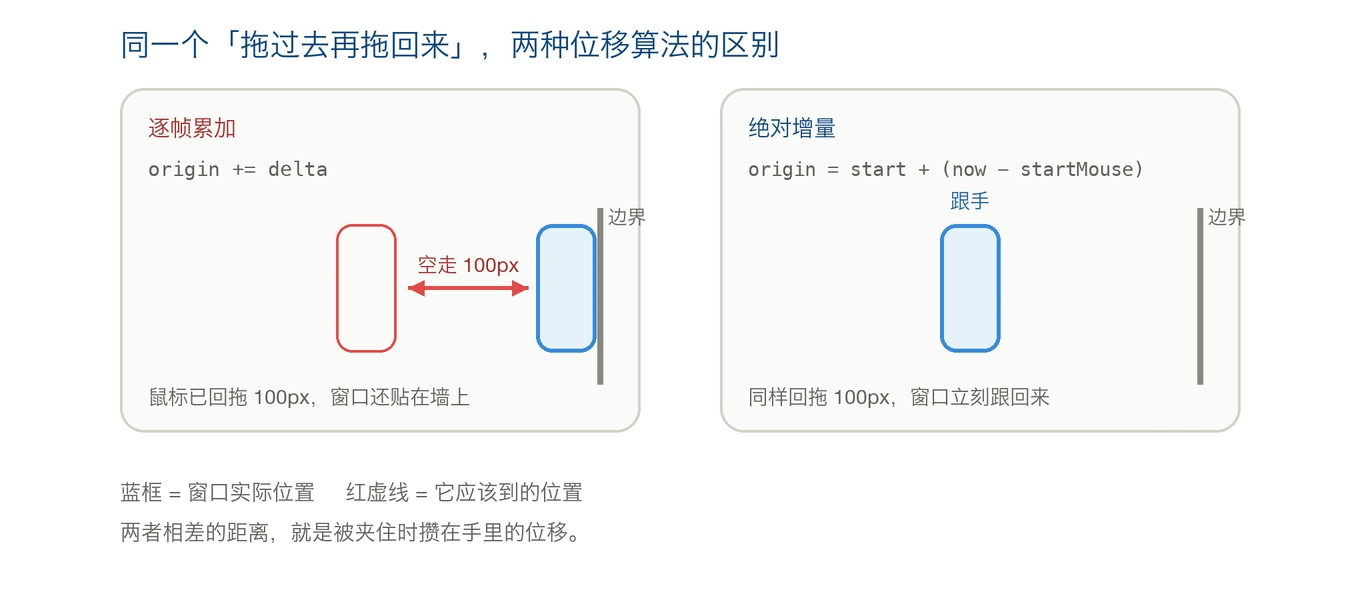
2.3 Why not accumulate the delta
This is the easiest line to get wrong. The intuitive version is:
1
origin.x += now.x - lastMouse.x
It looks equivalent, but there are two traps:
- Error accumulates at the edge. During the frames where the window is clamped, the mouse keeps moving while the window does not — the difference piles up. When you drag back, the window has to “walk” a while before it starts following.
- You need to maintain
lastMouseand handle dropped frames: more state.
An absolute delta (start + (now - start)) is recomputed from the mouse-down point every time, so clamping leaves nothing behind. The left panel below shows the “dead walk”:
2.4 Clamp once more after mouse-up
During the drag, only the “background drag surface” path is clamped. If the user grabs the native drag handle on the left, AppKit’s performDrag(with:) takes over — that runs its own modal loop and we cannot intercept it. So clamp again on release:
1
2
3
4
func endDrag() {
    dragStart = nil
    snapToNearestEdge()     // clamps first, then snaps within 36pt
}
snapToNearestEdge() clamps before snapping, so “dragged off-screen with the handle” also gets pulled back.
2.5 Every positioning path should go through the same clamp
Clamping only the drag is not enough. The window position has other sources: restoring the saved position at launch, switching displays in settings, collapsing/expanding which changes the height. If each writes its own check, they will drift apart. Keep a single exit: drag, restore, screen switch, collapse — all call the same clamp.
2.6 A side note: borderless windows cannot be dragged at all
If you are building a borderless panel, note that isMovableByWindowBackground is a no-op on borderless windows (there is no theme frame to take over the drag). You have to implement it yourself: performDrag(with:), or a gesture plus setFrameOrigin.
And your custom NSView must implement:
1
override func acceptsFirstMouse(for event: NSEvent?) -> Bool { true }
Otherwise the panel never becomes key, every mouse-down is treated as a “first click” used to activate the window, and mouseDown never fires. The symptom is confusing: all the buttons work, dragging does not.
3. iOS: same problem, different source of bounds
On iOS you drag a view, not a window; the bounds come from the superview, not the screen. Not one character of the formula changes.
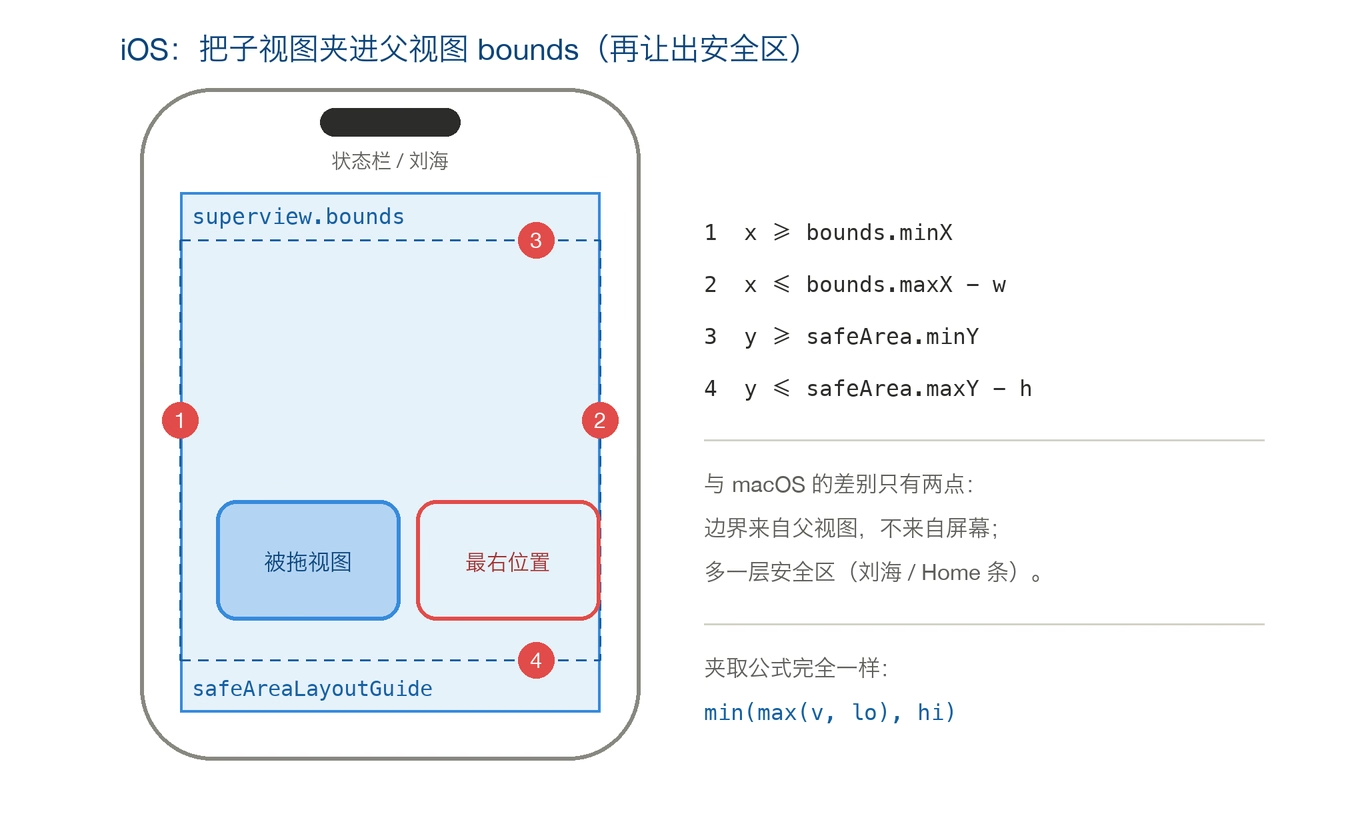
3.1 UIKit
1
2
3
4
5
6
7
8
9
10
11
12
13
14
15
16
17
18
19
20
21
22
23
24
25
26
27
28
29
30
31
32
33
34
private var startCenter: CGPoint?

@objc private func handlePan(_ gesture: UIPanGestureRecognizer) {
    guard let superview else { return }

    switch gesture.state {
    case .began:
        startCenter = center

    case .changed:
        guard let start = startCenter else { return }
        // Key: use the superview as the reference frame, never self
        let t = gesture.translation(in: superview)
        let target = CGPoint(x: start.x + t.x, y: start.y + t.y)
        center = clamp(target, size: bounds.size,
                       in: superview.bounds, safeArea: superview.safeAreaInsets)

    default:
        break
    }
}

/// center-based clamp: inset each edge by half of the view's own size
private func clamp(_ center: CGPoint, size: CGSize,
                   in bounds: CGRect, safeArea: UIEdgeInsets) -> CGPoint {
    let minX = bounds.minX + safeArea.left + size.width / 2
    let maxX = bounds.maxX - safeArea.right - size.width / 2
    let minY = bounds.minY + safeArea.top + size.height / 2
    let maxY = bounds.maxY - safeArea.bottom - size.height / 2

    return CGPoint(
        x: min(max(center.x, min(minX, maxX)), max(minX, maxX)),
        y: min(max(center.y, min(minY, maxY)), max(minY, maxY)))
}
Two details:
translation(in: superview), nottranslation(in: self). The translation is measured in the coordinate system you pass in. Passselfand the reference frame is the view being dragged — it moves along, so the drag drifts further and further. The superview does not move, so it is stable.- This works with
centerinstead oforigin, so each edge gives up half of the view’s size; in origin terms it isbounds.width - size.width. Both are equivalent.
3.2 SwiftUI
SwiftUI’s DragGesture has the same trap: translation is relative to the current view by default. The fix is to attach the gesture to a named coordinate space that does not move:
1
2
3
4
5
6
7
8
9
10
11
12
13
14
15
16
17
18
19
20
21
22
23
24
25
26
27
28
29
30
31
32
33
34
35
36
37
38
39
@State private var offset: CGSize = .zero
@State private var startOffset: CGSize = .zero
@State private var limit: CGSize = .zero      // maximum absolute offset

private let cardSize = CGSize(width: 120, height: 80)

var body: some View {
    GeometryReader { proxy in
        RoundedRectangle(cornerRadius: 12)
            .fill(.blue.opacity(0.2))
            .frame(width: cardSize.width, height: cardSize.height)
            .offset(offset)
            .gesture(
                DragGesture(minimumDistance: 1, coordinateSpace: .named("board"))
                    .onChanged { value in
                        let target = CGSize(
                            width: startOffset.width + value.translation.width,
                            height: startOffset.height + value.translation.height)
                        offset = clamp(target, limit: limit)
                    }
                    .onEnded { _ in startOffset = offset }
            )
            .onChange(of: proxy.size) { _, _ in
                limit = self.limit(for: proxy.size)
                offset = clamp(offset, limit: limit)     // re-clamp after rotation / split view
            }
    }
    .coordinateSpace(name: "board")     // must be attached to the parent container
}

private func limit(for container: CGSize) -> CGSize {
    CGSize(width: max(0, container.width - cardSize.width),
           height: max(0, container.height - cardSize.height))
}

private func clamp(_ value: CGSize, limit: CGSize) -> CGSize {
    CGSize(width: min(max(value.width, -limit.width), limit.width),
           height: min(max(value.height, -limit.height), limit.height))
}
Here offset is measured from the container’s top-leading corner (GeometryReader lays out its content there), so limit is simply “container minus card” — no division by two. If the container has a safe area, replace proxy.size with the area left after subtracting proxy.safeAreaInsets.
4. Four rules shared by both platforms
- Absolute delta, never accumulate.
start + (now - start)is immune to clamping and dropped frames. - Write the clamp as
min(max(v, lo), hi)and tolerate an inverted interval. When the view is larger than its container, an extramax(lo, hi)is cheaper than praying it never happens. - Let the system compute the bounds.
visibleFrameon macOS;boundsplussafeAreaInsetson iOS. Hand-written 44 / 34 / 20 will be wrong on some device. - Re-clamp whenever the size changes. Rotation, split view and the keyboard on iOS; display switch, resolution change and collapse on macOS — all go back to the same
clamp.
5. Two cases that are easy to miss on iOS
- Rotation / split view:
boundschanges. Re-clamp the current position inviewDidLayoutSubviewsoronChange(of: proxy.size). A position that used to be legal may end up off-screen after rotating. - Keyboard: the keyboard does not change
bounds, but it covers the lower half. UsekeyboardLayoutGuideor observekeyboardWillChangeFrameNotificationon UIKit;.safeAreaInset(edge: .bottom)on SwiftUI. Shrink the “visible area” once more, then run the sameclamp.
6. Wrap-up
The requirement sounds like “add a check”, but it is really two decisions:
- At which layer to clamp: every frame (during the drag) instead of on release. Only when the user never sees the out-of-bounds state are you actually preventing it.
- Where the bounds come from: ask the system, do not measure it yourself.
The only essential code is the dragStart anchor and the three lines of clamp. The rest is wiring those two into every entry point that can move the position.
Floating bubbles, picture-in-picture, draggable panels — it is all the same. Copy those two pieces and you are done.