
Preface
On the iOS platform, audio rendering is done directly through the AudioUnit API. It is used to implement effects like “uncle voice”, “KTV”, and “monitor return”.
Today I’ll take you through an in-depth understanding and study of these audio effects.
Background of Implementing Voice Changing on iOS
Voice changing generally happens between one end that captures/records audio and the other end that plays it. Ignoring the transcoding in between, you change the voice by adjusting the corresponding audio parameters in the middle of the input/output pipeline.
The following image shows the workflow of AVAudioSession 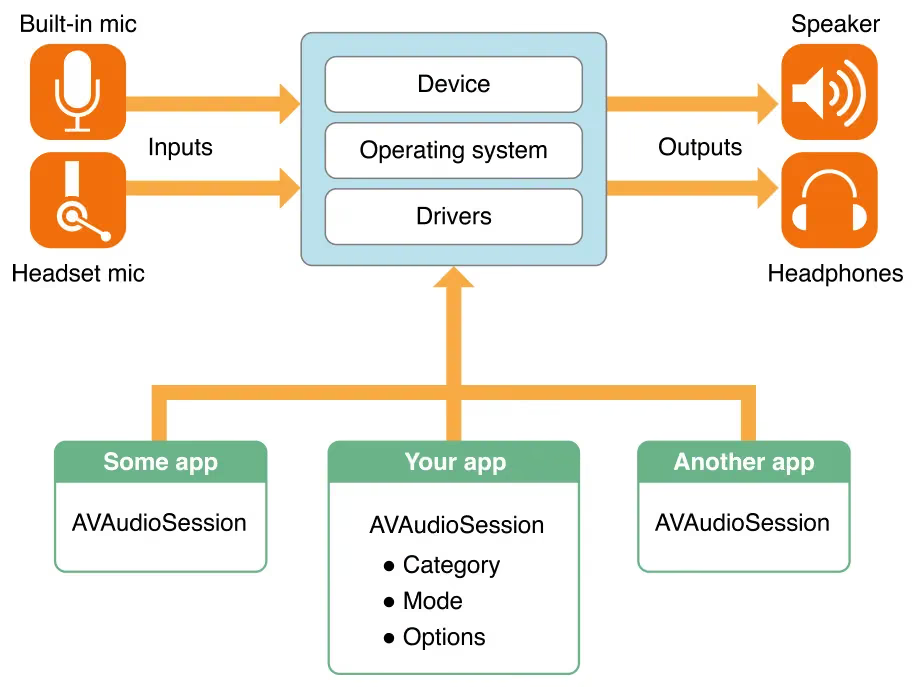
There are many commonly used voice changing solutions:
- FFMpeg’s built-in effects, e.g. EQ equalizer
Audio Unitat the bottom of AVFoundation, e.g. reverb- SoundTouch
- Other solutions…
Here we choose the audio processing unit Audio Unit provided by iOS AVFoundation itself.
Audio Unit provides the following features:
- Low-latency audio I/O, e.g. voip
- Mixing and playing back multiple audio tracks, e.g. music synthesizers in games
- Audio Unit itself provides: echo cancellation, mixing two audio tracks, equalizers, compressors, reverb effects, etc.
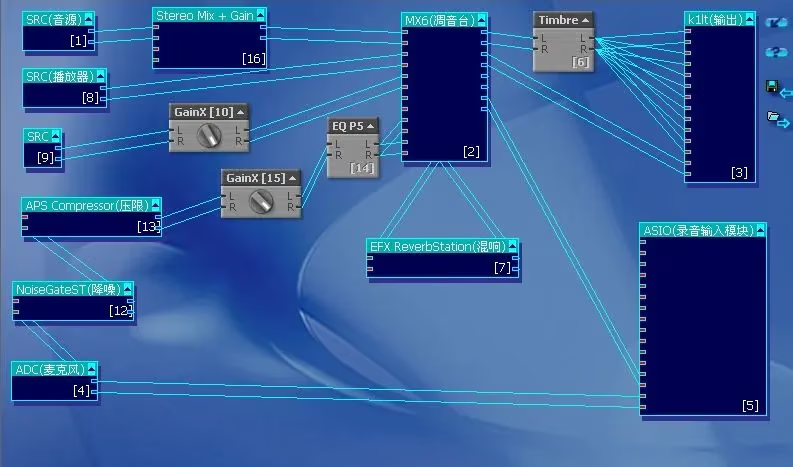
- A graph-like structure is needed to process audio, e.g. somewhat similar to the KX driver that streamers in the PC era often used.
The image below shows the KX driver connection diagram on the Windows platform
AudioUnit Introduction
iOS Layered Architecture Diagram
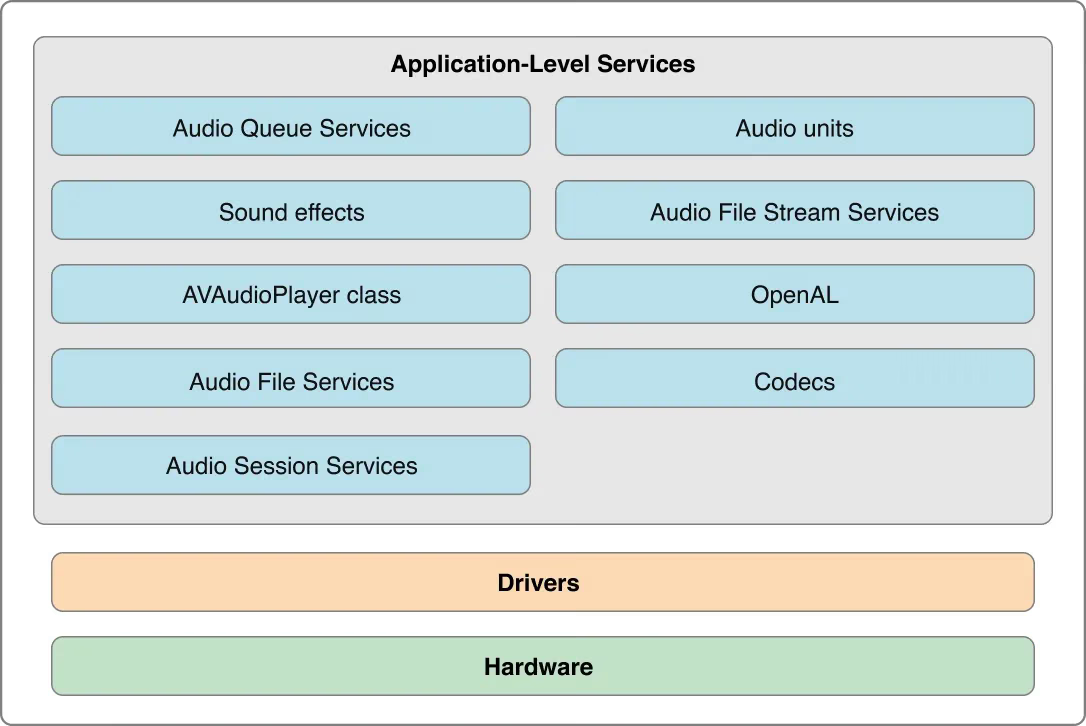
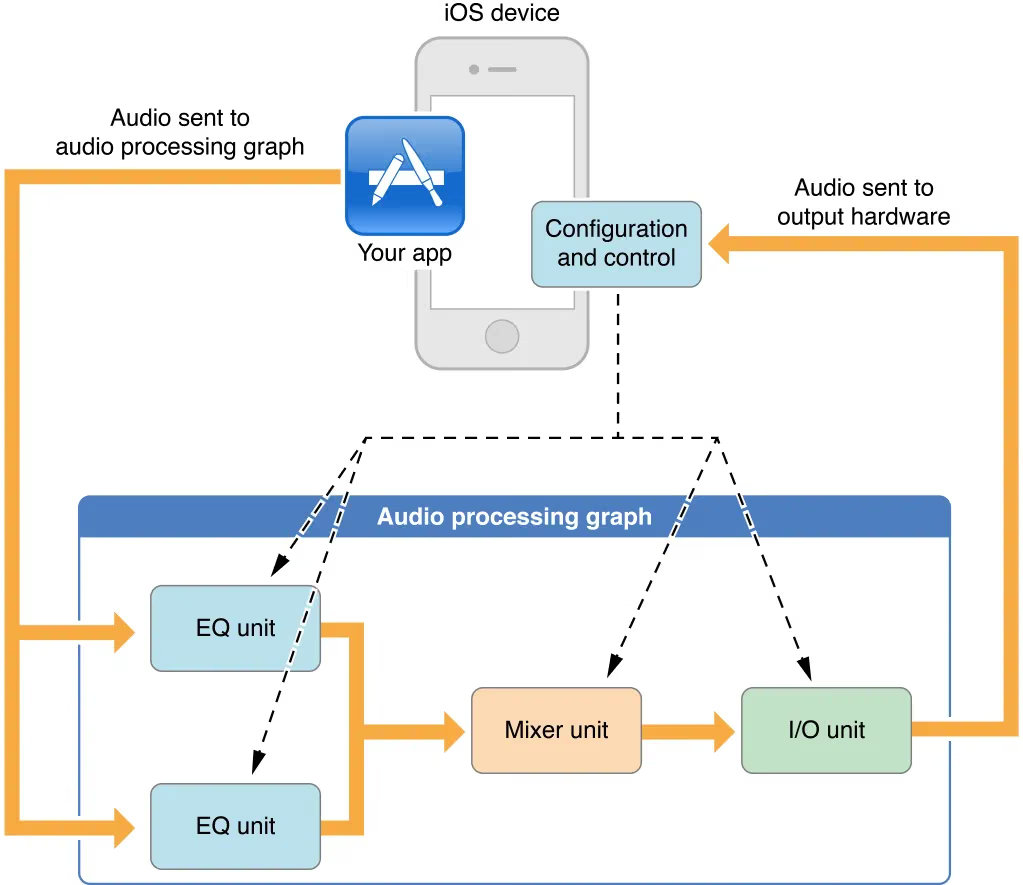
To understand the audio processing flow, you first need to know about
AUGraph
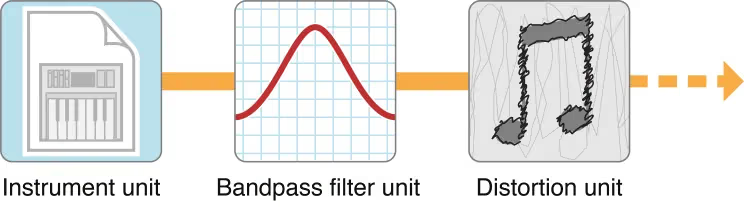
audio processing graph: A representation of a signal chain comprising an interconnection of audio units. Also called an AUGraph or graph. Core Audio represents such an interconnected network as a software object of typeAUGraph. Audio processing graphs must end in an output unit. See also audio unit.
A representation of a signal chain, including the interconnection of audio units. Also called an AUGraph or graph. Core Audio represents such an interconnected network as a software object of typeAUGraph.
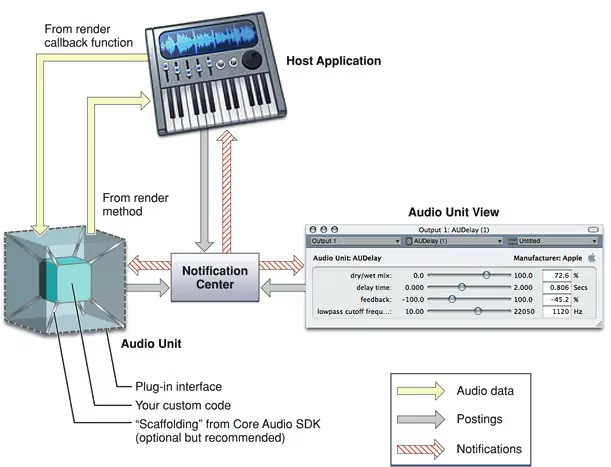
audio unit structure diagram (workflow)
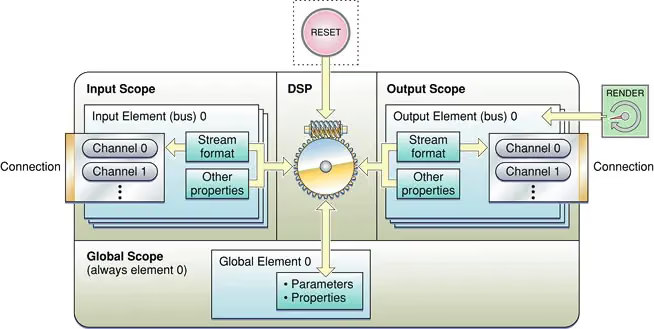
Audio Unit composition diagram
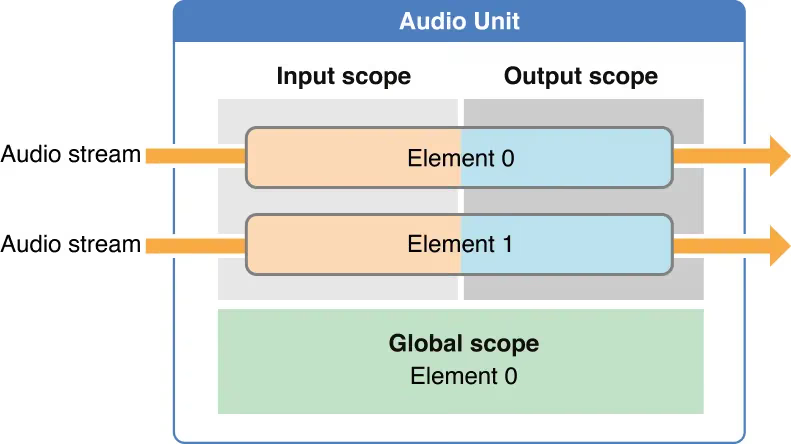
A Unit is generally divided into Element0 and Element1
Below we’ll take the Remote I/O Unit as an example:
The RemoteIO unit is the unit related to hardware I/O. It has an input end and an output end. The input end generally refers to the microphone, and the output end generally refers to the speaker.
Element0controls output
Element1controls input
In the diagram, Element is also called bus;
The audio stream comes in from the input scope and goes out from the output scope The whole Render process is one RenderCycle
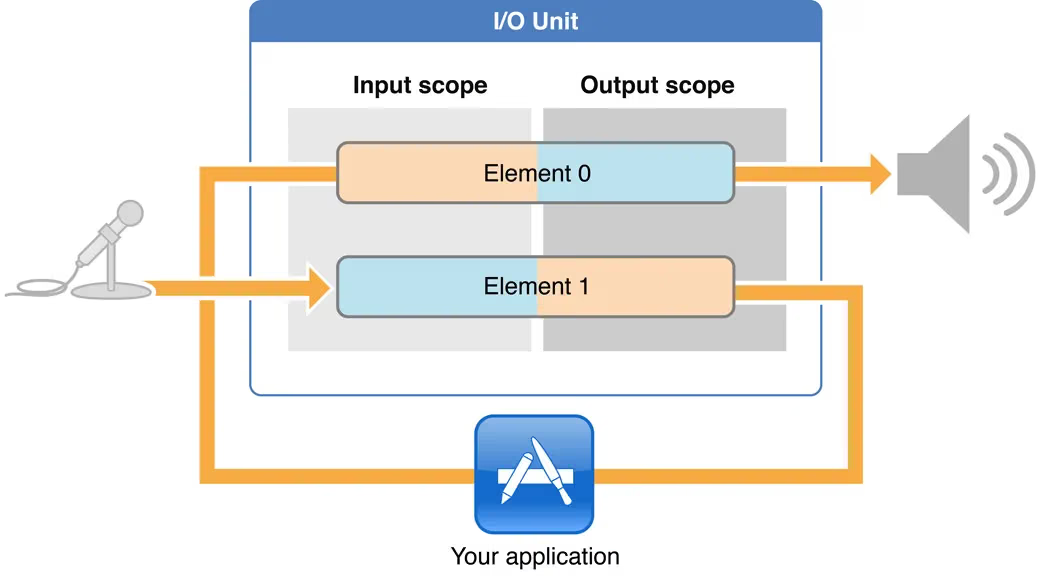
At the same time, each Element is divided into an Input Scope and an Output Scope. If we want to use the speaker’s playback function, we must connect the OutputScope of this Unit’s Element0 to the speaker. If we want to use the microphone for recording, we must connect the InputScope of this Unit’s Element1 to the microphone.
Building an Audio Unit
First you need to enable the audio session — you can configure that part yourself.
1
2
	//Pseudo-code for configuring the session
	[[AVAudioSession sharedInstance].xxxxx xxxxx];
How do you build an Audio Unit with code? Here we’ll use the Remote I/O Unit as an example:
There are two ways to create an AudioUnit:
- Create it directly with the bare AudioUnit API
- Build it using AUGraph and AUNode
- The first way: bare creation
1
2
3
4
5
6
7
8
9
10
11
12
13
14
15
16
17
18
19
20
21
22
23
24
25
#import "ViewController.h"
#import <AudioUnit/AudioUnit.h>
@interface ViewController ()
{
    AudioUnit ioUnitInstance; //声明一变量
}

@end

@implementation ViewController

- (void)viewDidLoad {
    [super viewDidLoad];
    //First build the struct needed to create the Unit
    AudioComponentDescription ioUnitDescription;
    ioUnitDescription.componentType = kAudioUnitType_Output;
    ioUnitDescription.componentSubType = kAudioUnitSubType_RemoteIO;
    ioUnitDescription.componentManufacturer = kAudioUnitManufacturer_Apple;
    ioUnitDescription.componentFlags = 0;
    ioUnitDescription.componentFlagsMask = 0;

    AudioComponent ioUnitRef = AudioComponentFindNext(NULL, &ioUnitDescription);
    //Create the AudioUnit instance
    AudioComponentInstanceNew(ioUnitRef, &ioUnitInstance);
}
- The second way: using AUGraph and AUNode
1
2
3
4
5
6
7
8
9
10
11
12
13
14
15
16
17
18
19
20
21
22
23
24
25
26
27
28
29
30
31
32
33
34
35
36
#import "ViewController.h"
#import <AudioUnit/AudioUnit.h>
#import <AudioToolbox/AudioToolbox.h>
@interface ViewController ()
{
    AUGraph     processingGraph;
    AUNode      ioNode;
    AudioUnit   ioUnit;
}

@end

@implementation ViewController

- (void)viewDidLoad {
    [super viewDidLoad];
    //First build the struct needed to create the Unit
    AudioComponentDescription ioUnitDescription;
    ioUnitDescription.componentType = kAudioUnitType_Output;
    ioUnitDescription.componentSubType = kAudioUnitSubType_RemoteIO;
    ioUnitDescription.componentManufacturer = kAudioUnitManufacturer_Apple;
    ioUnitDescription.componentFlags = 0;
    ioUnitDescription.componentFlagsMask = 0;

    //1 new
    NewAUGraph(&processingGraph);
    AUGraphAddNode(processingGraph, &ioUnitDescription, &ioNode);

    //2 open
    AUGraphOpen(processingGraph);

    //3 Get the AudioUnit from the corresponding Node
    AUGraphNodeInfo(processingGraph, ioNode, NULL, &ioUnit);

}
The second way is recommended because it’s more extensible.
Note: AUNode and AudioUnit must appear in pairs
As shown below: Remote I/O Unit
The microphone and speaker have corresponding enums in the Audio Unit.
The “monitor return” (耳返) used in live streaming does exactly this — it feeds the data captured by the microphone directly to the speaker, so you can hear the microphone in real time with low latency.
Live streaming generally uses theRemote I/Ounit to do the capturing
Using AudioUnit to connect to the speaker
1
2
3
4
5
6
OSStatus status = noErr;
UInt32 onFlag = 1;
UInt32 busZero = 0; //Element0  就是bus0
status = AudioUnitSetProperty(remoteIOUnit, kAudioOutputUnitProperty_EnableIO, kAudioUnitScope_Output, busZero, &onFlag, sizeof(onFlag));
CheckStatus(status, @"不能连接扬声器", YES);
Note: kAudioUnitScope_Output is the key for connecting to the speaker
Connecting the microphone
1
2
3
4
5
OSStatus status = noErr;
UInt32 busOne = 1; //Element1 就是bus1 接麦克风输入
UInt32 oneFlag = 1;
status =  AudioUnitSetProperty(remoteIOUnit, kAudioOutputUnitProperty_EnableIO, kAudioUnitScope_Input, busOne, &oneFlag, sizeof(oneFlag));
CheckStatus(status, @"不能连接麦克风", YES);
You can use the following code to debug each step when an error occurs.
1
2
3
4
5
6
7
8
9
10
11
12
13
14
15
16
17
static void CheckStatus(OSStatus status, NSString *message, BOOL fatal) {
    if (status != noErr) {
        char fourCC[16];
        *(UInt32 *)fourCC = CFSwapInt32HostToBig(status);
        fourCC[4] = '\0';
        if (isprint(fourCC[0]) && isprint(fourCC[1]) &&
            isprint(fourCC[2]) && isprint(fourCC[4])) {
            NSLog(@"%@:%s",message, fourCC);
        } else {
            NSLog(@"%@:%d",message, (int)status);
        }

        if (fatal) {
            exit(-1);
        }
    }
}
Since status prints a related number on every error, and you may not understand it, you can click OSStatus to look up the error code.
AVAudioMix
We generally use AVAudioMixer in the classes for capturing, recording, or editing audio/video.
For example: the flow of our voice changing implementation is roughly like this: AVAudioPlayer -> AVPlayerItem -> AVAudioMixer-> AUGraph -> AUNode + AudioUnit
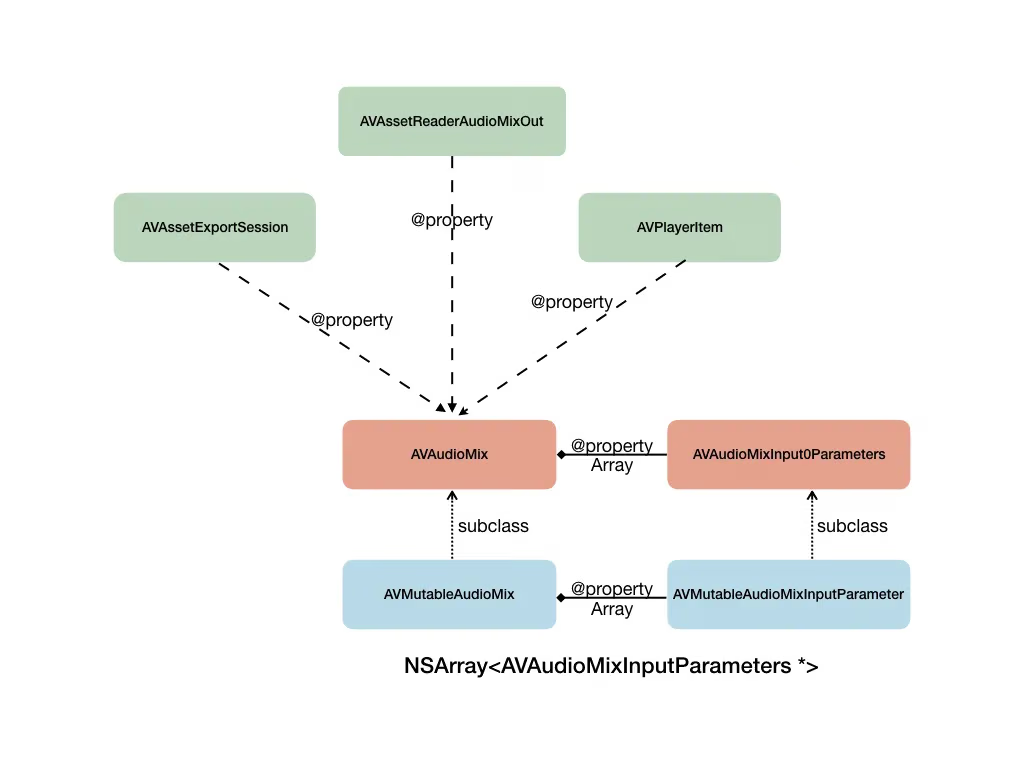
Configuring the microphone input parameters with AudioStreamBasicDescription
When we control the Remote IO Unit and want to tell the microphone the various input parameters, we can use a struct data description called ASBD to set them on the corresponding Unit.
Audio Stream Format describes the ASBD
1
2
3
4
5
6
7
8
9
10
11
12
UInt32 bytePerSample = sizeof(Float32);
AudioStreamBasicDescription asbd;
bzero(&asbd, sizeof(asbd));
asbd.mFormatID = kAudioFormatLinearPCM;
asbd.mSampleRate = 44100;
asbd.mChannelsPerFrame = channels;
asbd.mFramesPerPacket = 1;
asbd.mFormatFlags = kAudioFormatFlagsNativeFloatPacked | kAudioFormatFlagIsNonInterleaved;
asbd.mBitsPerChannel = 8 * bytePerSample;
asbd.mBytesPerFrame = bytePerSample;
asbd.mBytesPerPacket = bytePerSample;
The code above shows how to fill in the ASBD struct, which describes the specific format of the audio/video.
Below is a detailed introduction of what each parameter means:
- mFormatID is used to specify the encoding format, e.g. PCM
- mSampleRate the sample rate
- mChannelsPerFrame how many channels each Frame has
- mFramesPerPacket how many Frames each Packet has
- mFormatFlags this is the parameter that describes how the sound format is represented. In the code above, we specified that each sample is represented as a Float, somewhat similar to SInt16. If it’s followed by NonInterleaved, it means non-interleaved. For this audio, the left and right channels are stored non-interleaved. The actual audio data is stored in the mBuffers variable of an AudioBufferList struct. If mFormatFlags is set to NonInterleaved, the left channel goes into mBuffers[0] and the right channel goes into mBuffers[1].
- mBitsPerChannel indicates how many bits are used to represent one channel of audio data. Above we used Float, so this is assigned 8 multiplied by the number of bytes per sample.
- mBytesPerFrame and mBytesPerPacket — these two values are assigned according to the value of mFormatFlags. In the non-interleaved case, they are assigned bytePerSample (because the left and right channels are separate). But if it’s Interleaved, it should be bytePerSample * channels (because the left and right channels are stored interleaved). Only then can you represent how many bytes are in one Frame.
With all that said, how do we give this ASBD to the Unit?
The following code sets the ASBD on the corresponding Audio Unit:
1
AudioUnitSetProperty(remoteIOUnit, kAudioUnitProperty_StreamFormat, kAudioUnitScope_Output, 1, &asbd, sizeof(asbd));
Here’s the complete code:
1
2
3
4
5
6
7
8
9
10
11
12
13
14
15
16
17
18
19
//Set ASBD
AudioStreamBasicDescription inputFormat;
inputFormat.mSampleRate = 44100;
inputFormat.mFormatID = kAudioFormatLinearPCM;
inputFormat.mFormatFlags = kAudioFormatFlagIsSignedInteger | kAudioFormatFlagIsNonInterleaved;
inputFormat.mFramesPerPacket = 1;
inputFormat.mChannelsPerFrame = 1;
inputFormat.mBytesPerPacket = 2;
inputFormat.mBytesPerFrame = 2;
inputFormat.mBitsPerChannel = 16;
//Set it on the input side to configure what format the microphone output data is in
OSStatus status = noErr;
status = AudioUnitSetProperty(audioUnit,
                              kAudioUnitProperty_StreamFormat,
                              kAudioUnitScope_Output,
                              InputBus,
                              &inputFormat,
                              sizeof(inputFormat));
CheckStatus(status, @"AudioUnitGetProperty bus1 output ASBD error", YES);
Audio Unit Categories
1
2
3
4
5
6
7
8
9
10
11
12
CF_ENUM(UInt32) {
	kAudioUnitType_Output					= 'auou',
	kAudioUnitType_MusicDevice				= 'aumu',
	kAudioUnitType_MusicEffect				= 'aumf',
	kAudioUnitType_FormatConverter			= 'aufc',
	kAudioUnitType_Effect					= 'aufx',
	kAudioUnitType_Mixer					= 'aumx',
	kAudioUnitType_Panner					= 'aupn',
	kAudioUnitType_Generator				= 'augn',
	kAudioUnitType_OfflineEffect			= 'auol',
	kAudioUnitType_MIDIProcessor			= 'aumi'
};
| Category | Function/Role | Type |
|---|---|---|
| Effect Unit | Provides sound effect processing | kAudioUnitType_Effect |
| Mixer Units | Provides the ability to mix multiple audio tracks | kAudioUnitType_Mixer |
| I/O Units | I/O — captures audio and plays audio | kAudioUnitType_Output |
| AUConverter Units | Format conversion, e.g. converting the sample format from Float to SInt16, interleaved or deinterleaved, mono/stereo conversion | kAudioUnitType_FormatConverter |
| Generator Units | Provides player functionality | kAudioUnitType_Generator |
1
2
3
4
5
6
7
8
9
10
11
12
13
14
15
16
17
18
19
20
21
CF_ENUM(UInt32) {
	kAudioUnitSubType_PeakLimiter			= 'lmtr',
	kAudioUnitSubType_DynamicsProcessor		= 'dcmp',
	kAudioUnitSubType_LowPassFilter			= 'lpas',
	kAudioUnitSubType_HighPassFilter		= 'hpas',
	kAudioUnitSubType_BandPassFilter		= 'bpas',
	kAudioUnitSubType_HighShelfFilter		= 'hshf',
	kAudioUnitSubType_LowShelfFilter		= 'lshf',
	kAudioUnitSubType_ParametricEQ			= 'pmeq',
	kAudioUnitSubType_Distortion			= 'dist',
	kAudioUnitSubType_Delay					= 'dely',
	kAudioUnitSubType_SampleDelay			= 'sdly',
	kAudioUnitSubType_NBandEQ				= 'nbeq'
};


CF_ENUM(UInt32) {
	kAudioUnitSubType_Reverb2				= 'rvb2',
	kAudioUnitSubType_AUiPodEQ				= 'ipeq'
};
Effect Unit subtypes and their usage
| Subtype | Usage Description | Sub-enum Type |
|---|---|---|
| Equalizer | Boosts or attenuates the energy of certain frequency bands of the sound. The effect unit requires you to specify multiple frequency bands, then set a gain for each band, ultimately changing the sound’s energy distribution across the spectrum | kAudioUnitSubType_NBandEQ |
| Compressor | When the sound is too quiet or too loud, raises or lowers the sound energy by setting a threshold, e.g. attack time, release time, and threshold value, ultimately controlling the sound’s energy range in the time domain | kAudioUnitSubType_DynamicsProcessor |
| Reverb | Controls the sound effect through the delay of sound reflections | kAudioUnitSubType_Reverb2 |
The three most commonly used effects under Effect Unit are the ones above. High Pass, Low Pass, Band Pass, Delay, and Limiter are not used very often. If you’re familiar with them, feel free to give them a try.
Mixer Units subtypes and their usage
| Subtype | Usage Description | Sub-enum Type |
|---|---|---|
| 3D Mixer | Only supported on macOS | |
| MultiChannelMixer | Multi-track mixing effect unit. It can accept multiple audio inputs, separately adjust the gain and on/off of each track, and mix multiple tracks into one | kAudioUnitSubType_MultiChannelMixer |
I/O Units subtypes and their usage
| Subtype | Usage Description | Sub-enum Type |
|---|---|---|
| Remote I/O | Captures audio and plays audio. This is the Unit you use when working with the microphone and speaker in an Audio Unit | kAudioUnitType_Output |
| Generic Output | For offline processing, or when the AUGraph doesn’t want to drive the whole data flow with a speaker but with an output (which can go into an in-memory queue or disk I/O) | kAudioUnitSubType_GenericOutput |
AUConverter Units subtypes and their usage
| Subtype | Usage Description | Sub-enum Type |
|---|---|---|
| AUConverter | Format conversion. When some effects have strict requirements on the input audio format, or when we feed the audio data to other encoders for encoding… | kAudioUnitSubType_AUConverter |
| Time Pitch | Pitch/speed shifting effect that adjusts the pitch of the sound, e.g. the talking Tom cat | kAudioUnitSubType_NewTimePitch |
Note: if the PCM decoded by FFMpeg is in SInt16 format, it must be converted to Float32 before it can be used with the format converter effect unit.
Generator Units subtypes and their usage
| Subtype | Usage Description | Sub-enum Type |
|---|---|---|
| AudioFilePlayer | Receives raw PCM and plays it. You can generally use this together with Remote I/O to build a player | kAudioUnitSubType_AudioFilePlayer |
Related shell command: convert an audio file to pcm
1
ffmpeg -i test.mp3 -acodec pcm_s16le -f s16le output.pcm
brew install ffmpeg
Demo implementing monitor return (ear return)
Demo2 implementing monitor return + accompaniment playback
Below I’ll share some reverb effect code for voice changing
1
2
3
4
5
6
7
8
9
10
11
12
13
14
15
16
17
18
19
20
21
22
23
24
25
26
27
28
29
30
31
32
33
34
35
36
37
38
39
40
41
42
43
44
45
46
47
48
49
50
51
52
53
54
55
56
57
58
59
60
61
62
63
64
65
66
67
68
69
70
71
72
73
74
75
76
77
78
79
80
81
82
83
84
85
86
87
88
89
90
91
92
93
94
95
96
97
98
99
100
101
102
103
104
105
106
107
108
109
110
111
112
113
114
115
116
117
118
119
120
121
122
123
124
125
126
127
128
129
130
131
132
133
134
135

//Declaration part  .h
@interface KSYAudioReverbFilter : NSObject


-(instancetype)init;

- (void)setupWithAUGraph:(AUGraph)auGraph asbd:(const AudioStreamBasicDescription *)asbd maxFrame:(CMItemCount)max;

// Global, CrossFade, 0->100, 100
@property (nonatomic) double dryWetMix;
// Global, Decibels, -20->20, 0dB.
@property (nonatomic) double gain;
// Global, Secs, 0.0001->1.0, 0.008
@property (nonatomic) double minDelayTime;
// Global, Secs, 0.0001->1.0, 0.050
@property (nonatomic) double maxDelayTime;
// Global, Secs, 0.001->20.0, 1.0
@property (nonatomic) double decayTimeAt0Hz;
// Global, Secs, 0.001->20.0, 0.5
@property (nonatomic) double decayTimeAtNyquist;
// Global, Integer, 1->1000, 1
@property (nonatomic) double randomizeReflections;

@end


//Implementation part

//Common macro
#define RC_CHECK(rc, str) if (rc != noErr) \
{ \
NSLog(@"Err :%@ %@ %@", @(rc), str, @(__func__)); \
}

@implementation KSYAudioReverbFilter

-(instancetype)init{
    self = [super init];
    if (self){
        self.acDes = (AudioComponentDescription){kAudioUnitType_Effect, kAudioUnitSubType_Reverb2, kAudioUnitManufacturer_Apple, 0, 0};
    }

    return self;
}

- (void)setupWithAUGraph:(AUGraph)auGraph asbd:(const AudioStreamBasicDescription *)asbd maxFrame:(CMItemCount)maxFrame
{
    //
    OSStatus status = noErr;
    NSAssert(auGraph != nil, @"auGraph is null");
    audioGraph = auGraph;
    NSLog(@"setup :%@", NSStringFromCode(_acDes.componentSubType));
    status = AUGraphAddNode(auGraph, &_acDes, &_node);

    if (noErr != status){

        NSString *error = [NSString stringWithFormat:@"add node with type %u failed", _acDes.componentType];
        NSLog(@"%@", error);
        return ;
    }
    status = AUGraphNodeInfo(auGraph, _node, NULL, &_audioUnit);
    if (noErr != status){
        NSLog(@"create audiouinit failed err:%@", @(status));
        return ;
    }

    RC_CHECK(AudioUnitSetProperty(_audioUnit,
                                  kAudioUnitProperty_StreamFormat,
                                  kAudioUnitScope_Input, 0, asbd, sizeof(AudioStreamBasicDescription)),
             @"kAudioUnitProperty_StreamFormat kAudioUnitScope_Input err");

    RC_CHECK(AudioUnitSetProperty(_audioUnit,
                                  kAudioUnitProperty_StreamFormat,
                                  kAudioUnitScope_Output, 0, asbd, sizeof(AudioStreamBasicDescription)),
             @"kAudioUnitProperty_StreamFormat kAudioUnitScope_Output err");

    // Set audio unit maximum frames per slice to max frames.
    RC_CHECK(AudioUnitSetProperty(_audioUnit,
                                  kAudioUnitProperty_MaximumFramesPerSlice,
                                  kAudioUnitScope_Global, 0, &maxFrame, (UInt32)sizeof(UInt32)),
             @"set kAudioUnitProperty_MaximumFramesPerSlice err");
}

#pragma mark - Setters

- (void)setDryWetMix:(double)dryWetMix
{
    [self setGlobalParam:kReverb2Param_DryWetMix value:dryWetMix];
}

- (void)setGain:(double)gain
{
    [self setGlobalParam:kReverb2Param_Gain value:gain];
}

- (void)setMinDelayTime:(double)minDelayTime
{
    [self setGlobalParam:kReverb2Param_MinDelayTime value:minDelayTime];
}

- (void)setMaxDelayTime:(double)maxDelayTime
{
    [self setGlobalParam:kReverb2Param_MaxDelayTime value:maxDelayTime];
}

- (void)setDecayTimeAt0Hz:(double)decayTimeAt0Hz
{
    [self setGlobalParam:kReverb2Param_DecayTimeAt0Hz value:decayTimeAt0Hz];
}

- (void)setDecayTimeAtNyquist:(double)decayTimeAtNyquist
{
    [self setGlobalParam:kReverb2Param_DecayTimeAtNyquist value:decayTimeAtNyquist];
}

- (void)setRandomizeReflections:(double)randomizeReflections
{
    [self setGlobalParam:kReverb2Param_RandomizeReflections value:randomizeReflections];
}

//Common method
- (void)setGlobalParam:(AudioUnitParameterID)paramId value:(AudioUnitParameterValue)value
{

    RC_CHECK(AudioUnitSetParameter(_audioUnit,
                                   paramId,
                                   kAudioUnitScope_Global, 0, value, 0),
             ([NSString stringWithFormat:@"set %u value %f err", paramId, value]));
}

@end
The external call looks like this:
1
2
3
4
5
6
7
8
9
AURenderCallbackStruct renderCallbackStruct;
renderCallbackStruct.inputProc = ksyme_RenderCallback;
renderCallbackStruct.inputProcRefCon = (void *)self.apt;

if (!_reverbFilter){
    _reverbFilter = [[KSYAudioReverbFilter alloc] init];
    [_reverbFilter setupWithAUGraph:auGraph asbd:format maxFrame:max];
    _reverbFilter.renderCallBack = renderCallbackStruct;
}
Connecting Nodes
1
2
3
4
5
6
7
8
9
AUGraphClearConnections(auGraph);
NSMutableArray *array = [[NSMutableArray alloc] init];
[array addObject:@(_mixFilter.node)];

[array addObjectsFromArray:@[@(_reverbFilter.node),@(_delayFilter.node),@(_pitchFilter.node)]];
for (int i = 0; i < array.count -1; i++) {
    AUGraphConnectNodeInput(auGraph,[array[i] intValue], 0,[array[i+1] intValue], 0);
}
The core code is how to connect Nodes
1
AUGraphConnectNodeInput(auGraph,reverbNode, 0, remoteIONode, 0)
0 stands for bus0
The system-defined API looks like this:
1
2
3
4
5
6
extern OSStatus
AUGraphConnectNodeInput(	AUGraph			inGraph,
						AUNode			inSourceNode,
						UInt32			inSourceOutputNumber,
						AUNode			inDestNode,
						UInt32			inDestInputNumber)		__OSX_AVAILABLE_STARTING(__MAC_10_0,__IPHONE_2_0);
Summary
There are quite a lot of learning points in Audio Unit related technologies. Master them flexibly and apply them as needed. If you don’t understand something, that’s fine — start from the simple Units and learn as you go.
End of article
Reference list:
iOS Audio related terms (Glossary)
Reference
How to make your own Audio Unit
Kingsoft Cloud live streaming audio effects implementation
Audio Unit official documentation