
Preface
This article carries strong personal sentiment. If it makes you uncomfortable, please close it as soon as possible. This article is only for personal study records. Reprinting or sharing within the scope of the license is also welcome. Please respect the copyright and keep the original link. Thank you for your understanding and cooperation. If you find this site helpful, you can subscribe via RSS. Thanks for your support!
The SwiftUI Course
I’ve been persisting in learning SwiftUI recently. Over the weekend, when I had free time, I finished Chapter 4. What I mean by “watching” is hands-on practice plus tutorial study. Let me record some content that’s easy to forget.
Main Contents
- Handling the TabBar transparency issue
- Handling unit formatting issues
The TabBar Transparency Issue
After building various UIs with SwiftUI, I found that the TabBar view was being obscured,
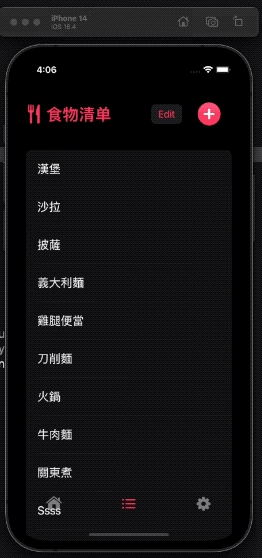
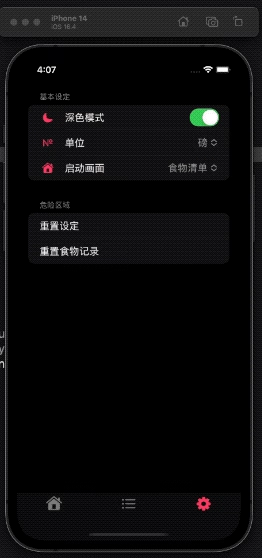
and you need to use the following function applyTabbarBackground() when the app launches.
import SwiftUI

@main
struct AppEntry: App {
    init() {
        applyTabbarBackground()
    }

    var body: some Scene {
        WindowGroup {
            HomeScreen()
        }
    }

    func applyTabbarBackground() {
        let tabbarAppearence = UITabBarAppearance()
        tabbarAppearence.configureWithTransparentBackground()
        tabbarAppearence.backgroundColor = .secondarySystemBackground.withAlphaComponent(0.3)
        tabbarAppearence.backgroundEffect = UIBlurEffect(style: .systemChromeMaterial)
        UITabBar.appearance().scrollEdgeAppearance = tabbarAppearence
    }
}
Handling Unit Formatting Issues
The iOS system provides an internationalized unit class, Measurement, to handle units like grams, g, pounds, etc.
1
2
3
4
5
6
7
var desciption : String {
        let preferredUnit = Unit.getPreferredUnit(from: store)
        let measureMent = Measurement(value: wrappedValue, unit: unit.dimension)
        let converted = measureMent.converted(to: preferredUnit.dimension)
//        return converted.formatted(.measurement(width: .abbreviated, usage: .asProvided, numberFormatStyle: .number.precision(.fractionLength(0...1))))
        return converted.value.formatted(.number.precision(.fractionLength(0...1))) + " " + preferredUnit.localizedSymbol
    }
Here I recommend checking out the official WWDC20 video Formatters: Make data human-friendly
The video introduces tools that can format data such as dates, units, numbers, and text according to the user’s Locale.
Summary
Actually, Chapter 5 talks a lot about the high-level wrapping of property wrappers. I think the content is too long; rather than me writing it all out here, you’re better off watching the tutorial video yourself — the explanations are quite thorough.
Secondly, a large portion covers unit testing. Since I’m not too keen on writing unit tests myself, I’ll skip it directly…
I’ve been following this course and hope to gain something from it. Below are the course materials I’ve organized. Please take a look.
SwiftUI Introductory Course
Place the related files of SwiftUI 入門課程 here, along with related links and further reading for each chapter.
Chapter 1: Basic Introduction
Introduces the Xcode interface and the basic architecture of SwiftUI.
Related Links
- 1-1 Website showing phone versions and upgrade trends
- 1-3 Source of the plate image used
- 1-5 Website showing device information
- 1-5 Further reading on layout types
- If you’re coming from UIKit, you might ask where AppDelegate went. Pair it with this property wrapper. However, if you just need to do some operations at launch, doing them in the App’s init is enough; for screen transition-related events, use ScenePhase.
Chapter 2: Layout
Practice layout and basic code refactoring.
Related Links
- Several ways to center a view in SwiftUI
- Besides using @ViewBuilder with computed properties as shown in the video, you might also use it in init or closures.
Chapter 3: Property Wrappers
Introduces the commonly used property wrappers in SwiftUI: State, Binding, and Environment; practices creating lists and forms, and uses enums to organize code.
Related Links
- EnvironmentValues environment variables
- The “in a result builder, local variables are treated as the block being built” mentioned in the video — you can learn more in this evolution proposal. Under the section The result builder transform, you can learn how result builders judge different statements.
Chapter 4: Data Persistence
Introduces iOS’s native data persistence methods and the concept of encoding, and implements a settings screen that uses AppStorage to store Boolean, enum, and Array data.
Related Links
- Official data persistence documentation
- Modifiers that add Presentation
- The video mentions you can try to build your own AppStorage property wrapper. If interested, refer to this article by SwiftLee, but this is relatively advanced content — you’ll need basic Combine concepts and an understanding of ObservableObject and DynamicProperty.
- When using FileManager, you might need to know how to get file URLs.
Chapter 5: Testing
Introduces basic testing concepts, Xcode’s testing interface, implements a test, and uses Measurement for unit conversion and displaying localized unit strings according to the user’s Locale.
Related Links
- WWDC20: Localized formatting tools, the video introduces tools that can format data such as dates, units, numbers, and text according to the user’s Locale.
- WWDC19: Introduction to Testing, Test Plans, and CI/CD
- Understanding Locale — Locale doesn’t refer only to language, but combines language and region to provide more precise conventions. For example, even in the same English language, the order of writing dates still differs between countries.
- If your app doesn’t support other languages yet, Locale will be set to your project’s base language. For a detailed introduction, see this article, which also provides
methods for getting the user's preferred / currently used language. Before you do localization, you can try getting these values to force-modify the Locale.
- If your app doesn’t support other languages yet, Locale will be set to your project’s base language. For a detailed introduction, see this article, which also provides
- Adding a background color to the toolbar in iOS 16: the article focuses on the TabBar, but this
toolbarBackgroundmodifier can also modify the Navigation Bar. - You might notice that the TabBar looks different before iOS 14 🥲. If you want to unify it, you can refer to the code in this article to make the changes.
Chapter 6: Network Calls
Introduces basic networking concepts and further applications of Codable, and builds a new project that integrates The Cat API. The implementation of the new project includes:
- Creating a Manager dedicated to handling networking.
- Handling errors and showing alerts.
- Observing reference types using
ObservableObject. - Infinite Scroll that automatically loads more content.
- Understanding the difference between the
.taskmodifier and creating a newTask.
Related Links
- 6-2 Common HTTP status codes
- 6-2 MIME type name lookup
- 6-2 Flowchart for deciding whether to use cached data
- 6-3 The conditions for adding a response to the cache mentioned in the video
- 6-5 The website for quickly generating JSON parsing code used in the video. Remember, when using auto-generated code, always double-check it yourself, no matter how simple the data is.
- 6-8 StateObject documentation: this document briefly introduces the three property wrappers used with
ObservableObjectand their update timing. I suggest reading the init and update parts; come back to it when you encounter StateObject being initialized repeatedly or not updating as expected. - 6-8 If you have doubts about the difference between StateObject and ObservedObject, refer to onevcat’s this article.
- 6-11 The difference between onAppear and the task modifier. I think the differences mentioned in this article are all quite important; besides what’s mentioned in the video, it also covers using task with an id.
- 6-11 If you’re unsure about when to use
TaskandTask.detached, refer to the When to use unstructured tasks and When to use detached tasks sections of this article.Additionally, the mainstream approach nowadays is to avoid using detached — not because it’s bad, but because there’s no strong reason to use it (i.e., no need to make your code more complex). However, I personally feel that detached’s explicitness is very helpful for initially understanding what your code does, and the errors and warnings arising from its lack of inheritance are also helpful for early learning.
- 6-11 If you want to learn more about when
onAppearfires, check out this article on View lifecycle. - 6-11 As mentioned in the video, ObservableObject puts the entire View on the MainActor. This article explains in detail the mysterious @MainActor situation of View structs. Once again, I don’t think you need to worry too much about this; when you encounter this error, just move it into the MainActor.