
Preface
This post carries strong personal opinions; if reading it makes you uncomfortable, please close it right away. This article is only for my personal study notes. You’re welcome to repost or share it within the scope of the license — please respect the copyright and keep the original link. Thank you for your understanding and cooperation. If you find this site helpful, you can subscribe via RSS. Thanks for your support!
Demystifying AI Coding Agents: Build Your Own Agent with Swift
A Magic Trick That Isn’t Magic
AI coding agents feel like magic. You type a request, and they search files, write code, refactor functions, and seem to “know” what to do next. Amazing, right?
But here’s the secret: the concept is surprisingly simple.
I’ve always believed the best way to truly understand something is to build it yourself. That’s exactly what I did after reading Amp’s excellent article “How to Build an Agent”. I wanted to see if I could recreate that magic in Swift — and guess what? You absolutely can.
Today, we’ll build a real AI coding agent in Swift that can read files, list directories, and even edit code. No smoke, no mirrors. Just a loop, some tools, and an opinionated language model.
By the end of this article, you’ll know exactly how tools like Claude Code, Cursor, or GitHub Copilot Workspace work. Spoiler: it’s simpler than you think.
What Is an AI Coding Agent, Really?
An AI coding agent comes down to three things:
- A language model (like GPT-5, Claude, or Gemini)
- A set of tools it can call (functions that do the actual work)
- A loop that keeps the conversation going
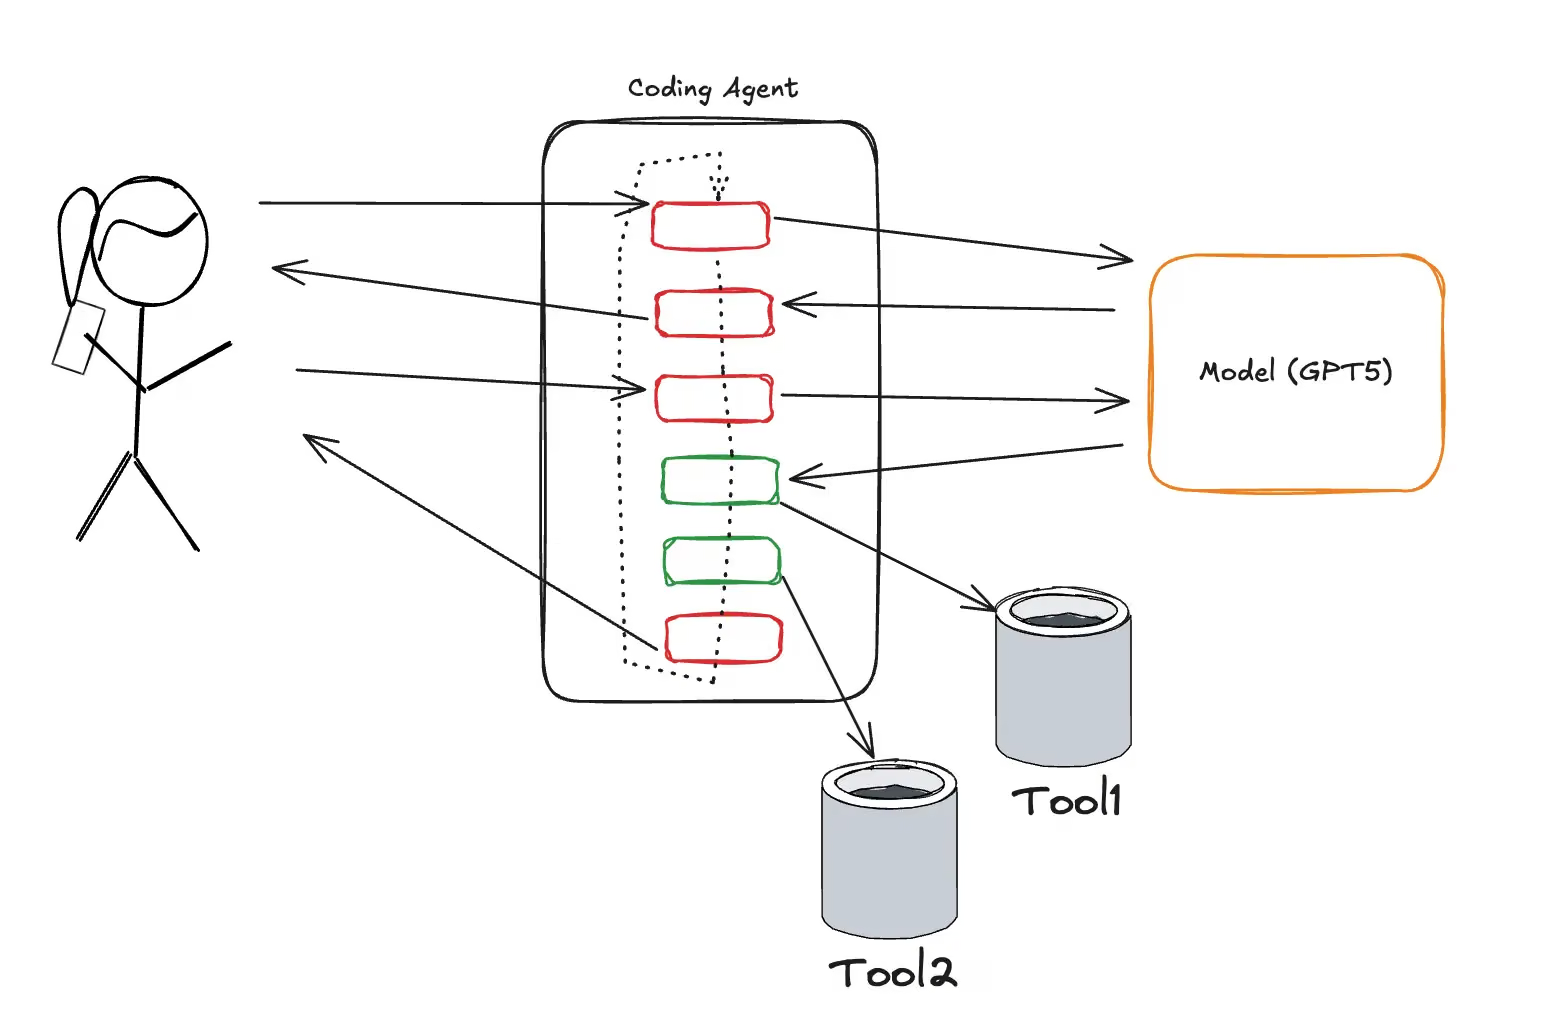
Think of it as having a brilliant scientist who can’t leave their office. You (the agent loop) keep asking them what to do next, they tell you, you go do it and report back, and they figure out the next step. Lather, rinse, repeat until the job is done.
The Context Window: Your Agent’s Working Memory
Here’s where things get interesting. Language models don’t actually “remember” previous conversations the way humans do. Every time you send a message, you’re sending the entire conversation history along with it.
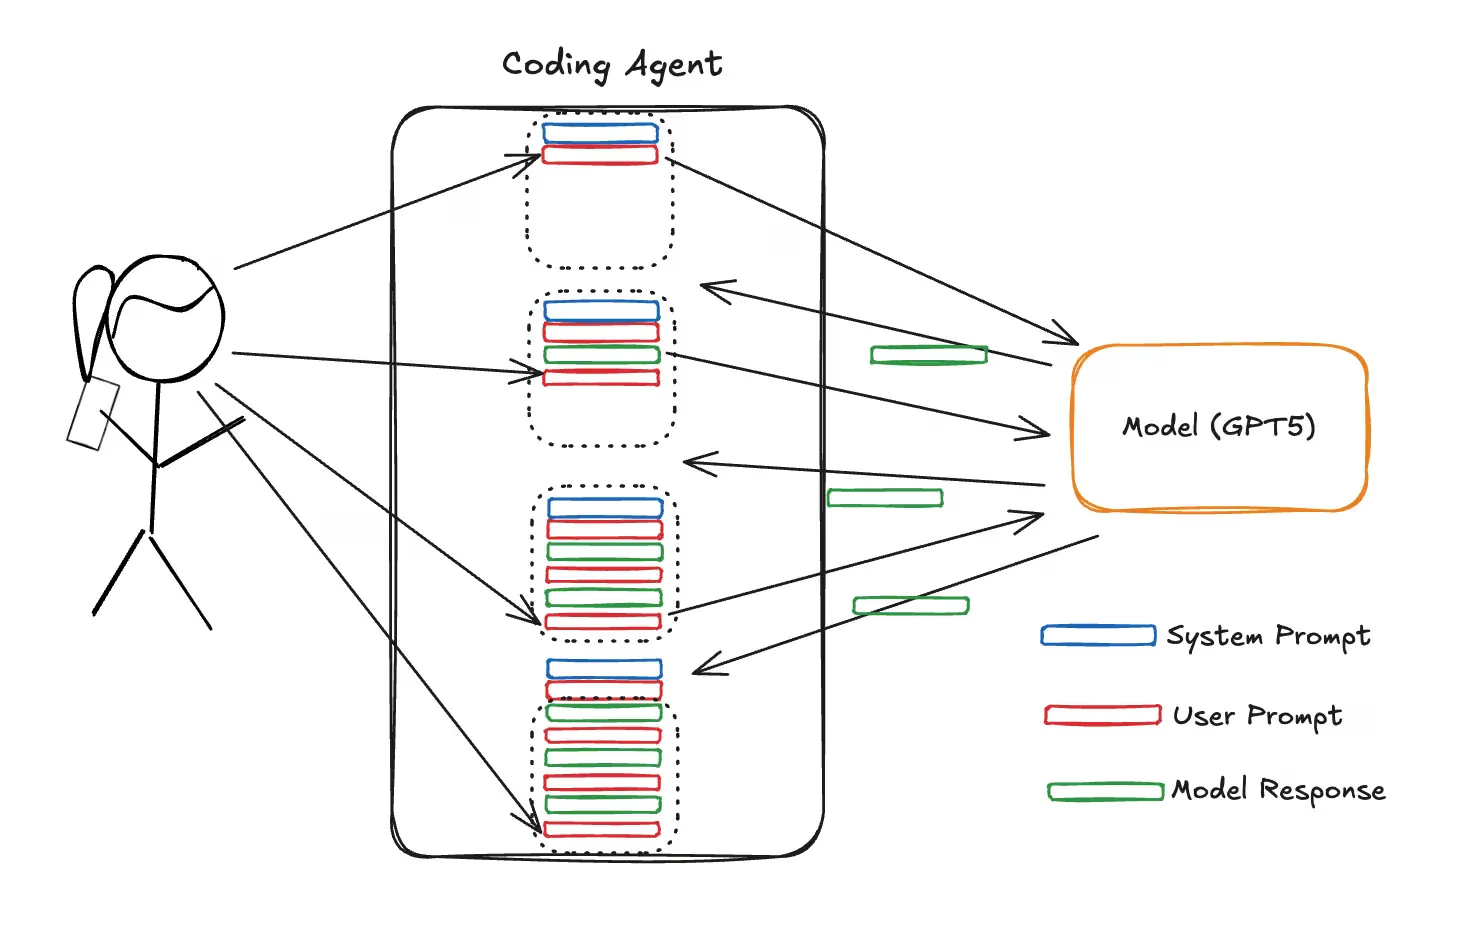
This “working memory” is called the context window. Modern models typically have context windows of 128K to 200K tokens (roughly 100,000–150,000 words).
Why does this matter?
Because the longer your agent runs:
- Every file it reads gets added to the history.
- Every tool call and result takes up space.
- The model has more and more text to process each time.
- Eventually, you hit the limit.
When the context fills up, three things happen:
- Performance degrades, because the model struggles to “pay attention” to everything.
- Costs skyrocket, because you’re paying per token, remember?
- You hit a hard limit, and the API simply rejects your request.
That’s why production agents use clever tricks like summarization, selective memory, and context pruning. But for our learning journey, we’ll keep it simple.
The Game Plan: Five Steps to Agent Enlightenment
We’re going to build Nimbo, a Swift-based coding agent that can help you work with files. Here’s our roadmap:
- The basics: Set up a basic chat loop.
- Teaching tools: Define what our agent can do.
- Tool execution: Make those tools actually work.
- The loop: Wire everything together.
- The finish line: Handle edge cases and errors.
All the code we discuss is in the Nimbo repository. Feel free to clone it and follow along!
Step 1: The Basics (Building the Chat Loop)
Every agent needs a conversation loop. In our case, we’re building a CLI tool that feels like chatting with a helpful assistant.
Here’s the core structure from main.swift:
1
2
3
4
5
6
7
8
9
10
11
12
13
14
15
// main.swift
private func runLoop() async {
    print("\nChat with Nimbo (use 'ctrl-c' to quit)\n")

    let agent = Agent(
        apiKey: apiKey,
        system: "You are Nimbo, a concise CLI assistant."
    )

    while let line = input() {
        if line.isEmpty { continue }
        let answer = await agent.respond(line)
        print("\(display("Nimbo", in: .green)): \(answer)")
    }
}
Simple, right? We:
- Create an agent with a system prompt.
- Get user input in a loop.
- Ask the agent to respond.
- Print the response.
The real magic happens inside the agent.respond() call. Let’s look under the hood.
The Agent class maintains the conversation history:
1
2
3
4
5
6
7
8
9
10
11
12
13
14
15
16
17
// Agent.swift
final class Agent {
    private let client: OpenAIService
    private var history: [ChatCompletionParameters.Message]
    private let tools: [Tool]

    init(apiKey: String, system: String) {
        client = OpenAIServiceFactory.service(apiKey: apiKey)
        history = [.init(role: .system, content: .text(system))]
        tools = [ListFiles(), ReadFile(), EditFile()]
    }

    func respond(_ text: String) async -> String {
        history.append(.init(role: .user, content: .text(text)))
        // ... 魔法发生在这里 ...
    }
}
Notice that history array? That’s our context window filling up. Every message (yours, the model’s, and tool results) gets appended to it.
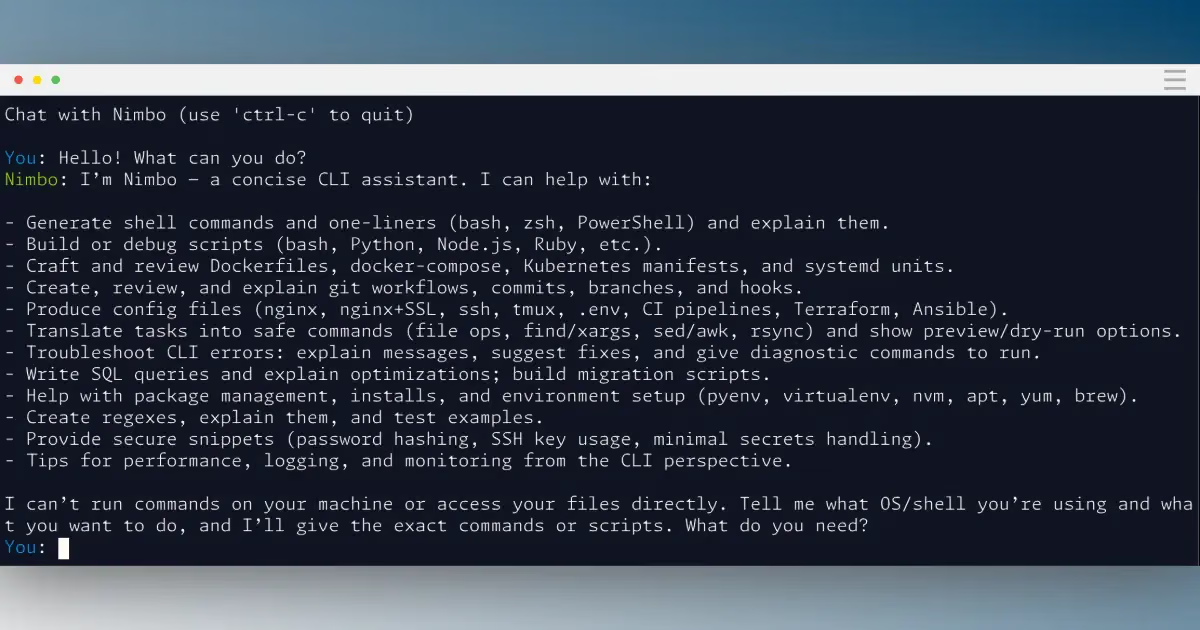
What We Have So Far
At this point, we have a basic chat loop, but no tools yet. The agent can only converse. It can’t actually do anything to files.
Step 2: Teaching Tools (Defining Capabilities)
Tools are just functions with fancy descriptions. The LLM doesn’t actually execute code; it just tells us which tool to call and with what arguments.
In Swift, we define tools using a protocol (Tool.swift):
1
2
3
4
5
6
// Tool.swift
protocol Tool {
    var name: String { get }
    var chatTool: ChatCompletionParameters.Tool { get }
    var exec: (Data?) -> String { get }
}
Let’s look at a concrete example, the ReadFile tool:
1
2
3
4
5
6
7
8
9
10
11
12
13
14
15
16
17
18
19
20
21
22
23
24
25
26
27
28
29
// ReadFile.swift
struct ReadFile: Tool {
    var name = "read_file"

    var chatTool: ChatCompletionParameters.Tool = {
        let schema = JSONSchema(
            type: .object,
            properties: ["path": JSONSchema(type: .string)]
        )

        let function = ChatCompletionParameters.ChatFunction(
            name: "read_file",
            description: """
                读取给定相对文件路径的内容。
                当你想查看文件内部内容时使用此工具。
                """,
            parameters: schema
        )

        return .init(function: function)
    }()

    var exec: (Data?) -> String = { input in
        guard let path = input.asPath(defaultPath: nil) else {
            return "<error> 无效的 JSON 参数"
        }
        return ReadFile.readFile(atPath: path)
    }
}
Three key parts:
- Name: the tool’s name.
- Description: the instructions to the LLM about when to use it.
- Exec: the Swift function that does the actual work.
The LLM sees the description and decides, “Oh, the user wants to look at a file. I should call read_file with path foo.txt!”
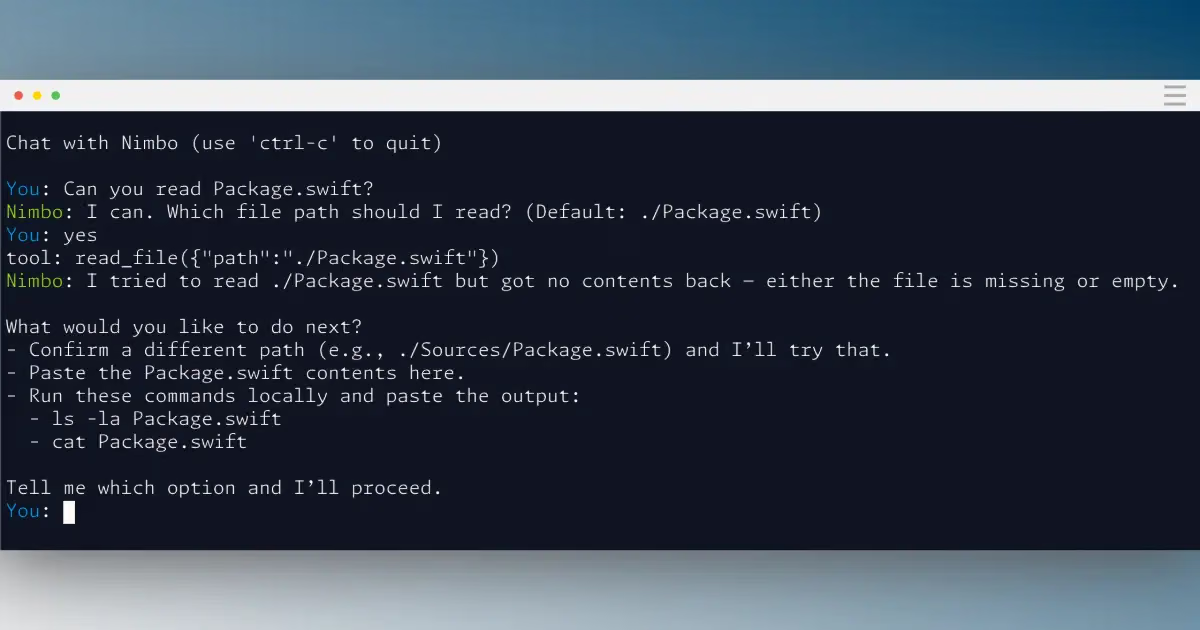
What We Have So Far
Now we’ve defined our tools! The agent knows which tools exist and when to use them, but it still can’t execute them. If you ask it to read a file, it will try to call the tool, but nothing will happen yet.
Step 3: Tool Execution (Making Them Work)
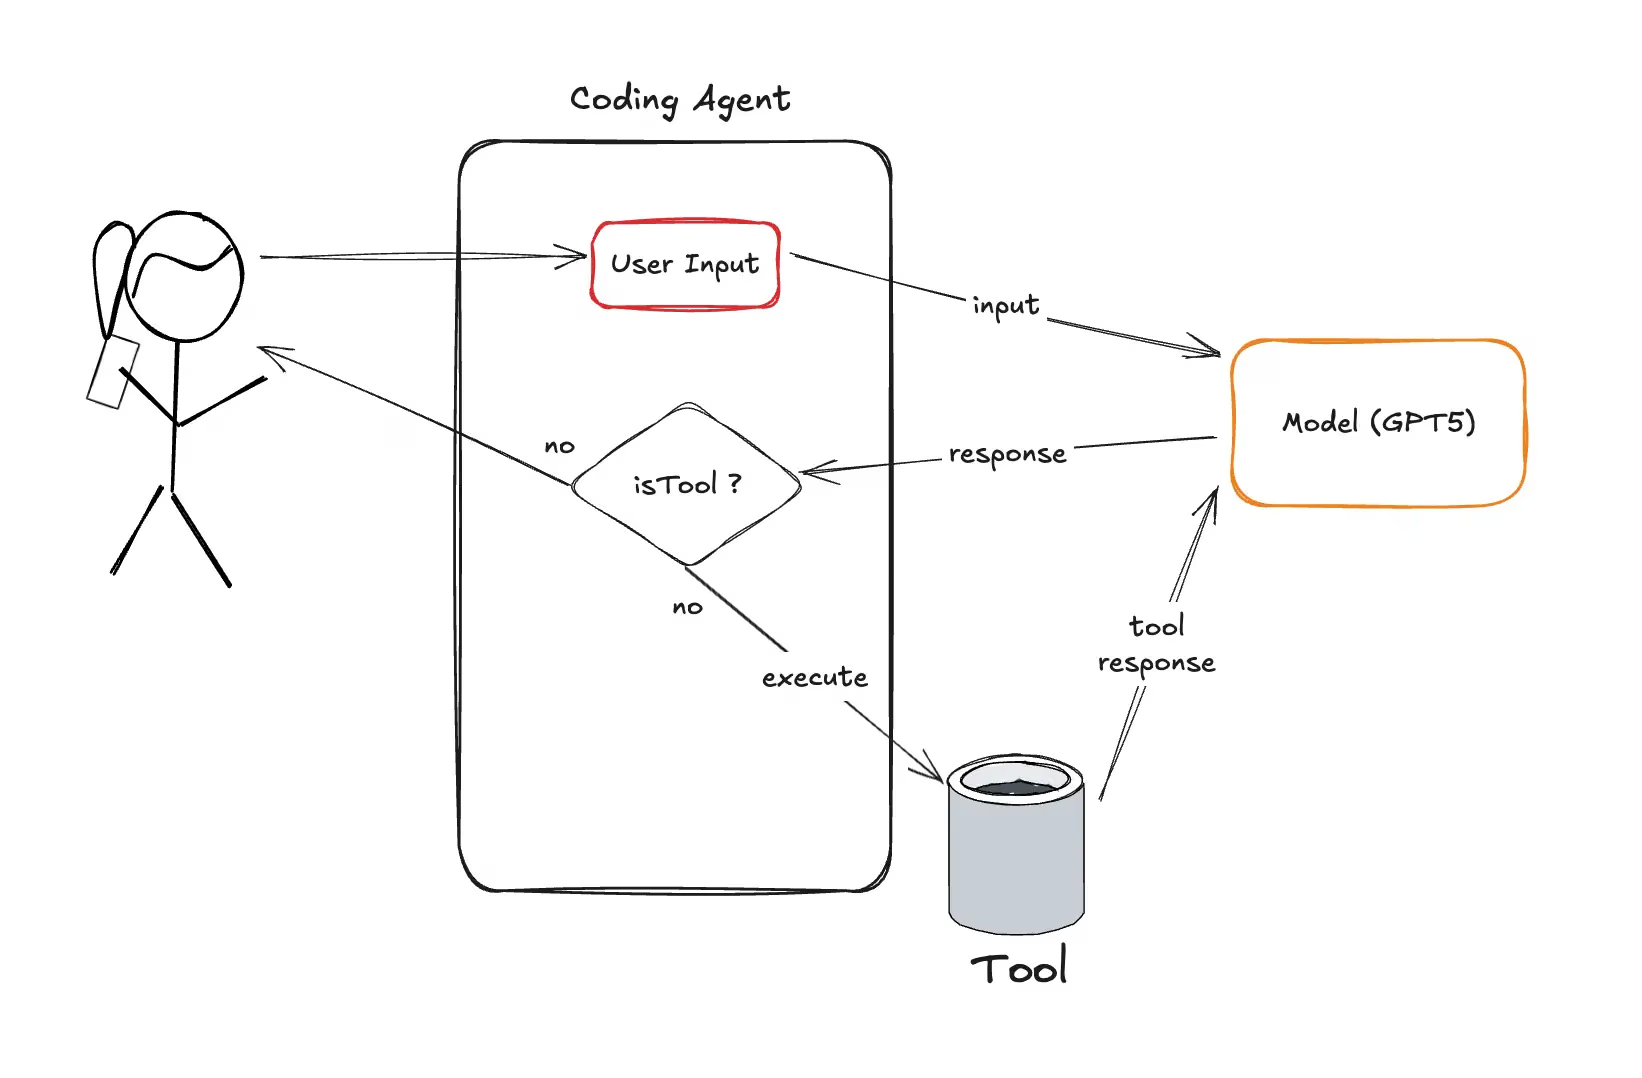
Here’s where things get interesting. When the model responds, it might:
- Return a text answer (we’re done!).
- Request one or more tool calls (continue!).
Our agent needs to detect tool calls and execute them (Agent.swift):
1
2
3
4
5
6
7
8
9
10
11
12
13
14
15
16
17
18
19
20
21
22
23
24
25
// Agent.swift
func respond(_ text: String) async -> String {
    history.append(.init(role: .user, content: .text(text)))

    do {
        for _ in 0..<Agent.maxToolIterations {
            let response = try await requestCompletion()
            let assistantMessage = try firstAssistantMessage(from: response)
            appendAssistantMessage(assistantMessage)

            // 检查模型是否想使用工具
            if let calls = assistantMessage.toolCalls, !calls.isEmpty {
                executeToolCalls(calls)
                continue  // 循环回去再次询问模型
            }

            // 没有请求工具,我们有答案了!
            return assistantMessage.content ?? ""
        }

        throw AgentError.toolIterationLimitReached
    } catch {
        return "<error> \(error.localizedDescription)"
    }
}
Notice the maxToolIterations constant? That’s our safety net. Without it, the agent could theoretically loop forever.
The executeToolCalls method is simple:
1
2
3
4
5
6
7
8
9
10
11
12
13
14
15
16
17
18
19
20
21
22
23
24
// Agent.swift
private func executeToolCalls(_ calls: [ToolCall]) {
    for call in calls {
        let toolMessage = perform(call)
        history.append(toolMessage)  // 将结果添加到历史记录!
    }
}

private func perform(_ call: ToolCall) -> ChatCompletionParameters.Message {
    let toolName = call.function.name ?? "<nil>"
    let rawArgs = call.function.arguments

    print("tool: \(toolName)(\(rawArgs))")

    let result = {
        if let tool = tools.first(where: { $0.name == toolName }) {
            return tool.exec(rawArgs.data(using: .utf8))
        } else {
            return "<error> 未知工具: \(toolName)"
        }
    }()

    return .init(role: .tool, content: .text(result), toolCallID: call.id)
}
We:
- Look up the matching tool by name.
- Execute it with the provided arguments.
- Package the result as a message.
- Add it to the history.
The model sees this result in the next iteration and can decide what to do next.
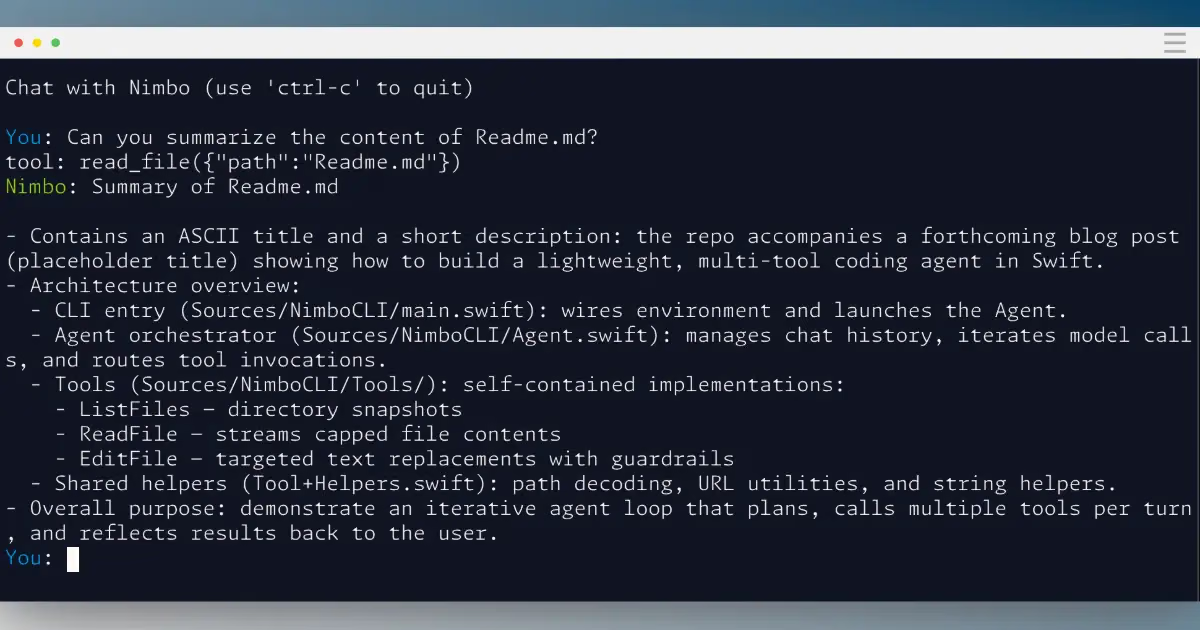
What We Have So Far
Now the agent can execute a single tool! It can call read_file or list_files and actually get results. But it stops there. It can’t yet chain multiple tools together.
The Other Tools: ListFiles and EditFile
Following the same pattern as ReadFile, Nimbo includes two more essential tools, rounding out its capabilities:
ListFiles — navigating the directory structure:
1
2
3
4
5
6
7
8
9
10
11
12
13
14
15
16
17
18
19
20
21
22
// ListFiles.swift
struct ListFiles: Tool {
    var name = "list_files"

    var chatTool: ChatCompletionParameters.Tool = {
        let function = ChatCompletionParameters.ChatFunction(
            name: "list_files",
            description: """
                列出给定相对路径下的文件和目录。
                当你需要检查项目结构时使用此工具。
                当没有提供路径时,默认为当前工作目录。
                """,
            parameters: schema
        )
        return .init(function: function)
    }()

    var exec: (Data?) -> String = { input in
        let path = input.asPath(defaultPath: ".")
        return ListFiles.listDirectory(atPath: path.asURL)
    }
}
This tool limits results to 200 entries to prevent overloading the context window. When a directory has more files, it shows a truncated list with a count of the remaining items.
EditFile — making precise changes to files:
1
2
3
4
5
6
7
8
9
10
11
12
13
14
15
16
17
18
19
20
21
22
// EditFile.swift
struct EditFile: Tool {
    var name = "edit_file"

    var chatTool: ChatCompletionParameters.Tool = {
        let function = ChatCompletionParameters.ChatFunction(
            name: "edit_file",
            description: """
                通过将 `old_str` 的精确匹配替换为 `new_str` 来编辑文本文件。
                替换必须是唯一的,`old_str` 必须与 `new_str` 不同。
                当文件不存在且 `old_str` 为空时创建文件。
                """,
            parameters: schema  // 期望:path, old_str, new_str
        )
        return .init(function: function)
    }()

    var exec: (Data?) -> String = { data in
        let arguments = try? JSONDecoder().decode(Arguments.self, from: data)
        return EditFile.process(arguments)
    }
}
The EditFile tool is clever. It:
- Creates new files when
old_stris empty. - Updates existing files by replacing exact matches.
- Validates uniqueness —
old_strmust match exactly once in the file. - Prevents accidents —
old_strandnew_strmust be different.
This design forces the agent to be precise. It can’t make fuzzy edits or accidentally replace the wrong text. If a pattern matches multiple times, the tool returns an error asking the model to be more specific.
These three tools (ListFiles, ReadFile, EditFile) together give the agent everything it needs to explore and modify a codebase. The model decides which tools to use and in what order. All we did was describe what they do.
Step 4: Keeping the Conversation Going
Remember our context window discussion? Every tool call adds to it:
1
2
3
4
5
6
7
8
9
10
11
用户:"你能检查一下 src 文件夹里有什么吗?"
→ 历史记录增加 1 条消息

代理:(调用 list_files 工具)
→ 历史记录增加 1 条消息(工具调用)

工具结果:[长文件列表]
→ 历史记录增加 1 条消息(结果)

代理:"当然!src 文件夹包含..."
→ 历史记录增加 1 条消息(响应)
Four messages for a single request! Now imagine:
- Reading a 500-line file.
- Editing multiple files.
- Running back and forth 20 times.
Your context window fills up fast. That’s why the ReadFile tool caps file contents at 100KB:
1
2
3
4
let capped = fileData.prefix(100_000)
if let text = String(data: capped, encoding: .utf8) {
    return text
}
It’s a balance: give the model enough context to be useful, but not so much that we blow the budget or hit the limit.
Step 5: Putting It All Together
Let’s trace a real interaction to see how everything connects:
User input: "Create a hello.txt file with the content 'Hello, Nimbo!'"
- Input added to history —
history.append(userMessage) - Agent calls the LLM — sending the entire history along with the tool definitions.
- LLM responds — “I’ll use the
edit_filetool.” - Agent executes the tool — creating the file.
- Tool result added to history —
"<success> file created" - Agent calls the LLM again — with the updated history.
- LLM responds — “Done! I created hello.txt with your message.”
- User sees the response — task complete!
Here’s the most beautiful part: you never taught the model when to use which tool. You just described what each tool does, and it figured out the right sequence on its own.
This emergent behavior is what makes agents feel magical. The model chains tools together, handles errors, and adjusts its strategy — all from natural language descriptions.
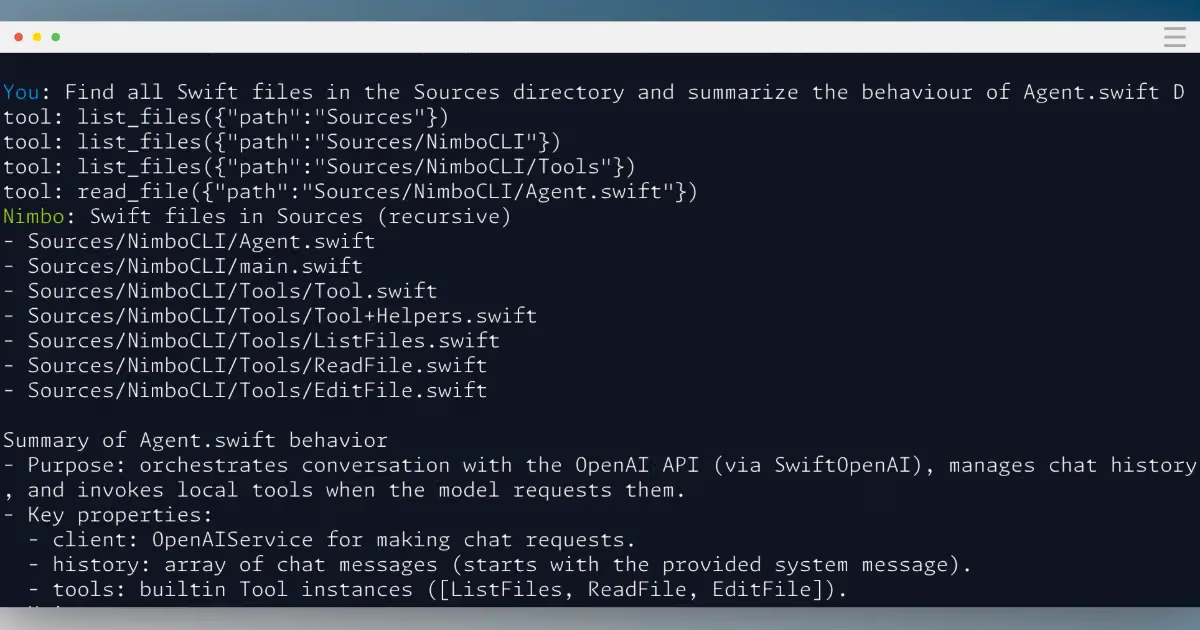
What We Have Now: A Complete Agent!
At this point, we have a fully functional agent. It can:
- Chat with the user.
- Understand when to use tools.
- Execute tools and get results.
- Chain multiple tool calls together.
- Loop until the task is complete.
Practical Considerations
Our Nimbo agent is educational, but production agents need more polish.
Safety First
1
private static let maxToolIterations = 8
We cap iterations to prevent infinite loops. Production systems use more sophisticated safeguards:
- Token budgets per conversation.
- Rate limiting on tool calls.
- Sandboxing for dangerous operations.
Error Handling
Notice how our tools return <error> strings? The model can actually read those and adjust:
1
return "<error> 无法读取路径下的文件: \(path)"
The LLM sees this and might try a different path or ask the user for clarification.
Context Management
Production agents employ techniques like:
- Summarization — compressing older messages.
- Selective forgetting — dropping less important context.
- RAG (Retrieval-Augmented Generation) — storing context in a database and retrieving only what’s needed.
Let’s See It in Action
Want to run Nimbo? Here’s how:
1
2
3
4
git clone https://github.com/gscalzo/Nimbo.git
cd Nimbo
export OPENAI_API_KEY="your-key-here"
swift run
Now let’s look at a real example of how the agent chains tools together.
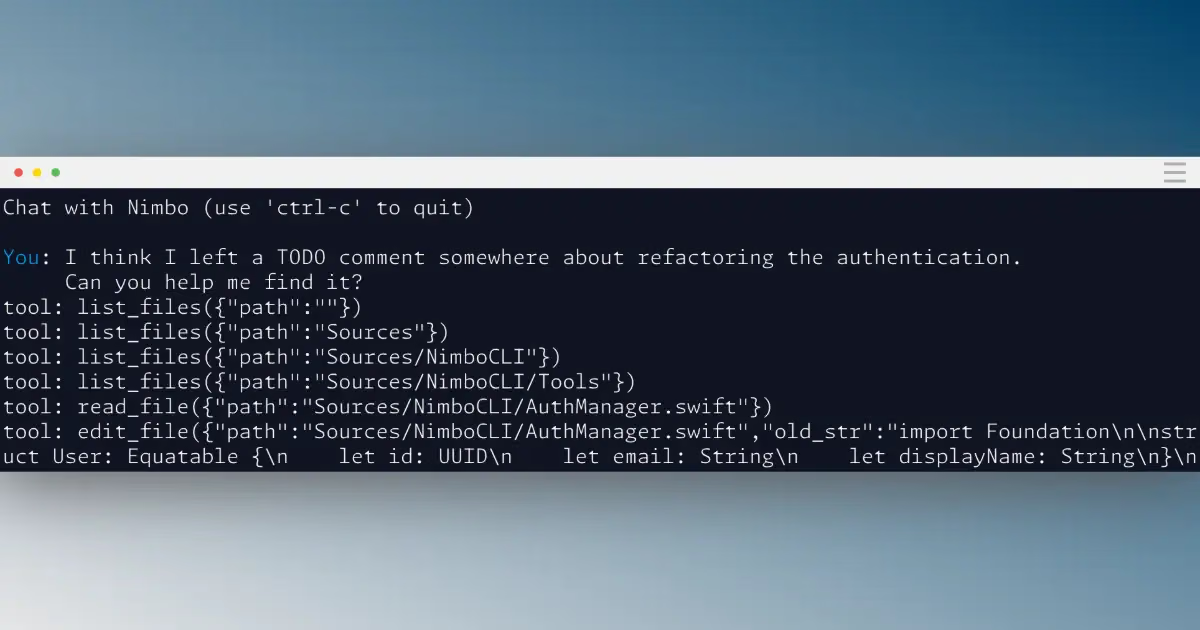
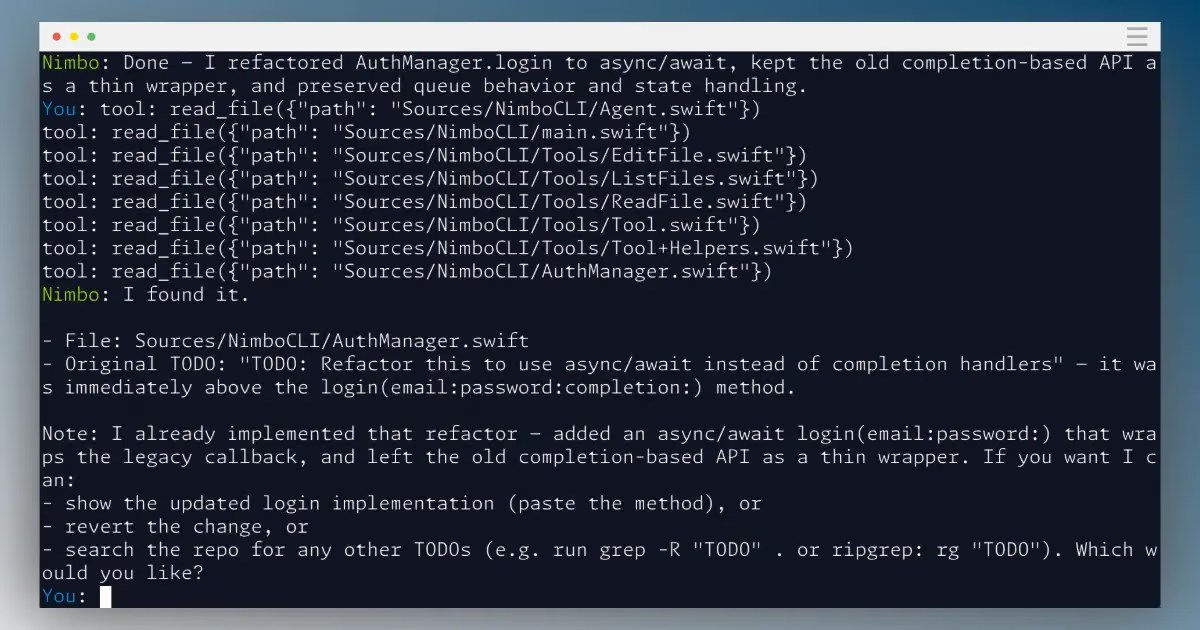
Example 1: The Curious Case of the Missing TODO
Let’s ask our agent to help us find something in a messy project:
1
2
3
4
5
6
7
8
9
10
11
12
13
14
15
16
17
18
19
20
21
22
23
24
25
26
27
28
29
30
31
32
你:我想我在某个地方留下了一个关于重构身份验证的 TODO 注释。
    你能帮我找到它吗?

tool: list_files({"path": "."})

Nimbo:我将搜索你的 Swift 文件。让我检查 Sources 目录。

tool: list_files({"path": "Sources"})

tool: read_file({"path": "Sources/AuthManager.swift"})

Nimbo:找到了!在 AuthManager.swift 的第 42 行:

      // TODO: 重构此代码以使用 async/await 而不是完成处理程序
      func login(email: String, password: String, completion: @escaping (Result<User, Error>) -> Void) {
          // ... 旧式回调代码 ...
      }

      看起来你想将其现代化以使用 Swift 并发。想让我
      创建一个使用 async/await 的新版本吗?

你:是的,请!给我看看那会是什么样子。

tool: edit_file({"path": "AuthManager_v2.swift", "old_content": "", "new_content": "..."})

Nimbo:完成!我创建了带有现代化版本的 AuthManager_v2.swift:

      func login(email: String, password: String) async throws -> User {
          // ... 干净的 async/await 代码 ...
      }

      干净多了!不再有回调地狱。
Notice what happened? The agent:
- Understood vague intent: “a TODO about authentication” is pretty vague.
- Explored systematically: listing directories, then files.
- Actually read the code: found the specific TODO comment.
- Provided value: suggested creating a refactored version.
- Executed creatively: proactively wrote modern Swift code.
The agent didn’t just find text. It understood the context and anticipated your next need.
Example 2: Building a Fun Game
Now for something fun — let’s ask it to create something from scratch:
1
2
3
4
5
6
7
8
9
10
11
12
13
14
15
16
17
18
19
20
21
22
23
24
25
26
27
28
29
30
31
32
33
34
35
36
37
38
39
40
41
42
43
你:创建一个命令行游戏,让我猜一个随机表情符号。
    让它有趣一点!

tool: edit_file({"path": "EmojiGuesser.swift", "old_content": "", "new_content": "..."})

Nimbo:创建了 EmojiGuesser.swift!这是你的游戏:

      import Foundation

      let emojiSet = ["🎸", "🦖", "🌮", "🚀", "🎨", "🎪", "🦄", "🌈"]

      func playEmojiGame() {
          let secret = emojiSet.randomElement()!
          print("🎮 我在想这个集合中的一个表情符号: \(emojiSet.joined())")
          print("你能猜出是哪一个吗?输入它!")

          while let guess = readLine() {
              if guess == secret {
                  print("🎉 是的!你找到了!你是表情符号低语者!")
                  break
              } else if emojiSet.contains(guess) {
                  print("❌ 不对!再试一次,侦探!")
              } else {
                  print("🤔 那甚至不在集合中!从这里选择: \(emojiSet.joined())")
              }
          }
      }

      playEmojiGame()

      尝试运行它:swift EmojiGuesser.swift

你:这很有趣,但你能在 3 次错误猜测后添加一个提示系统吗?

tool: read_file({"path": "EmojiGuesser.swift"})

tool: edit_file({"path": "EmojiGuesser.swift", "old_content": "...", "new_content": "..."})

Nimbo:更新了!现在在 3 次错误猜测后,它会给你一个提示,比如:
      "🕵️ 提示:它押韵... 开玩笑的,表情符号不押韵!
       但它以 🎯 类别开始:有趣!"

      游戏跟踪尝试次数并提供鼓励。好多了!
Even better — the agent:
- Got creative: added personality to the game without being asked.
- Made good choices: picked fun emojis, wrote playful strings.
- Understood iteration: read the existing file before modifying it.
- Applied edits correctly: replaced the old game logic with the enhanced version.
- Explained the improvements: told you what changed.
What This Tells Us
These examples demonstrate three key superpowers of AI agents:
- Tool chaining: the agent decides which tools to use and in what order.
- Context awareness: it remembers what it did (because it’s all in the history!).
- Creative reasoning: it doesn’t just execute commands; it thinks about what would make the outcome better.
The real magic? You didn’t program any of this logic. You just:
- Described what each tool does.
- Gave the agent access to them.
- Let the language model figure out the rest.
The Power of Simplicity
Here’s what we learned:
- Agents are loops: just keep asking the model “what’s next?”
- Tools are descriptions: the LLM chooses, you execute.
- Context is precious: every message costs tokens and attention.
- Emergent behavior is real: complex behavior arises from simple rules.
The entire Nimbo agent is under 300 lines of Swift. Yet it can:
- Navigate the file system.
- Read and modify files.
- Chain multiple operations together.
- Handle errors gracefully.
That’s the power of building on top of a language model. You’re not coding every possibility; you’re creating a space where the model can think and act.
What’s Next?
Now that you understand the basics, you can:
- Add more tools: web search, API calls, database queries.
- Improve context management: implement summarization or RAG.
- Build domain-specific agents: focused on your particular use case.
- Create agent networks: let multiple agents collaborate.
The code is all on GitHub. Fork it, break it, improve it.
Next time you use Claude Code or Cursor, you’ll know exactly what’s happening under the hood: a loop, some tools, and a very smart intern making decisions.
Further Reading
Want to go deeper? Check out:
- The complete Nimbo source code
- Anthropic’s guide to tool use
- OpenAI’s function calling documentation
Questions? Ideas? Reach out on Twitter or LinkedIn. I’d love to see what you build!
Original article: https://gioscalzo.com/blog/demystifying-ai-coding-agents-in-swift/
Author: Giordano Scalzo
Translator’s note: This article is translated from Giordano Scalzo’s blog post, introducing how to build an AI coding agent from scratch with Swift. Through this article, you’ll understand the core principles of AI agents and be able to build a fully functional agent system yourself.