
Preface
This article is highly personal in tone. If you find it uncomfortable to read, please close it as soon as possible. This article is only a personal learning record. Reposts and sharing are welcome within the scope of the license agreement. Please respect the copyright and keep the original link. Thank you for your understanding and cooperation. If you find this site helpful, you can subscribe via RSS. Thanks for your support!
Background
While studying Metal by Tutorials (4th edition, 2023) in 2024, I hit the chapter on using unsafe Swift pointers and interacting with C — mainly how to work with C data in memory. Below is the tutorial the book introduces. After working through it, I put together this write-up to digest the material.
In this tutorial, you’ll learn how to access memory directly through various pointer types using unsafe Swift. By Brody Eller.
Update note: Brody Eller updated this tutorial for Swift 5.1. The original version was written by Ray Fix.
By default, Swift is memory-safe: it prevents direct access to memory and ensures everything is initialized before use. The key phrase is “by default.” You can also use unsafe Swift, which allows you to access memory directly through pointers.
This tutorial will give you a quick tour of what’s called “unsafe” in Swift.
“Unsafe” doesn’t mean the code may fail or be dangerous. Rather, it refers to code that requires extra care, because it limits the compiler’s ability to prevent you from making mistakes.
These features are useful if you need to interact with unsafe languages such as C, need to improve runtime performance, or simply want to explore Swift’s internals. In this tutorial, you’ll learn how to use pointers and interact with the memory system directly.
Note: Although this is an advanced topic, you can follow along if you have a decent grasp of Swift. If you need a refresher on Swift, check out the iOS and Swift beginner series. Experience with C will help, but it isn’t required.
Download the demo for this article before you begin
Download Materials — download the starter project.
This tutorial includes three empty Swift Playground files:
- In the first Playground, you’ll use a few short pieces of code to explore memory layout and try using unsafe pointers.
- In the second Playground, you’ll use a low-level C API to perform streaming data compression and wrap it in a Swift-style interface.
- In the last Playground, you’ll create a cross-platform random number generator that replaces
arc4random. It uses unsafe Swift internally, but hides this detail from users.
Explore Unsafe Swift Memory Layout
First, open the UnsafeSwift Playground. Since all the code in this tutorial is cross-platform, you can choose any platform.
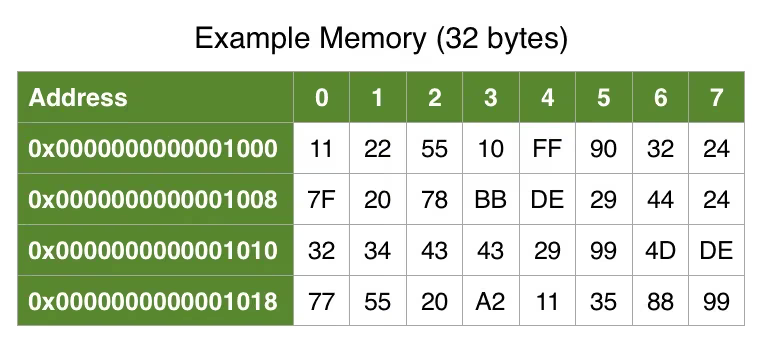
Unsafe Swift interacts directly with the memory system. You can think of memory as a series of boxes — actually billions of boxes — each containing a number.
Each box has a unique memory address. The smallest addressable storage unit is a byte, which is usually made up of 8 bits.
An 8-bit byte can store values between 0 and 255. The processor can also access words in memory efficiently; a word usually consists of multiple bytes.
For example, on a 64-bit system, a word is 8 bytes (64 bits). To understand this more intuitively, you can use MemoryLayout to see the size and alignment of some native Swift types.
Add the following code to your Playground:
1
2
3
4
5
6
7
8
9
10
11
12
13
14
15
16
17
18
19
20
21
22
import Foundation

MemoryLayout<Int>.size          // returns 8 (on 64-bit)
MemoryLayout<Int>.alignment     // returns 8 (on 64-bit)
MemoryLayout<Int>.stride        // returns 8 (on 64-bit)

MemoryLayout<Int16>.size        // returns 2
MemoryLayout<Int16>.alignment   // returns 2
MemoryLayout<Int16>.stride      // returns 2

MemoryLayout<Bool>.size         // returns 1
MemoryLayout<Bool>.alignment    // returns 1
MemoryLayout<Bool>.stride       // returns 1

MemoryLayout<Float>.size        // returns 4
MemoryLayout<Float>.alignment   // returns 4
MemoryLayout<Float>.stride      // returns 4

MemoryLayout<Double>.size       // returns 8
MemoryLayout<Double>.alignment  // returns 8
MemoryLayout<Double>.stride     // returns 8
MemoryLayout<Type> is a generic type evaluated at compile time. It’s used to determine the size, alignment, and stride of the specified Type, returning values in bytes.
For example, Int16 has a size of 2 bytes and an alignment of 2. This means it must start at an even address — an address divisible by 2.
For example, an Int16 can be placed at address 100, but not at address 101 — the odd address violates the required alignment.
When you pack a bunch of Int16 values together, they’re laid out at intervals of the stride. For these basic types, the stride is the same as the size.
Examine the Memory Layout of Structs
Next, look at the memory layout of some user-defined structs by adding the following code to your Playground:
1
2
3
4
5
6
7
8
9
10
11
12
13
14
15
struct EmptyStruct {}

MemoryLayout<EmptyStruct>.size      // returns 0
MemoryLayout<EmptyStruct>.alignment // returns 1
MemoryLayout<EmptyStruct>.stride    // returns 1

struct SampleStruct {
  let number: UInt32
  let flag: Bool
}

MemoryLayout<SampleStruct>.size       // returns 5
MemoryLayout<SampleStruct>.alignment  // returns 4
MemoryLayout<SampleStruct>.stride     // returns 8
The empty struct has a size of zero. Since its alignment is 1, it can exist at any address, because every number is divisible by 1.
Interestingly, its stride is 1. This is because even though EmptyStruct has a size of zero, every EmptyStruct you create must have a unique memory address.
For SampleStruct, the size is 5 but the stride is 8. That’s because its alignment requires it to sit on a 4-byte boundary. In this case, the best packing interval Swift can achieve is 8 bytes.
To see the difference in memory layout between classes and structs, add the following code:
1
2
3
4
5
6
7
8
9
10
11
12
13
14
15
class EmptyClass {}

MemoryLayout<EmptyClass>.size      // returns 8 (on 64-bit)
MemoryLayout<EmptyClass>.stride    // returns 8 (on 64-bit)
MemoryLayout<EmptyClass>.alignment // returns 8 (on 64-bit)

class SampleClass {
  let number: Int64 = 0
  let flag = false
}

MemoryLayout<SampleClass>.size      // returns 8 (on 64-bit)
MemoryLayout<SampleClass>.stride    // returns 8 (on 64-bit)
MemoryLayout<SampleClass>.alignment // returns 8 (on 64-bit)
Classes are reference types, so MemoryLayout reports the size of the reference: 8 bytes.
If you want to explore memory layout in more detail, check out Mike Ash’s excellent talk: Exploring Swift Memory Layout.
Using Pointers in Unsafe Swift
A pointer encapsulates a memory address.
Types that involve direct memory access carry the unsafe prefix, so the pointer type is named UnsafePointer.
The extra typing may seem annoying, but it reminds you that you’re accessing memory that the compiler doesn’t check. If done incorrectly, it can lead to undefined behavior, not just a predictable crash.
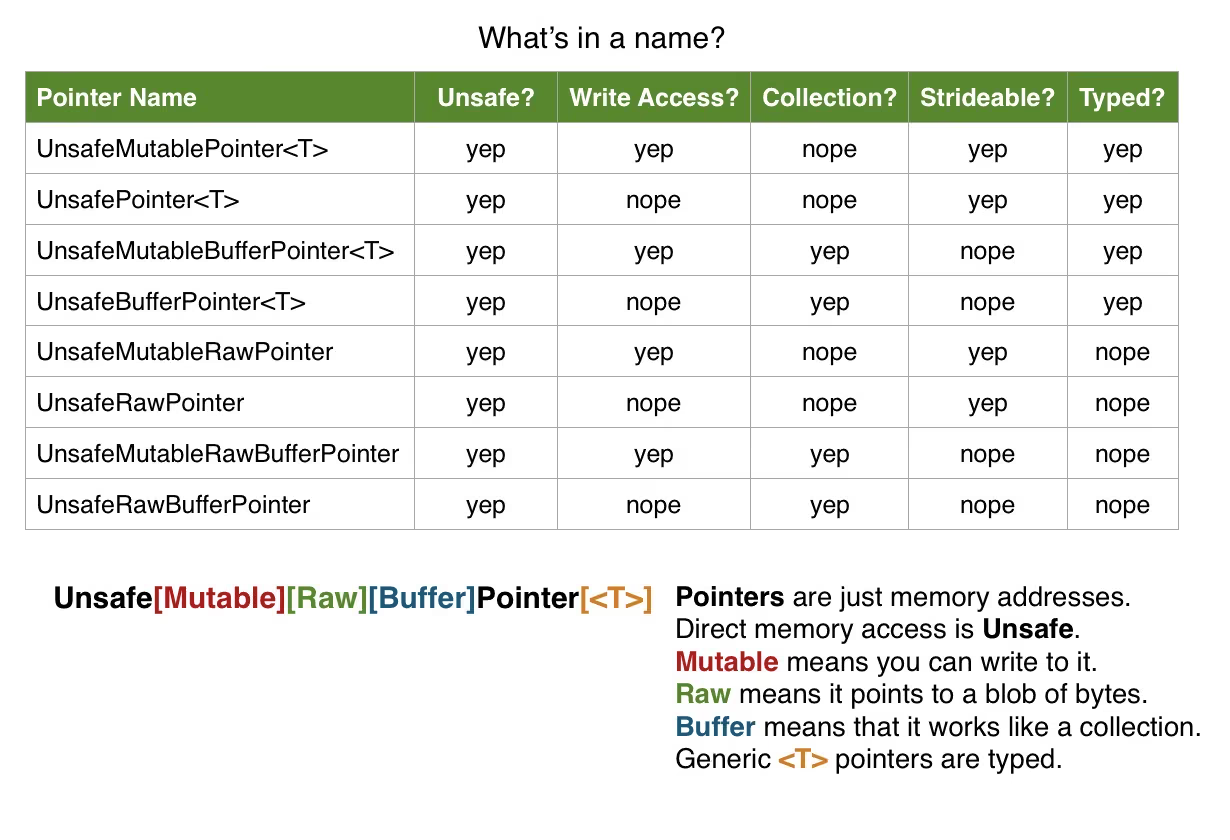
Unlike C’s single unstructured char * pointer, Swift doesn’t provide just one UnsafePointer type for accessing memory. Swift provides nearly a dozen pointer types, each with different capabilities and purposes.
You should always choose the most appropriate pointer type for your needs. This not only expresses intent better, but also reduces errors and avoids undefined behavior.
Unsafe Swift pointers use a predictable naming scheme to describe the pointer’s characteristics: mutable or immutable, raw or typed, buffer style or non-buffer style. In total, there are eight pointer combinations. You’ll learn more about them in the following sections.
Using Raw Pointers
In this section, you’ll use unsafe Swift pointers to store and load two integers. Add the following code to your Playground:
1
2
3
4
5
6
7
8
9
10
11
12
13
14
15
16
17
18
19
20
21
22
23
24
25
26
27
28
29
30
31
32
// 1
let count = 2
let stride = MemoryLayout<Int>.stride
let alignment = MemoryLayout<Int>.alignment
let byteCount = stride * count

// 2
do {
  print("Raw pointers")

  // 3
  let pointer = UnsafeMutableRawPointer.allocate(
    byteCount: byteCount,
    alignment: alignment)
  // 4
  defer {
    pointer.deallocate()
  }

  // 5
  pointer.storeBytes(of: 42, as: Int.self)
  pointer.advanced(by: stride).storeBytes(of: 6, as: Int.self)
  pointer.load(as: Int.self)
  pointer.advanced(by: stride).load(as: Int.self)

  // 6
  let bufferPointer = UnsafeRawBufferPointer(start: pointer, count: byteCount)
  for (index, byte) in bufferPointer.enumerated() {
    print("byte \(index): \(byte)")
  }
}
Here’s a detailed breakdown of the code:
- These constants hold commonly used values:
countholds the number of integers to store.strideholds the stride of theInttype.alignmentholds the alignment of theInttype.byteCountholds the total number of bytes needed.
- These constants hold commonly used values:
- A
doblock adds a level of scope so you can reuse variable names in the following examples.
- A
UnsafeMutableRawPointer.allocateallocates the required bytes. This method returns anUnsafeMutableRawPointer. The type name tells you this pointer can load and store (or modify) raw bytes.
- The
deferblock ensures you release the pointer properly. ARC (Automatic Reference Counting) won’t help you here — you need to manage memory yourself! You can read more aboutdeferstatements in the official Swift documentation.
- The
- The
storeBytesandloadmethods are used to store and load bytes. You can compute the memory address of the second integer by advancing the pointer bystridebytes. Since pointers areStrideable, you can also use pointer arithmetic, e.g.(pointer+stride).storeBytes(of: 6, as: Int.self).
- The
UnsafeRawBufferPointerlets you access memory as a collection of bytes. This means you can iterate over the bytes and access them by subscript. You can also use methods likefilter,map, andreduce. You can initialize a buffer pointer from a raw pointer.
Even though UnsafeRawBufferPointer is unsafe, you can still make it safer by constraining it to a specific type.
Using Typed Pointers
You can simplify the previous example by using typed pointers. Add the following code to your Playground:
1
2
3
4
5
6
7
8
9
10
11
12
13
14
15
16
17
18
19
20
21
do {
  print("Typed pointers")

  let pointer = UnsafeMutablePointer<Int>.allocate(capacity: count)
  pointer.initialize(repeating: 0, count: count)
  defer {
    pointer.deinitialize(count: count)
    pointer.deallocate()
  }

  pointer.pointee = 42
  pointer.advanced(by: 1).pointee = 6
  pointer.pointee
  pointer.advanced(by: 1).pointee

  let bufferPointer = UnsafeBufferPointer(start: pointer, count: count)
  for (index, value) in bufferPointer.enumerated() {
    print("value \(index): \(value)")
  }
}
Note the following differences:
- You use
UnsafeMutablePointer.allocateto allocate memory. The generic parameter lets Swift know you’ll use this pointer to load and store values of typeInt. - Before using typed memory, you must initialize it first, and deinitialize it after use. You do this with the
initializeanddeinitializemethods respectively. Deinitialization is only required for non-trivial types. However, including deinitialization is a good way to ensure your code still works if it switches to non-trivial types in the future. It usually doesn’t cost anything, because the compiler optimizes it away. - Typed pointers have a
pointeeproperty that provides a type-safe way to load and store values. - When advancing a typed pointer, you can simply specify the number of values you want to advance by. The pointer can compute the correct stride based on the type of value it points to. Again, pointer arithmetic applies. You could also write
(pointer+1).pointee = 6. - The same is true for typed buffer pointers: they iterate over values rather than bytes.
Next, you’ll learn how to convert from an unconstrained UnsafeRawBufferPointer to a safer, type-constrained UnsafeRawBufferPointer.
Converting Raw Pointers to Typed Pointers
You don’t always need to initialize typed pointers directly. You can also derive them from raw pointers.
Add the following code to your Playground:
1
2
3
4
5
6
7
8
9
10
11
12
13
14
15
16
17
18
19
20
21
22
23
24
25
26
27
do {
  print("Converting raw pointers to typed pointers")

  let rawPointer = UnsafeMutableRawPointer.allocate(
    byteCount: byteCount,
    alignment: alignment)
  defer {
    rawPointer.deallocate()
  }

  let typedPointer = rawPointer.bindMemory(to: Int.self, capacity: count)
  typedPointer.initialize(repeating: 0, count: count)
  defer {
    typedPointer.deinitialize(count: count)
  }

  typedPointer.pointee = 42
  typedPointer.advanced(by: 1).pointee = 6
  typedPointer.pointee
  typedPointer.advanced(by: 1).pointee

  let bufferPointer = UnsafeBufferPointer(start: typedPointer, count: count)
  for (index, value) in bufferPointer.enumerated() {
    print("value \(index): \(value)")
  }
}
This example is similar to the previous one, except that it creates a raw pointer first. You create a typed pointer by binding the memory to the desired type, Int.
By binding the memory, you can access it in a type-safe way. When you create a typed pointer, the memory binding happens behind the scenes.
The rest of this example is also the same as the previous one. Once you’re in typed-pointer territory, you can use features like pointee.
Getting the Bytes of an Instance
Often, you already have an instance of a type and want to inspect the bytes that make it up. You can use the withUnsafeBytes(of:) method to do this.
To do so, add the following code to your Playground:
1
2
3
4
5
6
7
8
9
10
11
12
do {
  print("Getting the bytes of an instance")

  var sampleStruct = SampleStruct(number: 25, flag: true)

  withUnsafeBytes(of: &sampleStruct) { bytes in
    for byte in bytes {
      print(byte)
    }
  }
}
This prints the raw bytes of the SampleStruct instance.
withUnsafeBytes(of:) gives you access to an UnsafeRawBufferPointer that you can use inside the closure.
withUnsafeBytes can also be used as an instance method on Array and Data.
Computing a Checksum
Using withUnsafeBytes(of:), you can return a result. For example, you can use it to compute a 32-bit checksum of the bytes in a struct.
Add the following code to your Playground:
1
2
3
4
5
6
7
8
9
10
11
12
do {
  print("Checksum the bytes of a struct")

  var sampleStruct = SampleStruct(number: 25, flag: true)

  let checksum = withUnsafeBytes(of: &sampleStruct) { (bytes) -> UInt32 in
    return ~bytes.reduce(UInt32(0)) { $0 + numericCast($1) }
  }

  print("checksum", checksum) // prints checksum 4294967269
}
The reduce call sums up the bytes, then ~ flips the bits. While this isn’t the most robust method of error detection, it demonstrates the concept.
Now that you’ve learned how to use unsafe Swift, it’s time to learn about some things you absolutely should not do with it.
Three Rules of Unsafe Code
When writing unsafe code, be careful to avoid undefined behavior. Here are some examples of incorrect code:
Don’t return the pointer from withUnsafeBytes!
1
2
3
4
5
6
7
8
9
10
11
12
13
// Rule #1
do {
  print("1. Don't return the pointer from withUnsafeBytes!")

  var sampleStruct = SampleStruct(number: 25, flag: true)

  let bytes = withUnsafeBytes(of: &sampleStruct) { bytes in
    return bytes // strange bugs here we come ☠️☠️☠️
  }

  print("Horse is out of the barn!", bytes) // undefined!!!
}
You should never let a pointer escape the withUnsafeBytes(of:) closure. Even if your code works now, it may cause strange bugs in the future.
Only bind to one type at a time!
1
2
3
4
5
6
7
8
9
10
11
12
13
14
15
16
17
18
19
20
21
22
23
24
25
// Rule #2
do {
  print("2. Only bind to one type at a time!")

  let count = 3
  let stride = MemoryLayout<Int16>.stride
  let alignment = MemoryLayout<Int16>.alignment
  let byteCount = count * stride

  let pointer = UnsafeMutableRawPointer.allocate(
    byteCount: byteCount,
    alignment: alignment)

  let typedPointer1 = pointer.bindMemory(to: UInt16.self, capacity: count)

  // Breakin' the Law... Breakin' the Law (Undefined behavior)
  let typedPointer2 = pointer.bindMemory(to: Bool.self, capacity: count * 2)

  // If you must, do it this way:
  typedPointer1.withMemoryRebound(to: Bool.self, capacity: count * 2) {
    (boolPointer: UnsafeMutablePointer<Bool>) in
    print(boolPointer.pointee) // See Rule #1, don't return the pointer
  }
}
Never bind memory to two unrelated types at the same time. This is called type punning, and Swift doesn’t like puns. :]
Instead, use methods like withMemoryRebound(to:capacity:) to temporarily rebind memory.
Additionally, rebinding from a trivial type (like Int) to a non-trivial type (like a class) is illegal. Don’t do it.
Don’t walk off the end… whoops!
1
2
3
4
5
6
7
8
9
10
11
12
13
14
15
16
17
18
19
20
// Rule #3... wait
do {
  print("3. Don't walk off the end... whoops!")

  let count = 3
  let stride = MemoryLayout<Int16>.stride
  let alignment = MemoryLayout<Int16>.alignment
  let byteCount =  count * stride

  let pointer = UnsafeMutableRawPointer.allocate(
    byteCount: byteCount,
    alignment: alignment)
  let bufferPointer = UnsafeRawBufferPointer(start: pointer, count: byteCount + 1)
  // OMG +1????

  for byte in bufferPointer {
    print(byte) // pawing through memory like an animal
  }
}
When writing unsafe code, off-by-one errors are a much bigger problem. Be careful, double-check, and test your code!
Unsafe Swift Example 1: Compression
It’s time to put what you’ve learned to use and wrap a C API. Cocoa includes a C module that implements common data compression algorithms. These include:
- LZ4: for when speed is critical.
- LZ4A: for when maximum compression ratio matters and speed doesn’t.
- ZLIB: balances space and speed.
- LZFSE: the new open-source algorithm, with a better balance of space and speed.
Now, open the Compression Playground in the starter project.
First, you’ll define a pure Swift API using Data. Replace the contents of the Playground with the following code:
1
2
3
4
5
6
7
8
9
10
11
12
13
14
15
16
17
18
19
20
21
22
23
24
import Foundation
import Compression

enum CompressionAlgorithm {
  case lz4   // speed is critical
  case lz4a  // space is critical
  case zlib  // reasonable speed and space
  case lzfse // better speed and space
}

enum CompressionOperation {
  case compression, decompression
}

/// return compressed or uncompressed data depending on the operation
func perform(
  _ operation: CompressionOperation,
  on input: Data,
  using algorithm: CompressionAlgorithm,
  workingBufferSize: Int = 2000)
    -> Data?  {
  return nil
}
The function that performs compression and decompression is perform, which is currently stubbed out and returns nil. Later, you’ll add some unsafe code to it.
Next, add the following code to the end of your Playground:
1
2
3
4
5
6
7
8
9
10
11
12
13
14
15
16
17
18
19
20
21
22
23
24
25
26
27
28
/// Compressed keeps the compressed data and the algorithm
/// together as one unit, so you never forget how the data was
/// compressed.
struct Compressed {
  let data: Data
  let algorithm: CompressionAlgorithm

  init(data: Data, algorithm: CompressionAlgorithm) {
    self.data = data
    self.algorithm = algorithm
  }

  /// Compresses the input with the specified algorithm. Returns nil if it fails.
  static func compress(
    input: Data,with algorithm: CompressionAlgorithm)
      -> Compressed? {
    guard let data = perform(.compression, on: input, using: algorithm) else {
      return nil
    }
    return Compressed(data: data, algorithm: algorithm)
  }

  /// Uncompressed data. Returns nil if the data cannot be decompressed.
 func decompressed() -> Data? {
    return perform(.decompression, on: data, using: algorithm)
  }
}
The Compressed struct stores the compressed data along with the algorithm used to create it. This makes the code less error-prone when deciding which decompression algorithm to use.
Next, add the following code to the end of your Playground:
1
2
3
4
5
6
7
8
9
10
11
12
13
14
15
16
17
18
/// For discoverability, adds a compressed method to Data
extension Data {
  /// Returns compressed data or nil if compression fails.
  func compressed(with algorithm: CompressionAlgorithm) -> Compressed? {
    return Compressed.compress(input: self, with: algorithm)
  }
}

// Example usage:

let input = Data(Array(repeating: UInt8(123), count: 10000))

let compressed = input.compressed(with: .lzfse)
compressed?.data.count // in most cases much less than original input count

let restoredInput = compressed?.decompressed()
input == restoredInput // true
The main entry point is the extension on the Data type. You added a method called compressed(with:) that returns an optional Compressed struct. The method simply calls the static method compress(input:with:) on Compressed.
There’s an example at the end, but it doesn’t work yet. Time to fix it!
Scroll to the first code block you typed and start implementing perform(_:on:using:workingBufferSize:). Insert the following code before return nil:
1
2
3
4
5
6
7
8
9
10
11
12
13
14
15
16
17
18
19
20
21
// set the algorithm
let streamAlgorithm: compression_algorithm
switch algorithm {
case .lz4:   streamAlgorithm = COMPRESSION_LZ4
case .lz4a:  streamAlgorithm = COMPRESSION_LZMA
case .zlib:  streamAlgorithm = COMPRESSION_ZLIB
case .lzfse: streamAlgorithm = COMPRESSION_LZFSE
}

// set the stream operation and flags
let streamOperation: compression_stream_operation
let flags: Int32
switch operation {
case .compression:
  streamOperation = COMPRESSION_STREAM_ENCODE
  flags = Int32(COMPRESSION_STREAM_FINALIZE.rawValue)
case .decompression:
  streamOperation = COMPRESSION_STREAM_DECODE
  flags = 0
}
This converts your Swift types into the C types required by the compression algorithm.
Next, replace return nil with:
1
2
3
4
5
6
7
8
9
10
11
12
13
14
15
16
17
18
19
20
21
22
23
24
25
// 1: create a stream
var streamPointer = UnsafeMutablePointer<compression_stream>.allocate(capacity: 1)
defer {
  streamPointer.deallocate()
}

// 2: initialize the stream
var stream = streamPointer.pointee
var status = compression_stream_init(&stream, streamOperation, streamAlgorithm)
guard status != COMPRESSION_STATUS_ERROR else {
  return nil
}
defer {
  compression_stream_destroy(&stream)
}

// 3: set up a destination buffer
let dstSize = workingBufferSize
let dstPointer = UnsafeMutablePointer<UInt8>.allocate(capacity: dstSize)
defer {
  dstPointer.deallocate()
}

return nil // To be continued
Here’s what’s happening:
The compiler does something special here: it uses the in-out & marker to convert your compression_stream into an UnsafeMutablePointer<compression_stream> type. Alternatively, you could pass streamPointer directly, avoiding the need for this special conversion.
You allocate a compression_stream and arrange for its deallocation with a defer block. Then you get the stream through the pointee property and pass it to the compression_stream_init function.
The compiler does something special here: it uses the in-out & marker to convert your compression_stream into an UnsafeMutablePointer<compression_stream> type. Alternatively, you could pass streamPointer directly, avoiding the need for this special conversion.
Finally, create a destination buffer as your working buffer. Next, replace the final return nil with:
1
2
3
4
5
6
7
8
9
10
11
12
13
14
15
16
17
18
19
20
21
22
23
24
25
26
27
28
29
30
31
32
33
34
35
36
37
38
39
40
41
42
43
// process the input
return input.withUnsafeBytes { srcRawBufferPointer in
  // 1
  var output = Data()

  // 2
  let srcBufferPointer = srcRawBufferPointer.bindMemory(to: UInt8.self)
  guard let srcPointer = srcBufferPointer.baseAddress else {
    return nil
  }
  stream.src_ptr = srcPointer
  stream.src_size = input.count
  stream.dst_ptr = dstPointer
  stream.dst_size = dstSize

  // 3
  while status == COMPRESSION_STATUS_OK {
    // process the stream
    status = compression_stream_process(&stream, flags)

    // collect bytes from the stream and reset
    switch status {

    case COMPRESSION_STATUS_OK:
      // 4
      output.append(dstPointer, count: dstSize)
      stream.dst_ptr = dstPointer
      stream.dst_size = dstSize

    case COMPRESSION_STATUS_ERROR:
      return nil

    case COMPRESSION_STATUS_END:
      // 5
      output.append(dstPointer, count: stream.dst_ptr - dstPointer)

    default:
      fatalError()
    }
  }
  return output
}
This is where the real work happens. Here’s what it does:
- It creates a
Dataobject to hold the output — this could be compressed or decompressed data, depending on the current operation. - It sets up the source and destination buffers using the pointer and size you allocated.
- Here, it keeps calling
compression_stream_processas long as it returnsCOMPRESSION_STATUS_OK. - Then it copies the contents of the destination buffer into the output, which is ultimately returned from this function.
- When the last packet arrives, it’s marked as
COMPRESSION_STATUS_END, at which point you may only need to copy part of the destination buffer. - In this example, you can see an array of 10,000 elements being compressed down to 153 bytes. Not bad.
Unsafe Swift Example 2: Random Number Generator
Random numbers are important for many applications, from games to machine learning.
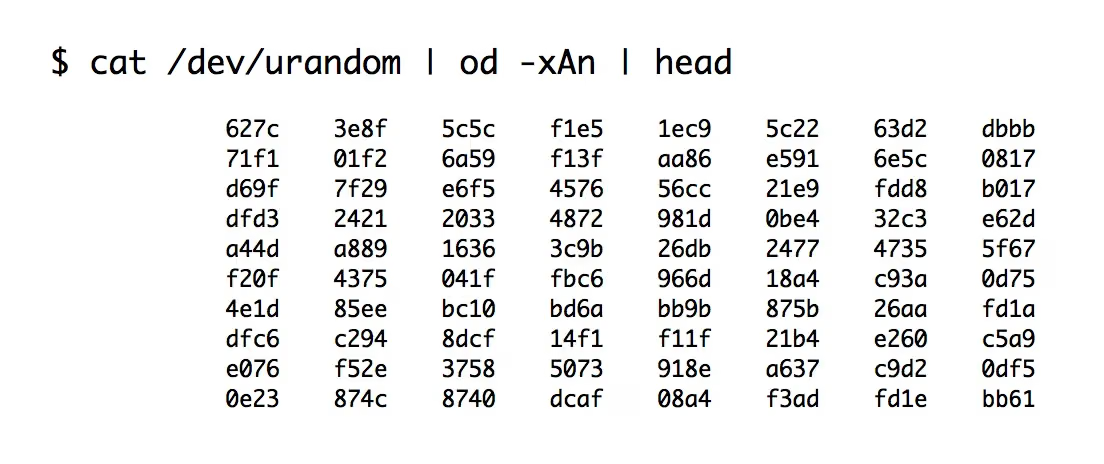
macOS provides arc4random, which generates cryptographically secure random numbers. Unfortunately, this function isn’t available on Linux. Also, arc4random only produces random numbers of type UInt32. However, /dev/urandom provides an unlimited source of high-quality random numbers.
In this section, you’ll use what you’ve learned to read this file and generate type-safe random numbers.
First, create a new Playground named RandomNumbers, or open the starter Playground in the project.
Make sure you choose the macOS platform this time.
Once you’re ready, replace the default contents with:
1
2
3
4
5
6
7
8
9
10
11
12
13
14
15
16
17
18
19
import Foundation

enum RandomSource {
  static let file = fopen("/dev/urandom", "r")!
  static let queue = DispatchQueue(label: "random")

  static func get(count: Int) -> [Int8] {
    let capacity = count + 1 // fgets adds null termination
    var data = UnsafeMutablePointer<Int8>.allocate(capacity: capacity)
    defer {
      data.deallocate()
    }
    queue.sync {
      fgets(data, Int32(capacity), file)
    }
    return Array(UnsafeMutableBufferPointer(start: data, count: count))
  }
}
You declare the file variable as static, so only one instance exists in the system. You’ll rely on the system to close it when the process exits.
Since multiple threads may need random numbers, you need to protect access to it with a serial GCD queue.
The get function is where the real work happens.
First, create an uninitialized storage that’s one larger than you need, because fgets always terminates with \0 (null character).
Next, work within the GCD queue to get data from the file.
Finally, copy the data into a standard array by wrapping it in an UnsafeMutableBufferPointer (which can act as a sequence).
So far, this only safely provides you with an array of Int8. Now, you’ll extend it.
Add the following to the end of your Playground:
1
2
3
4
5
6
7
8
9
10
11
12
13
14
15
16
17
18
19
20
21
22
extension BinaryInteger {
  static var randomized: Self {
    let numbers = RandomSource.get(count: MemoryLayout<Self>.size)
    return numbers.withUnsafeBufferPointer { bufferPointer in
      return bufferPointer.baseAddress!.withMemoryRebound(
        to: Self.self,
        capacity: 1) {
        return $0.pointee
      }
    }
  }
}

Int8.randomized
UInt8.randomized
Int16.randomized
UInt16.randomized
Int16.randomized
UInt32.randomized
Int64.randomized
UInt64.randomized
This adds a static randomized property to all subtypes of the BinaryInteger protocol. For more on this, check out our tutorial on protocol-oriented programming.
First, you get the random numbers. Then, using the bytes of the returned array, you rebind the Int8 values to the requested type and return a copy.
And that’s it! You now generate random numbers in a safe way, all powered by Swift’s unsafe features.
Where to Go From Here?
Congratulations on completing this tutorial! You can download the complete project files via the “Download Materials” link at the top or bottom of this tutorial.
If you want to learn more about Swift’s unsafe features, there are plenty of additional resources to explore:
Swift Evolution 0107: UnsafeRawPointer API
This article details Swift’s memory model and helps you better understand the API documentation.Swift Evolution 0138: UnsafeRawBufferPointer API
This article goes deeper into handling untyped memory and provides links to open-source projects that benefit from it.Imported C and Objective-C APIs
This section can help you understand how Swift interacts with C.
We hope you enjoyed this tutorial! If you have any questions or experiences you’d like to share, feel free to discuss them in the forums!
Summary
This was last year’s technical debt — finally paid off. The unsafe Swift memory APIs covered here are well worth studying in depth. The write-up still reads a bit mechanical; I’ll polish it when I have time.
Original article: Unsafe Swift: Using Pointers and Interacting With C